Overview
The Custom Connector provides a flexible solution for defining commands with parameter substitution, allowing the Launcher to execute various remote connection software. This versatility enables you to trigger connections using executable clients on the Launcher machine. The Custom Connector allows the Launcher to call an external program to perform the connection, rather than using a built-in Connector.
When none of the predefined connector options meet your requirements, the Custom Connector offers a tailored approach. If your connection system provides a command-line client that accepts parameters on the command line, you can simply call it. You can also build automation scripts using the Long Enterprise Script Editor to manage your interactive connections. We also provide a general web-interface automation framework called the Universal Web Connector (UWC). For guidance on using the UWC with the Custom Connector, see Configuring the Universal Web Connector.
Building a Custom Connector
If your connection system provides a command-line interface where you can specify credentials, addresses, and resources on the command line, that is the simplest option. Simply make sure the client software is installed on the Launcher, and then construct your command-line in the test configuration Connectors page.
If your connection system requires some kind of automation scripting, you can build a Login Enterprise Engine Script using our script Editor. There are stand-alone Engine executables available in the Script Editor in "ScriptEditor\engine\LoginEnterprise.Engine.Standalone.exe" or as part of the Universal Web Connector in "C:\Program Files\Login VSI\Universal Web Connector\engine\LoginEnterprise.Engine.Standalone.exe".
For an example of using an engine Script as a Custom Connector, see Deploying the AVD Connector.
If your connection system’s authentication and connection interface are implemented as a web server, you may be able to leverage the Universal Web Connector instead. It provides a framework where customer-generated JavaScript code can interact directly with the web page to fill in fields, select controls, and eventually launch the rete client.
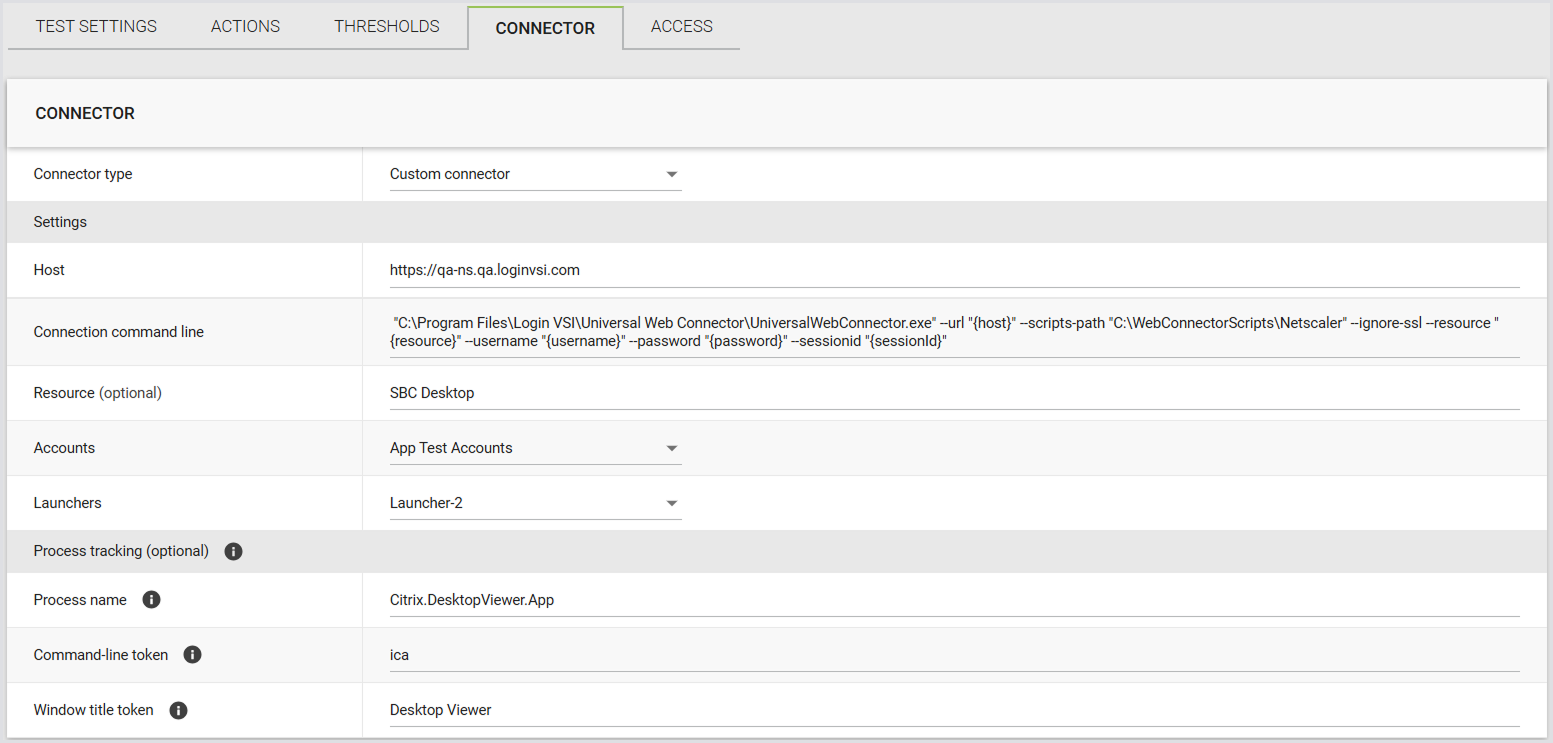
Configuring the Custom Connector
In Login Enterprise, the Custom Connector supports the following parameters:
|
Field |
Description |
|---|---|
|
Host |
The connection server. |
|
Resource |
The resource name visible to end users. |
|
Connection command line |
The command line executed on the Launcher machine to initiate a session. See Connection Command Line for details. |
|
Accounts |
Select from previously configured Account Groups or all Accounts. |
|
Launchers |
Select from previously configured Launcher Groups or all Launchers. |
Connection Command Line
The following variables are used in the connection command line for the Custom Connector.
|
Field |
Description |
|---|---|
|
host |
The “Host” field from the Custom Connector configuration |
|
username |
The username field from the selected account |
|
password |
The plain-text password from the selected account |
|
domain |
The domain field from the selected account |
|
resource |
The “Resource” field from the Custom Connector configuration |
|
|
The e-mail field from the selected account |
|
sessionId |
The current session ID provided by the Launcher for event tagging |
|
customX |
The Custom1 to Custom5 fields configured within the Account record |
|
SecureCustomX |
The Secure Custom1 to Secure Custom5 fields configured within the Account recordSecureCustomX |
Custom Fields
You can add custom fields during account configuration and use them with Custom Connectors, just like you would with email, username, domain, password, and other standard fields. You can define up to five custom fields with editable values, but their names remain fixed.
Benefits of Using Custom Fields
Custom fields offer several practical advantages, especially when used with the Universal Web Connector:
|
Benefit |
Description |
|---|---|
|
Enhanced customization |
You can store extra information, like additional usernames or authentication tokens, making your setup more specific to your needs. |
|
Improved flexibility |
Custom fields let you pass values in command lines, so you can easily adapt to different configurations without changing core settings. |
|
Streamlined testing |
You can quickly adjust field values for testing. This makes your testing process more efficient and thorough. |
|
Seamless integration |
Custom fields work well with Custom Connectors and Swagger, helping you manage extra data smoothly across different tools. |
|
Increased efficiency |
Updating custom field values through Launchers and command lines reduces manual errors and saves time. |
Setting Custom Field Values
Custom field values can be set when creating a new Account. To edit these values later, use the account editing form. Click the “pencil” icon in each row to open this form, which will display the fields with their current values pre-populated.

If any custom fields have been saved, the panel automatically expands to show their values. Custom fields can hold various types of values, including a single digit, random text, or an authentication token. They accept any string up to 1,024 characters in length.
Note: To use saved custom field values with Custom Connectors, you need to update your Launchers. This ensures that the latest custom field values are correctly integrated and utilized. For more information, see Launchers.
Adding Custom Fields as Arguments
Once the Launchers are updated, you can include custom fields as arguments when starting a new Custom Connector process. For example, you might pass a custom field value like this:
CustomConnector.exe --custom1 "{custom1}"

Modifying Command Line Values
You can also modify the command line to source values for username, email, domain, and other fields from custom fields instead of their dedicated fields. For example:
CustomConnector.exe --username "{username}" --password "{password}" --domain "{domain}"--resource "{resource}" --email "{email}"
Can be updated to:
CustomConnector.exe --username "{custom1}"--password "{custom2}" --domain "{custom3}" --resource "{custom4}" --email "{custom5}"
This flexibility allows you to use custom field values in various configurations and testing scenarios.
Other Customization Options
In some cases, you might need to test with an additional username, password, or authentication token. Custom fields provide this additional level of customization.
Custom fields can also be added when creating accounts in Swagger (API v5 and v6). Since this is optional, the property can be set to null or omitted entirely.
Custom Events for Connectors and Launchers
You can emit custom events directly from connector scripts and view them alongside standard Launcher events in the Events feed. This helps you trace and diagnose Custom Connector behavior without relying on external logs. For implementation information and example scripts, see Custom Events for Connectors and Launchers.
Secure Custom Fields in Connector Configurations
Secure custom fields can be passed to Launchers and Connectors at runtime, the same way password fields are handled.
Runtime Behavior
-
Launchers and connectors receive secured values at runtime in the same way as passwords.
-
Values aren’t retrievable after the test finishes.
UWC/Custom Connectors
When you use secure custom fields with the Custom Connector, pass them as command-line parameters. Use these parameter names in the same way you use {custom1}, {custom2}, and so on for standard custom fields.
|
Field |
Parameter name |
|---|---|
|
SecureCustom1 |
|
|
SecureCustom2 |
|
|
SecureCustom3 |
|
|
SecureCustom4 |
|
|
SecureCustom5 |
|
For details on configuring secure custom fields in accounts, see Secure Custom Fields (Optional).
Process Tracking (Optional)
By default, the Launcher will track the specific process ID it gets when it starts the Custom Connector. Login Enterprise will track the main window associated with that process ID, and report when that process ID terminates. If your Custom Connector creates additional processes, and if the initial process terminates before the remote session, the Launcher can find itself watching the wrong process.
Process tracking lets you monitor your Custom Connector and any processes it creates. It helps you:
-
See exactly when connections start and stop.
-
Identify the single process associated with the connector for the session (this may be the connector process itself or one of its child processes) that is configured for tracking.
-
Troubleshoot issues faster because you know which processes are running.
This ensures your Custom Connector runs smoothly and gives you accurate insight into its lifecycle.
Configuring Process Tracking
In your Custom Connector settings > Process Tracking, configure the following 3 fields:
|
Field |
Description |
|---|---|
|
Process name |
The name of the process to monitor. Process names don’t include file extensions. For example, enter |
|
Command-line token |
A substring to match in the process command line. |
|
Window title token |
A substring to match in the main window title. |

So that the fields are filled accurately, follow these rules:
-
Maximum 255 characters per field.
-
Leading and trailing spaces are removed automatically.
-
Token examples:
{sessionid},{username},{password},{domain},{custom1}. -
Functionality is enabled only if a value is present. Blank fields are ignored. The value is treated as a substring, so you don’t need to enter wildcards. For example, enter
{sessionid}instead of*{sessionid}*.
Note: The system only checks that fields aren’t empty or too long. Other errors, like typos in the process name, won’t be detected until you run the process.
Behavior Overview
-
If you leave all fields blank, process tracking is turned off, and the system defaults to the legacy behavior. If you enter one or more values, process tracking is turned on.
-
The system checks all the fields you enter and tracks a process only when every field matches.
-
For example, if you enter both the Process name and the Window title token, the system will track the process only if both match.
-
-
Matching happens automatically on the backend, i.e., you do not need to add scripts to your Custom Connector.
-
If no match is found, the system defaults to the legacy behavior.
-
A session is considered ended when the tracked process stops or the window closes. The engine timeout still applies, but is used only as a fallback safety measure.
Best Practices
-
Use unique identifiers in the Window title or Command-line token to avoid conflicts in multi-session scenarios.
-
Configure at least one field to ensure accurate session tracking.
-
Avoid relying solely on the Process name unless you are sure it will be unique.
-
Keep fields concise, under 255 characters, and avoid unnecessary spaces.
-
Track the actual remote session process, not the Custom Connector that initiates it. For example, if your connector is PowerShell-based, track the Windows remote session process (
mstsc) instead of the PowerShell process.
Named Pipes for Custom Connector
Custom Connectors communicate with the Launcher using Named Pipes, a lightweight and efficient Windows inter-process communication (IPC) mechanism. Named Pipes support bilateral communication, allowing both the Launcher and the Custom Connector to exchange structured messages with each other without relying on network services, sockets, or external dependencies.
Using Named Pipes improves reliability and bridges the gap between Custom Connectors and Built-in Connectors. It also replaces command-line arguments, which can expose sensitive data in logs or the Event Viewer. For implementation information and sample code for this system, see Named Pipes for Custom Connector.