Overview
The Windows 365 Connector enables automated testing of Windows 365 Cloud PCs by launching and interacting with a remote desktop session through the Windows App. The connector is typically used for Application and Continuous Tests, where a single user connects to a dedicated Cloud PC.
Windows 365 Script Version and Updates
Due to the nature of Windows 365 application and platform updates, the connector script may require updates. The latest version of the W365 script is maintained in the Login VSI GitHub repository. In the repository, you will find:
-
Script versions
-
Corresponding Windows App versions
-
Tested script and app version pairings
Installation Instructions
On the Launcher machine, locate the default connector script:
C:\Program Files\Login VSI\Login Enterprise Launcher\Windows365ConnectorScript.cs
-
Back up the existing Windows365ConnectorScript.cs file.
-
Download the replacement Windows365ConnectorScript.cs from the appropriate Windows App version folder in this repository.
-
Copy the file into:
C:\Program Files\Login VSI\Login Enterprise Launcher\
-
Do not rename the file. The Windows 365 Connector connection type depends on the filename and path remaining exactly:
Windows365ConnectorScript.cs
After replacing the file, run your Login Enterprise test scenario again.
Windows 365 Connector Behavior
The Windows 365 connector processes only one session at a time during the connection/login phase on a given Launcher. If multiple Windows 365 sessions are started on the same Launcher, their connection phases are queued and handled sequentially in FIFO (First-In, First-Out) order.
This limitation exists because Windows 365 automates the Windows App, which cannot be automated concurrently in multiple ways on the same machine.
The queuing behavior applies only to the connection phase. Once a session is fully connected, additional sessions may proceed. Sessions running on different Launchers can connect in parallel.
Important Considerations
The Windows 365 connection phase may take significantly longer than other connector types. Windows 365 sessions are exempt from the standard in-queue timeout and can safely wait for their turn.
However, if Windows 365 sessions share a Launcher with other connector types, non-Windows 365 sessions may time out and fail while Windows 365 is holding the queue (default in-queue timeout is 20 seconds). The most common scenario is:
“The Launcher did not respond to a session request in a timely fashion.”
Tip: For optimal reliability, use dedicated Launchers for Windows 365 sessions.
How the Windows 365 Connector Works
-
Launches the Windows App and waits (up to the configured timeout) until the main Windows App window appears, then focuses it
-
Checks whether the app is already on the Sign in screen (i.e., the Sign in button is visible)
-
If it isn’t on the Sign in screen (i.e., a user is likely already signed in or a dialog is open), it repeatedly attempts to reset the app back to a clean sign-in state until timeout by:
-
Opening the Account menu (if present) and selecting Sign out
-
Closing the account picker dialog (if it appears)
-
Re-checking until the Sign in button is visible
-
-
Clicks the Sign in button in the Windows App
-
Closes any leftover Microsoft authentication windows that may already be open (to avoid conflicting sign-in dialogs)
-
If the account picker offers it, clicks Use another account (to force a fresh login rather than reusing a cached account)
-
Waits (up to the configured timeout) for the Microsoft sign-in window to appear
-
In the Microsoft sign-in window:
-
Enters the username/email
-
Clicks Next
-
Enters the password
-
Clicks Sign in
-
-
Switches MFA method (if the option is available) by selecting Sign in another way, then chooses Use a verification code.
-
Generates a TOTP verification code (from the configured TOTP secret/settings), enters it, and clicks Verify.
-
Waits for sign-in to complete and for the Windows App UI to reach the post-login state, where the Devices navigation is available. If a first-run/onboarding Skip prompt is shown, it clicks Skip.
-
Opens Devices.
-
Uses the Search field to search for the configured Cloud PC name/title.
-
Before connecting, it closes any Cloud PC authentication web prompts/windows that might already be open in the background (cleanup step).
-
Clicks Connect to in order to initiate the Cloud PC (Windows 365) connection.
-
Waits briefly, then checks whether additional authentication is required for the Cloud PC connection. It loops (up to the configured timeout) looking for either:
-
A new remote desktop connection window to appear (indicating the connection window has launched), or
-
A Cloud PC sign-in web prompt
-
-
If a Cloud PC sign-in web prompt appears, it attempts to complete it:
-
Enters the password, and clicks Sign in
-
Switches to Use a verification code and enters a newly generated TOTP code
-
Clicks Verify
-
-
If a confirmation/consent prompt appears with a Yes button (e.g., an approval/confirmation step), it clicks Yes
-
After initiating the connection and handling any prompts it detects, it waits a short period, then attempts to reset the Windows App back to a clean Sign in state again (signs out if still signed in).
-
Stops the Windows App (ends the automation run)
Prerequisites
-
Launcher installed: Install the required Launcher version (the version that includes the Windows 365 Connector support).
-
Windows app installed: The Windows App must be installed on the Launcher machine.
-
Warm (pre-used) Windows account (recommended): The Windows account used on the Launcher machine should have previously signed in to the Windows App installed on that machine.
Note: This is a best practice. First-time sign-in flows in the Windows App might display one-time confirmation or welcome dialogs that can’t be reliably reproduced or automated. This prerequisite is evaluated per Windows App installation. Deploying a new Launcher machine, installing a new instance of the Windows App, or reinstalling the Windows App causes the account to be treated as new for this prerequisite.
Preparing the Virtual User Account
-
In the Login Enterprise sidebar > navigate to Accounts.
-
In Accounts Settings > Email, enter the user’s login information. You can use either the UPN (User Principal Name) or the email address associated with the account.
Important: While the Email field appears as optional, it is required for the Windows 365 connector.
.png?cb=166f2cec5bb020e60dd94e442d1ef9a2)
-
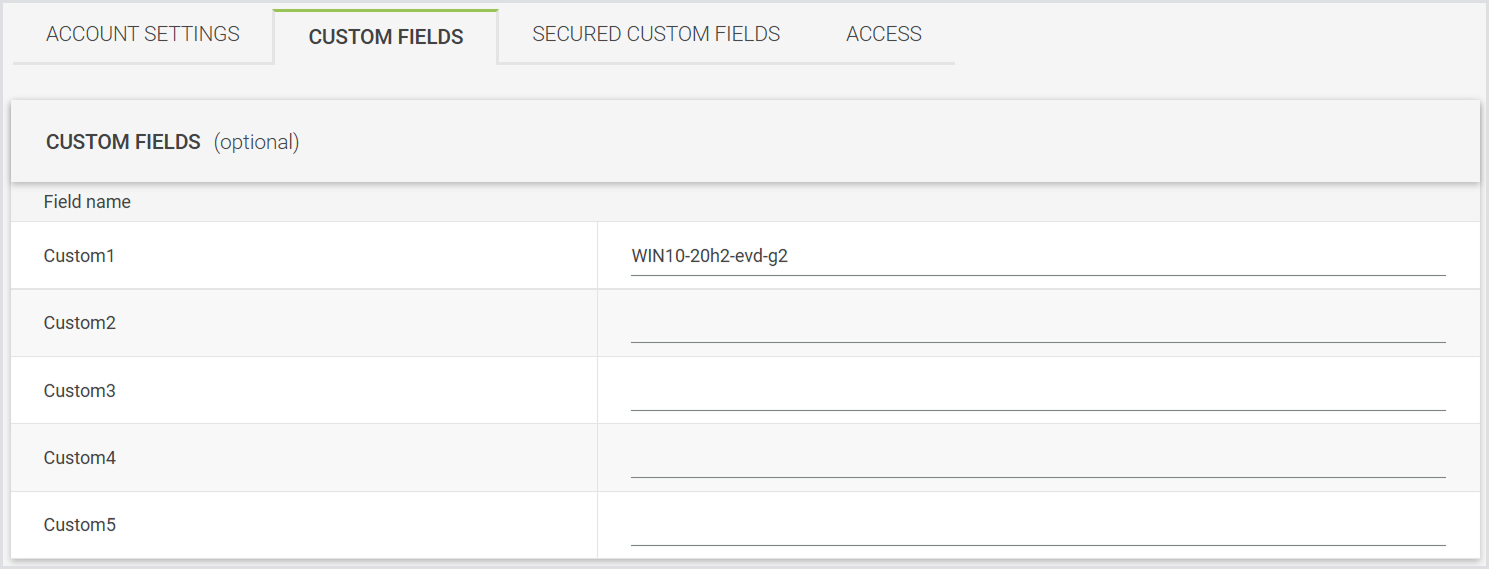
Select Custom Fields from the tab menu.
-
In Custom Field 1 (recommended): Enter the Cloud PC or Virtual Machine name that the test should connect to.
-
Getting a Virtual Machine or Device Name for Testing:
-
Sign in to the Windows 365 portal at windows365.microsoft.com.
-
Go to Cloud PCs.
-
Look under the Device Name column: this is the value you should use in Login Enterprise > Accounts > Custom Field 1.
-
-
-
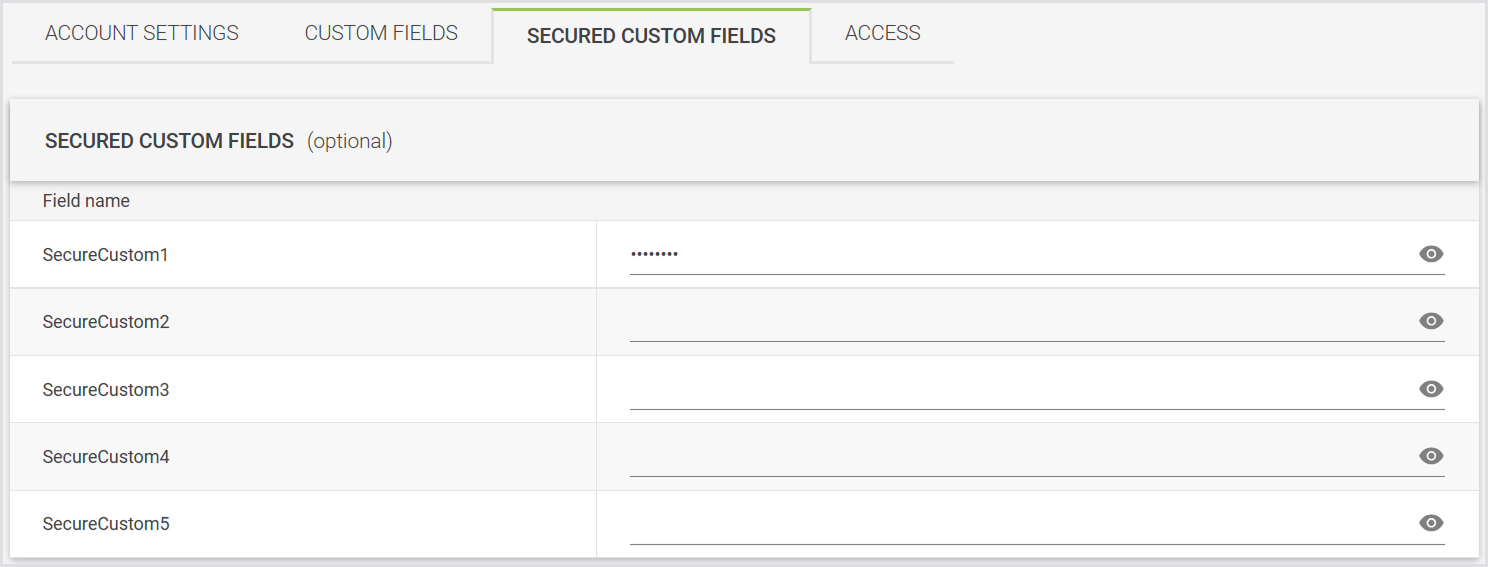
Select Secured Custom Fields from the tab menu.
-
In Secured Custom field 1 (recommended): Enter the Time-based One-Time Password (TOTP) secret for multi-factor authentication.
-
Getting a TOTP Secret:
-
If you haven't set up the authenticator app yet:
-
Sign in to your account at account.microsoft.com.
-
Go to Security > Advanced security options.
-
Under Additional security options, select Add a new sign-in method > Authenticator app.
-
During setup, a QR code is displayed. Select the option to manually enter the code (for example, “Can't scan the QR code”).
-
Copy the displayed secret key (TOTP seed).
Save this secret key. Enter this value in Secured Custom field 1 in your Windows 365 configuration.
-
-
If the authenticator app is already set up:
-
The secret key is shown only during the authenticator app setup and can’t be viewed later in the Microsoft account security settings. If you didn’t save the secret key during setup, you must remove and reconfigure the authenticator app to generate a new secret.
-
-
-
-
Click Save to apply the changes.
Note: You can use different secure fields and custom fields if needed, but you must then update the connector settings accordingly. Using the first custom field avoids the need for additional configuration.
Configuring the Windows 365 Connector
-
In the Login Enterprise sidebar > navigate to Сonfiguration > Manage tests, and create an Application or Continuous Test.
-
In Connector settings, select Windows 365 (Preview) as a connector type.
-
Configure the following settings:
|
Field |
Description |
|---|---|
|
Cloud PC name field |
The secure custom field in the account configuration that stores the Cloud PC name. The default value: Custom1 |
|
TOTP secret field |
The secure custom field in the account configuration that stores the TOTP secret used to generate the one-time passcode. The default value: SecureCustom1 |
|
TOTP time step |
Leave this field at its default value unless troubleshooting. |
|
Number of digits in TOTP code |
Leave this field at its default value unless troubleshooting. |
|
TOTP hash algorithm |
Leave this field at its default value unless troubleshooting. |
|
Script execution timeout |
Leave this field at its default value unless troubleshooting. |
|
Accounts |
Select from previously configured Account Groups or all Accounts. Note: All required authentication secrets must be configured. |
|
Launchers |
Select from previously configured Launcher Groups or all Launchers. |
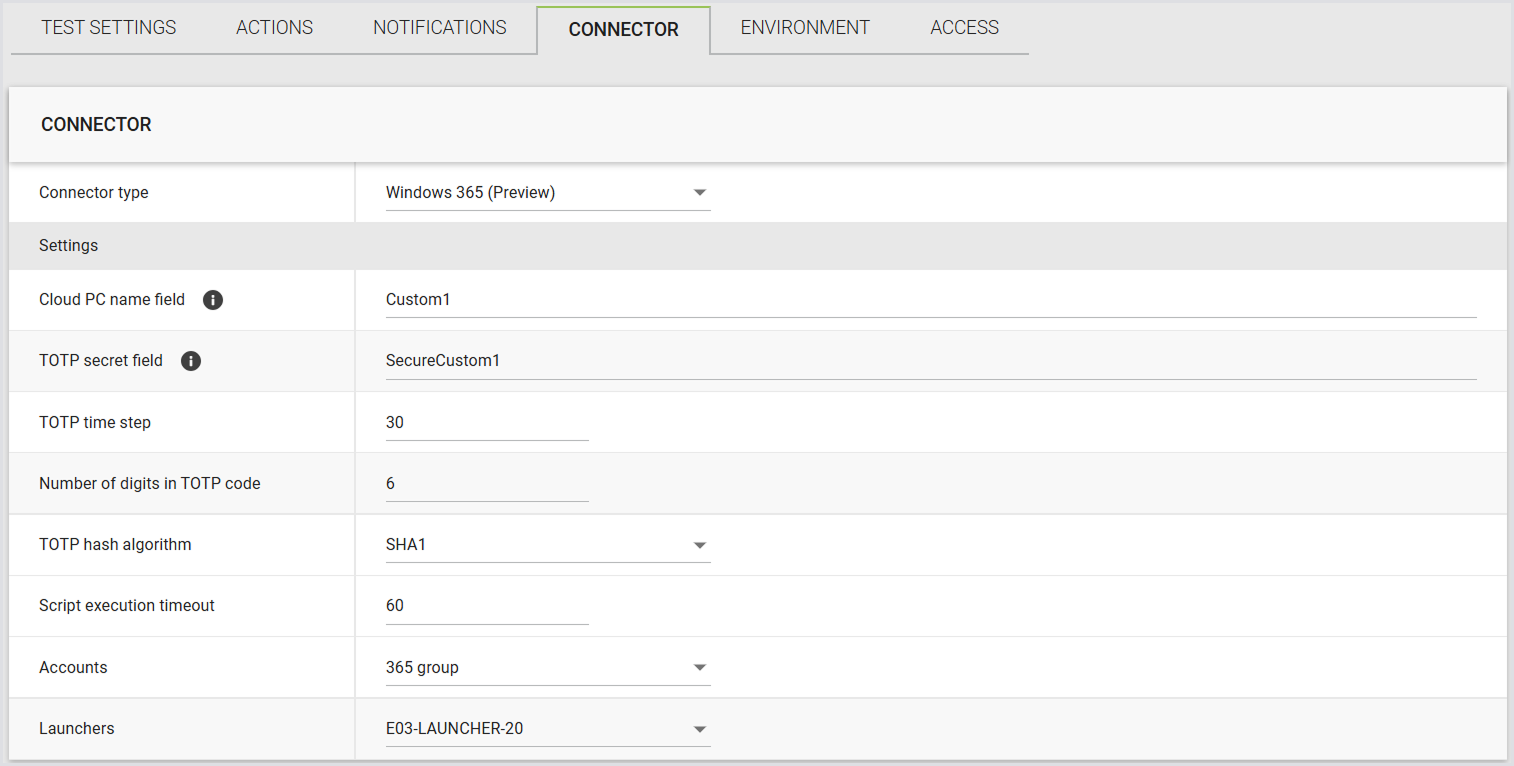
Note: If you store required values in different custom fields, make sure to update the connector settings to reference those fields.
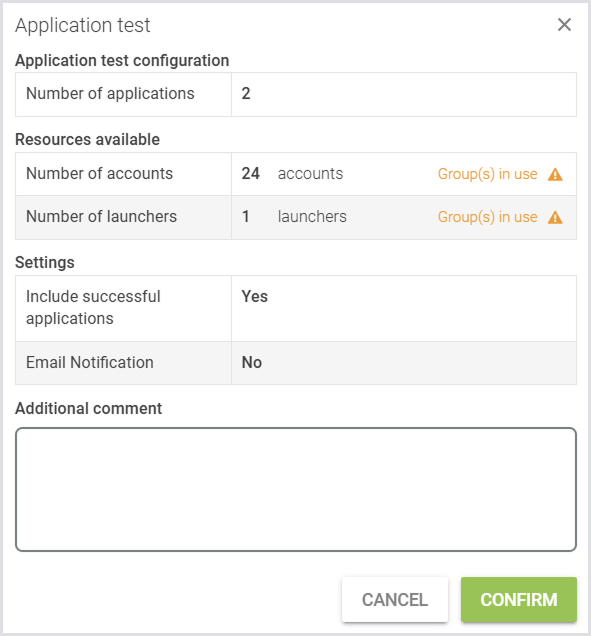
Running a Test with the Windows 365 Connector
-
In your newly configured test, click Run Test.
-
Review the test settings and verify they match your intended configuration.
-
Click Confirm.
Expected Behavior
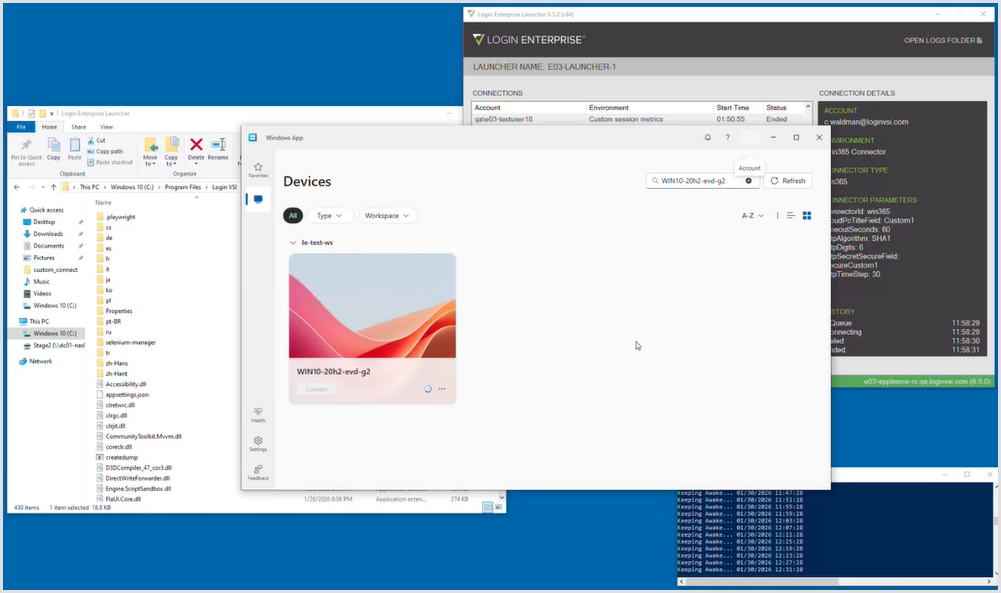
During execution, the Windows 365 Connector behavior should match the steps described in How the Windows 365 Connector Works section. The result should look as follows:
Windows 365 Connector Script Management
Windows 365 Connector scripts are centrally managed within Login Enterprise, removing the need for per-launcher updates. The system includes multiple built-in script versions and automatically selects the best match for the Appliance version. If no suitable match is found, the latest available built-in script is used as a fallback.
Alternatively, you can provide a custom script. If a custom script is provided, only that single script is always used, and no automatic matching is performed. You need to choose between using the system’s matching logic or supplying a custom script.
Script upload and management are currently available via Public API only.
Important: To be able to perform Windows 365 Connector script upload and management, you need to upgrade both the Appliance and the Launcher to v6.6. For more information, see Updating the Appliance and Updating the Launcher.
Windows 365 Connector Script API
This section describes how to retrieve and create Windows 365 Connector scripts via Public API, as well as the required structure of script files.
ConnectorScript Model
Endpoint responses return a ConnectorScript model with the following fields:
|
Name |
Value |
|---|---|
|
Version |
A version number that identifies the script |
|
Target |
The platform this script is for (e.g., Windows App) |
|
Target Version |
A version of the platform that the script supports |
|
Script Content |
The actual script code |
|
Is Custom |
Whether this is your custom script or a system default |
|
Created Time |
When the script was created |
Creating a Script
When creating a script via the API, provide the following fields:
|
Name |
Value |
|---|---|
|
Target Platform |
Specifies the target platform for connector scripts. Currently, only Windows App (1) is supported. |
|
Script Content |
The script code you want to use. |
Script File Requirements
Connector scripts must include metadata comments at the top of the script file. These comments are parsed by Login Enterprise to validate and manage scripts.
Important: Header field names and values are case-insensitive.
Each header must follow this format:
|
Name |
Value |
|---|---|
|
Version |
The version identifier of the script (e.g., LE-1.0, Custom-2.0). Used to track script versions. Max 64 characters. |
|
Target |
The target platform/application this script is designed for. Currently supported: Windows App |
|
Target Version |
The version of the target application this script supports (e.g., 2.0.964.0). Used to match scripts to installed application versions. Note: This field is mandatory only for default scripts, and can be skipped for custom scripts. |
The header prefix must include a colon followed by a space, as this format is required for proper parsing.
Example:
// Version: LE-1.0
// Target: Windows App
// Target version: 2.0.964.0