Overview
This section will help you quickly get stcarted with your new Appliance, ensuring you can set it up and run a simple Test to begin experiencing the Appliance value right away.
This is an overview of the basic setup steps for deploying and configuring the Appliance. For more in-depth information and advanced configuration options, we encourage you to take the introductory training lab and explore the Appliance web interface in greater detail once you’ve completed the initial setup.
By following this walkthrough, you'll be able to deploy the Appliance, configure key settings, create and execute a Test, and view the Test results.
Pre-installation Checklist
Your Login Enterprise system will be composed of the following elements:
-
Login Enterprise Appliance VM: you will deploy this VM from our VM template
-
Launcher VM: a Windows machine that will be used to originate user sessions
-
End-user VM pool: a set of machines that will host your Test sessions
-
A domain user group for managing Appliance access
-
A set of domain user accounts to host the Tests
To deploy the Appliance, you will need the following information:
-
FQDN for the Appliance
-
IP address and network configuration for the Appliance (or a decision to use DHCP-assigned addressing)
-
Certificate for the FQDN (Optional)
-
Password to use for the admin account
-
Information about an MS SQL Server to host your data (Optional)
-
Domain controller information (Optional)
|
Login Enterprise Appliance hostname: |
|
|---|---|
|
Login Enterprise Appliance domain name: |
|
|
Login Enterprise Appliance IP address*: |
|
|
Login Enterprise Appliance Subnet + Mask*: |
|
|
Login Enterprise Appliance Default Gateway*: |
|
|
Login Enterprise Appliance DNS Server(s)*: |
|
|
Login Enterprise Appliance DNS suffix*: |
|
|
Login Enterprise Appliance admin password: |
|
|
MS SQL Server instance**: |
|
|
Launcher Windows VM: |
|
|
Connection Broker: |
|
|
Resource Pool: |
|
|
Test Accounts/Name Pattern: |
|
|
Domain Controller Address:*** |
|
|
Read-only AD User Group:*** |
|
|
Admin AD User Group:*** |
|
* Optional, only necessary if not using DHCP for network configuration.
** Optional, only necessary if choosing an external database.
*** Optional, only if you are enabling LDAP logins to the Appliance UI.
Step 1: Deploy the Appliance
Please follow the platform-specific deployment instructions in Deploying the Appliance and then continue with the initial configuration.
Use the VM settings in our template when you import the Appliance VM, including 4 CPUs and 8GB RAM. The VM will automatically provision as a 100GB boot/data disk.
Azure, by default, provisions a 32GB boot disk. This is likely too small for a production system with an Internal Database, so you may need to expand the virtual disk and the filesystem. You can expand the disk in the future if you do not want to do it at the initial setup.
Use your hypervisor’s normal process to import the template. The deployment process of all possible hypervisors is beyond the scope of this document. You must connect the VM to an appropriate subnet and make other configuration choices.
Power on the VM. Eventually, you will see this login prompt:

As it says, log in using the default credentials: username: admin, password: admin.
Provide the network configuration in the next few prompts: computer name (also called the hostname), domain, and the network configuration. Select d for DHCP or s for static. The example below shows a Static network configuration.
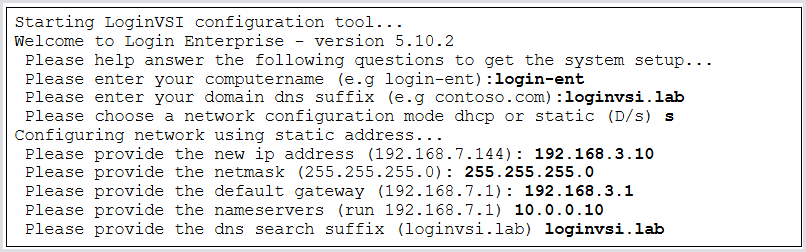
Note that if your subnet contains DHCP, your Appliance will automatically acquire a DHCP address initially. You can even use SSH to log in instead of the console (using the default admin/admin credentials) to perform the initial configurations if your subnet has DHCP.
After the network configuration (if any), the system will prompt you to set the name and password of the default administrator account. Then, it will automatically reboot. It’s normal to preserve the admin account name, but set a different password.
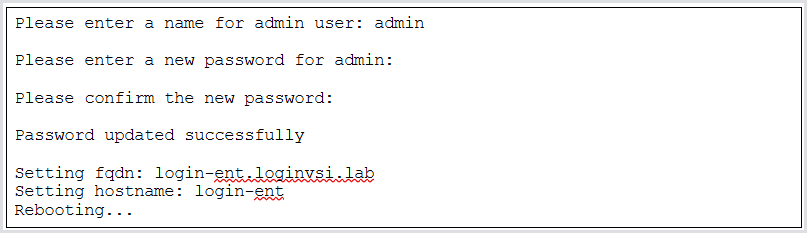
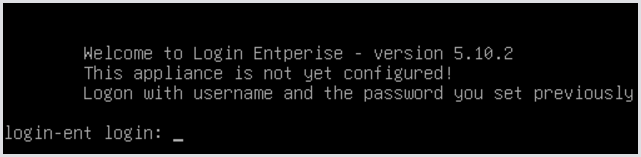
After the reboot, you are prompted to log in with the new administrator credentials you just set:
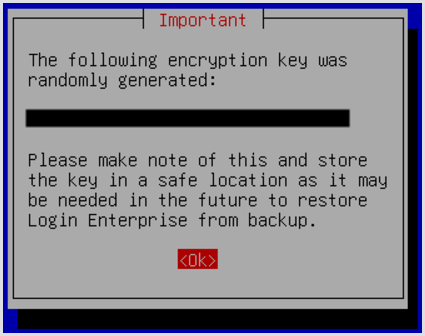
When you do that, the system will perform several automatic configuration operations. It will then prompt you whether to create a new encryption key or enter one. The encryption key is only used to encrypt sensitive data in the configuration database, like passwords. Connections to the Appliance and between the containers are handled over HTTPS with the applied SSL Certificate (self-signed or custom).
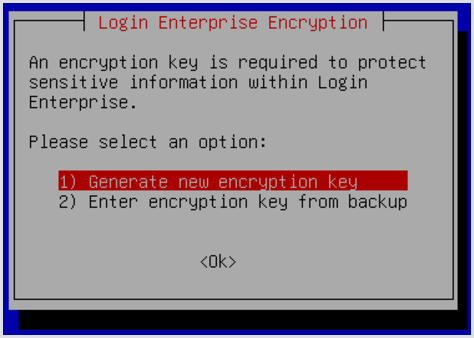
Normally, you would allow the system to generate a new encryption key. You would only use an existing key if you are trying to reconnect to an existing external MS SQL Server Appliance database that already has its own encryption key, and you do not have access to the original Appliance VM that created the database. Then, you would need to manually type in the existing key. Otherwise, the system will generate a key for you, which you should screenshot for future reference.
The system will automatically reboot. After it completes, you will see a screen like this on the console informing you that the Appliance is up and operational. If you have a certificate for the Appliance, you can add it now. Otherwise, you can leave the console and move to the Appliance web UI.
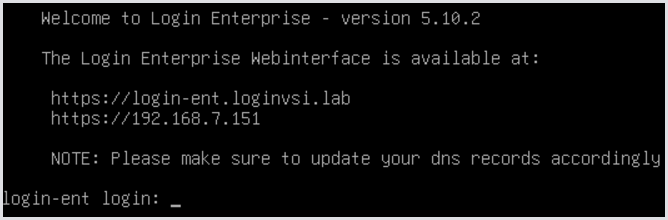
If you have not already added the DNS record for this host to your local DNS server, you should pause to do that now.
Step 2: Upload Certificates
From the VM console or with an SSH client, log in to the Appliance as the local admin account. You will see a menu like this:
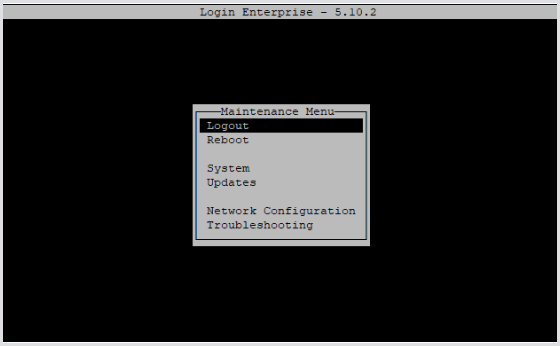
If you need to readjust your network configuration, you can do that now. Otherwise, the only configuration you are likely to need is uploading your machine certificate and any required root certificates for your domain.
Tip: If you're going to use the self-signed certificate, you can skip the rest of this section. The self-signed certificate has already been generated. Just remember that when you access the Login Enterprise UI web page, it will show up as untrusted in your browser, and you will have to acknowledge that.
To install any certificates, you will need to upload them to the system first. We support the SFTP protocol for transferring files to and from your Appliance. WinSCP is a popular Windows tool that supports SFTP.
Using the arrow keys, navigate to the System menu entry shown in the screenshot above. Hit Enter. You will see this menu:
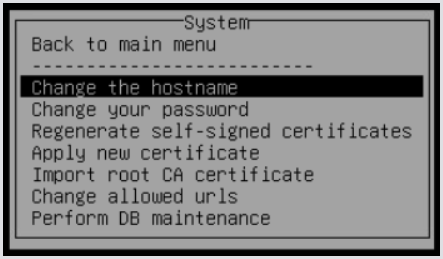
Install your Root CA Certificates first. These are required for the Appliance to communicate with any external hosts in your network, but they may also be required for your Appliance to talk to itself. We use your server certificate for internal communications as well, so if your server cert comes from your local CA, we won’t be able to use your cert internally until the root CA certificate is imported.
Using your SFTP client, upload your root and any intermediate certificates to a directory on the Appliance. /certificates is the normal folder to put these into. Select Import root CA certificate from the above menu. It will prompt you with:
Please enter the path to the root ca file (.crt):
Enter the full path of the file you uploaded, e.g.,/certificates/myrootca.crt. Hit Enter. The Login Enterprise system will offer to restart your services. If you have multiple certificates to upload, don’t restart the services until you have uploaded each of them. It will save time.
Next, upload the server certificate to the Appliance. Use the same directory, /certificates. Then, select Apply new certificate from the above menu. It will prompt you for the certificate file location and will then prompt you for the certificate password. Then, it will restart the Login Enterprise services again and return you to the menu. Your web services are now using the new certificate.
Tip: If your Appliance hangs while starting services, especially if it hangs at “10 services” remaining, there is a problem with your certificate, the upstream certificates, the network connection to the CA, or some other issue preventing the system from using the provided certificates. Contact our support at support@loginvsi.com or see Managing Certificates on the Appliance for more information.
Step 3: Configure Active Directory
After building your Appliance, it’s worthwhile to set up your directory services to support the operation of Login Enterprise.
There are three main functions you need to deal with:
-
Create at least one User Group (Optional)
-
You can create one or more Active Directory user groups to organize your test accounts. Alternatively, you can use individual AD accounts without assigning them to a group.
-
-
Create Test Accounts
-
Configure Test Accounts to run our login processor at login
Create Admin and Read-Only User Groups
Login Enterprise supports logging into the Login Enterprise web interface using LDAP/AD accounts. Below, you will configure the LDAP integration by telling the Appliance where your Active Directory (AD) is.
User access is managed using Role-Based Access Control (RBAC). You can connect multiple AD groups and assign custom permission levels to each group. While you may choose to create Admin and Read-Only groups as a starting point, you have full flexibility to define roles and permissions that suit your environment.
In Active Directory (AD), you can either create at least one user group or identify specific AD usernames (in email format) that you want to grant access to the Appliance. These groups or users will later be configured in the Access Control section of the Appliance.
The placement of users in the AD tree is not a concern for this process; we will query them by the name you give us. In those user groups, you can add AD accounts you want to log in as. You can change the membership of these groups at any time. We verify group membership on every login attempt. (This also means that if your domain controllers are down, you cannot log in as a domain user.)
Create Test Accounts
To perform Tests, the Appliance needs to have a set of AD accounts it can use to run Tests. We use those accounts to log in to your connection broker. The Appliance needs to know the name and password of every one of these accounts.
It’s easiest if you create a sequence of numbered accounts because the Appliance has a way to bulk-create sequential account records like that. So, for instance, you can create loginvsi0001 .. loginvsi0100 in Active Directory, and it’s straightforward to create records for those accounts in Login Enterprise. It’s also easiest if you set the passwords to the same.
If you need to have accounts with different naming conventions and different passwords, contact support@loginvsi.com for a script that can use the Login Enterprise API to upload a list of accounts from a CSV file.
Place these accounts in an OU specific to them so you can easily adjust permissions and policies.
Configure Test Accounts
We have one requirement for your Test Accounts: they must run our Login Processor at login. The Login Processor is a program named LoginPI.Logon.exe, and you can download it from the Appliance itself. At this point, you don’t need to download the program, but you do need to decide where and how you want to execute it.
There are multiple options. In our training lab, for instance, we have you place it in your domain’s NETLOGON share. You can put it on some other file share that your Test Accounts will have access to. You can even embed it in your VDI image’s local C: drive.
Please remember that you will need to replace LoginPI.Logon.exe every time you upgrade the Appliance, so a file share might be the easiest option in the long run.
Once you have decided where you want to put the executable, you need to configure it as a login script for these accounts. You can configure the individual account properties, or you can create a GPO that applies to the OU you put the accounts in. For most situations, a GPO is easier. You create it once for all accounts instead of having to modify each account (potentially hundreds) manually.
Step 4: Configure the Appliance
Licensing
Go to a web browser on a machine that has network access to your Appliance’s IP address. Point your web browser to the Appliance FQDN or IP address. If you are using a self-signed certificate, you will likely have to acknowledge an insecure connection. Your login page will look like this:
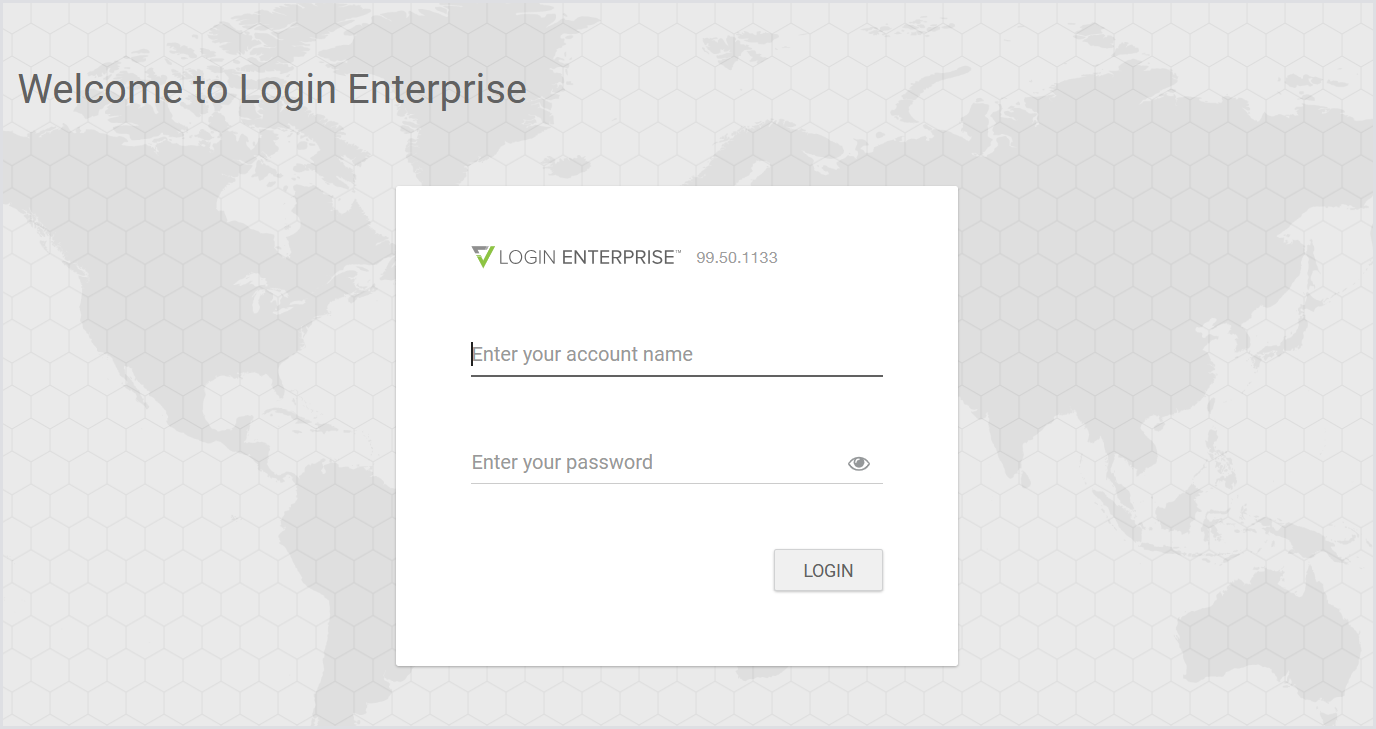
Provide your local admin username and password. After agreeing to the EULA and acknowledging the release notes, you will be presented with a few options for a quick tour of the Appliance and its functionality. Close that.
Your first task here is to upload the license you got from LoginVSI. The default grace license gives you 3 days, a maximum of 3 sessions, and a maximum of 3 Applications. (An Application in this context is a testing script.) Since the Appliance comes pre-installed with 21 application scripts, that effectively means you cannot add any custom scripts of your own.
At the top of the browser page, you will see this warning:

Click the blue link. Click the button that says Upload License, and select your license.lic file from your local machine. This is the file you got from LoginVSI to enable the software. The UI will update the table to show you the terms of your license. Click Save. You can upload an updated license at any time, but it is not possible to return to the grace license without recreating the Appliance from the template.
You can continue with the grace license if you need to, at least for the next 72 hours.
LDAP
Tip: If you do not wish to enable LDAP authentication to the appliance, you can skip this section.
Next, you may want to configure the domain connection information. You can configure LDAP integration to allow users to log in to the Appliance web UI using domain credentials, instead of relying only on the built-in local admin account.
LDAP authentication is used only for access to the Appliance web UI. It does not apply to console or SSH access, which is limited to local Linux accounts.
This configuration is separate from the Test Accounts used in your test environments. You can use unrelated domains for Test Accounts if needed; the Appliance does not validate those accounts against LDAP.
Set up LDAP Connection
-
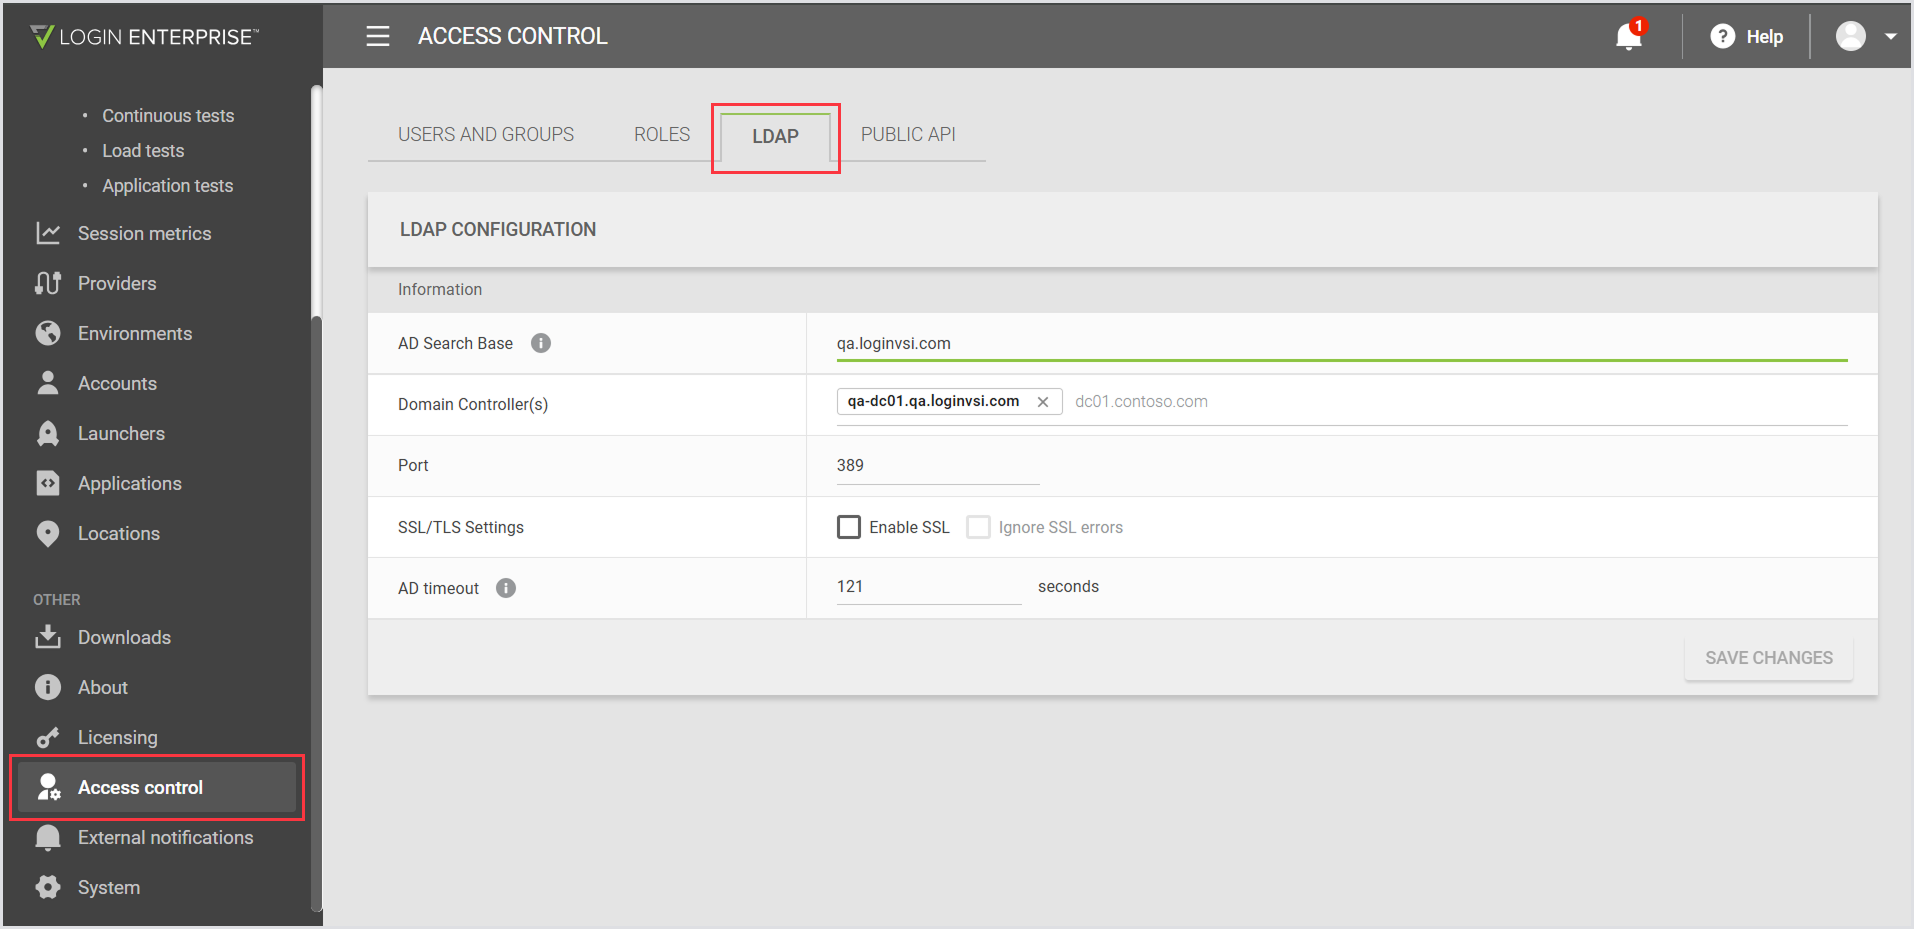
In the Login Enterprise sidebar menu, navigate to Other > Access control.
-
In the LDAP tab, fill in:
-
Domain Name
-
One or more Domain Controllers (DCs)
-
Port
-
SSL Options
-
Tip: You can enter up to five Domain Controllers. Use Tab after each entry to add another. The system treats them as a failover group; if one DC is unavailable, it will try the next.
-
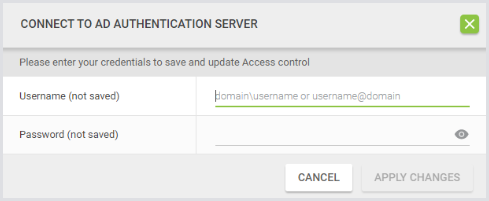
Click Save Changes. You will be prompted to enter a domain account and password.
-
These credentials are used only to verify access to the DC.
-
They are not saved or stored by the Appliance.
-
You cannot save the configuration unless the connection is validated.
Assign Roles with LDAP Groups or Users
Once LDAP is connected, you need to grant access to specific users or groups and assign them roles.
-
Go to the Users and Groups tab.
-
Add a LDAP Group or LDAP User.
The group or user must already exist in your LDAP. The Appliance does not create or manage LDAP objects.
-
Assign a role:
-
Use a Built-in Role such as Built-In Admin for full access.
-
Or create a Custom Role with limited permissions.
-
For detailed instructions on creating and managing custom roles, see Role-Based Access Control (RBAC).
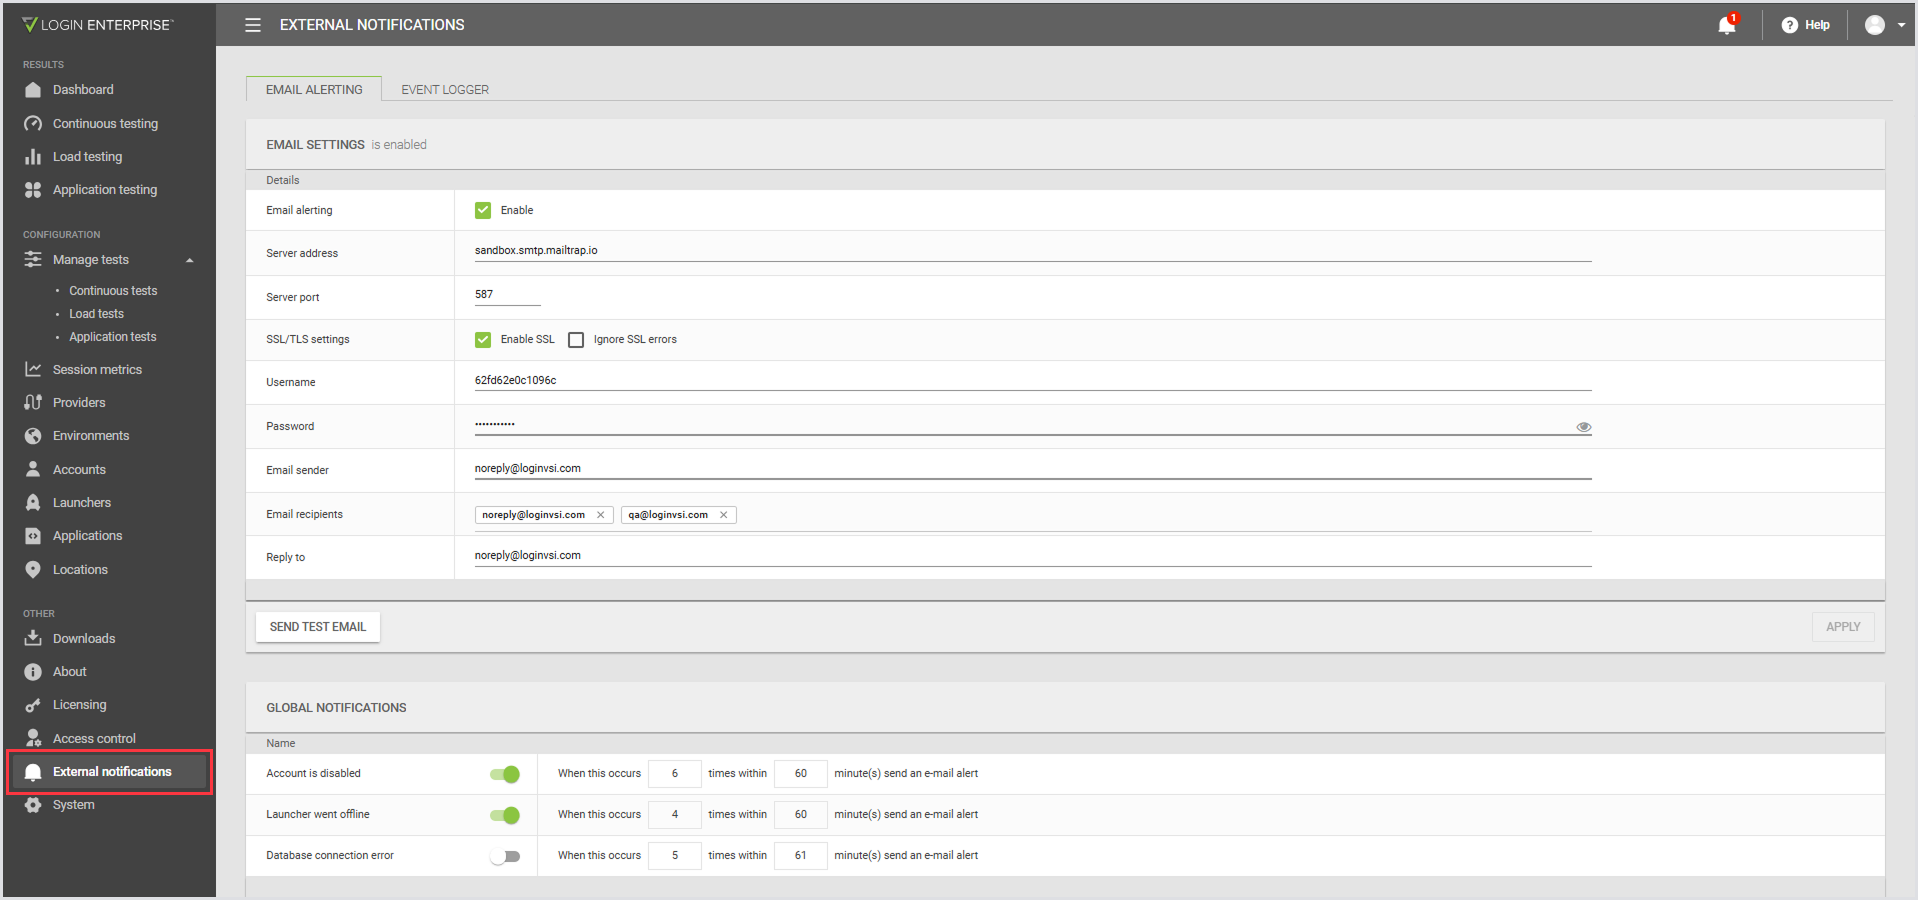
E-Mail
In the Login Enterprise sidebar menu, navigate to External notifications. Here, you can configure an outbound e-mail server for Test and event notifications.
There are also tabs for an Event Logger package you can install in Windows to receive every event generated within Login Enterprise, as well as information about our Public API. These are both beyond the scope of this section.
Accounts
You need to tell the Appliance what Test Accounts you have created. We don’t use these accounts internally at all, and we don’t verify them in your active directory. These are simply a set of name/password pairs (with some additional attributes) that we provide to your connection broker. The broker will handle authentication and connection routing.
There’s no requirement that your accounts be part of the LDAP server you have configured for Appliance logins. We simply provide strings to the connector, which it passes to your connection broker. You can support multiple domains with your testing. Just make sure you keep your usernames unique.
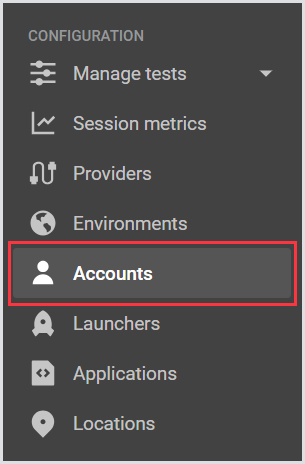
Go to the Accounts entry in the Configuration section of the menu.
The Accounts section looks like this:
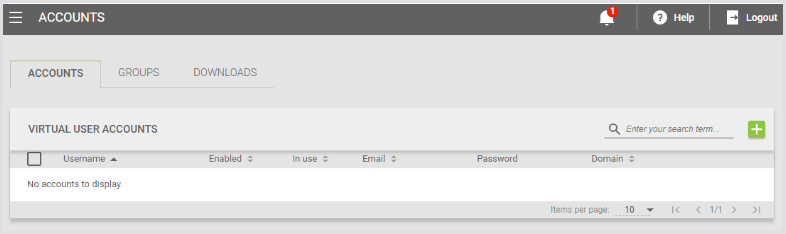
First, create some accounts. Click the green + icon to create either a single account or a set of them.
The single-account dialog looks like this:
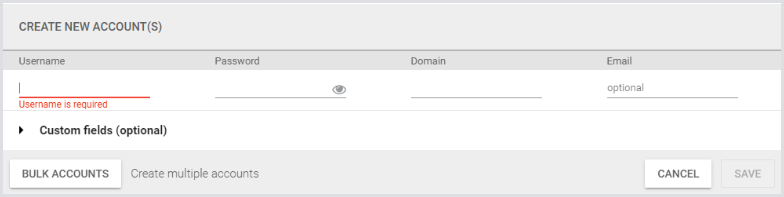
Provide a name, a password (which is encrypted in the database and is not shown in the UI), and a domain. These fields are provided to the Launcher whenever we need to start a new connection.
Or you can click Bulk Accounts. To create the 100 sample accounts, see the Create Test Accounts section. You would fill in the Bulk Accounts fields like this:
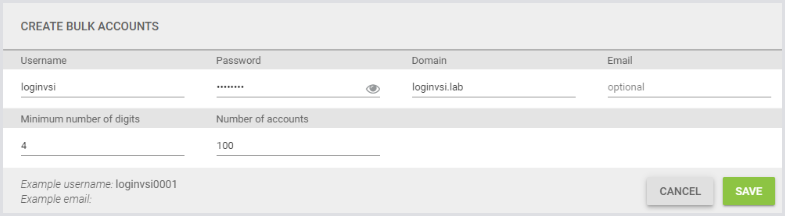
This assumes the passwords for all of your accounts will be the same. If that’s not true, you will need to update them.
The Public API provided by Login Enterprise offers API endpoints for updating account information, including passwords. If you need to script account updates or account creation, contact support@loginvsi.com for more information.
You can see there is also an Account Groups tab, which you can use to create subsets of your accounts for specific Tests. When you build a Test, you assign it to an Account Group. All accounts are automatically members of the “All” group, but you can create sub-lists for different domains, accounts with different permissions, or whatever you need.
Finally, the last tab in the Accounts section is called Downloads. This is where you get the LoginPI.Logon.exe login processor executable we discussed above.
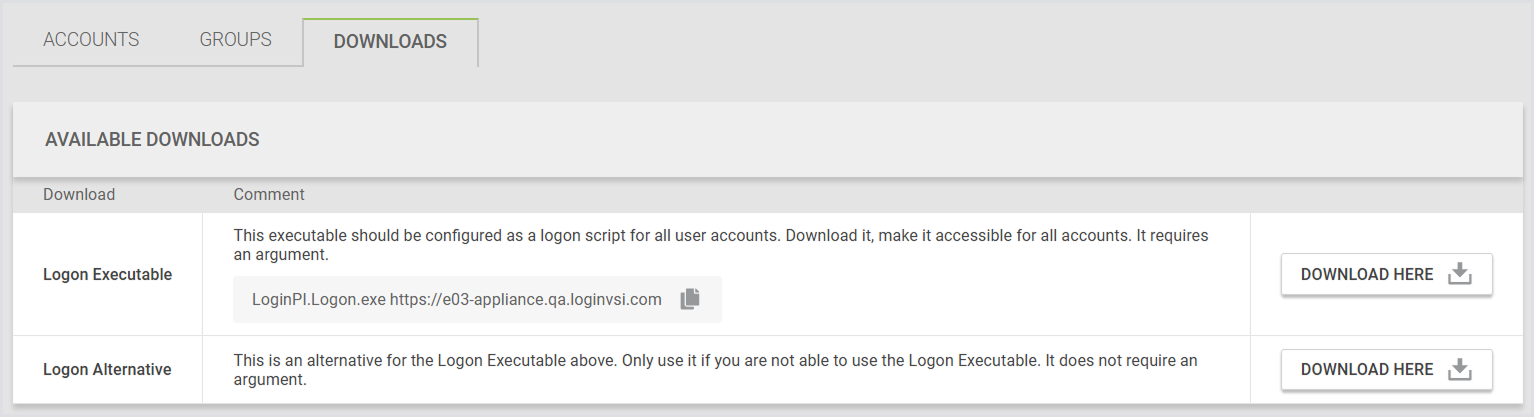
Click Download next to Logon Executable. Save that in whatever location you decide on in the Configure Test Accounts section. Now, when you log in as one of these users, the Login Processor should start automatically.
Logon Executable Verification
After logging in as a Test User, do you see the Login Enterprise icon and the Stop Engine button?
If the Stop Engine button is missing, it indicates that the Logon Executable hasn’t run successfully. Without this, Virtual Users will not function.
Step 5: Build a Launcher
A Launcher is just a regular Windows machine that has the Appliance’s software installed and running. A Launcher is bound to a specific Login Enterprise Appliance, so you must download the software from the Appliance to install it. The software contains server keys for communicating with the Appliance.
Tip: You may build as many Launchers as you need. Launchers have no enforced maximum number of sessions, but LoginVSI recommends you provision 1 Launcher for every 15 simultaneous sessions you expect to support. The exact number of sessions an individual Launcher is capable of will depend on the performance of the remote connection system and the hardware configuration of the VM.
You may add and remove Launchers at any time. The Login Enterprise Appliance is aware of all the Launchers that are connected (the Launcher application is running) and will only delegate user sessions to those Launchers. Launchers have no persistent data to preserve. You can stop a Launcher, reconfigure it with different hardware, and start it again at any time.
The Launcher does not have any account or authentication requirements. When the Login Enterprise Launcher software starts, it registers with the Login Enterprise Appliance. It will receive directions to start sessions and will then execute the remote client software for the desired user and endpoint. It does not need any special permissions for this and does not need to be run as an Administrator. However, your company’s security requirements may need you to join the Launcher to the domain, apply certain GPOs, and/or have special permissions for the account that will run the Launcher software.
The Launcher software must run as a user-mode program in an interactive session. It cannot run as a non-interactive service. Normally, we expect this to run on the VM console so that there is no danger of a remote session to the Launcher timing out or getting disconnected. If you choose to connect to the Launcher VM over a remote client and start the Launcher software within that window, you must not minimize that window while our software is running. Windows will report the resolution change (to 0x0) to our remote sessions, and your application scripts will start to behave unpredictably.
Login Enterprise recommends the following:
-
Designate a specific account to run the Launcher software
-
Disable any automatic screen-locking for this account
-
Configure Windows to perform an AutoLogin for this account so that, on machine restart, this account will automatically log in. Otherwise, you will have to manually log this account in after an error.
-
AutoLogin is a software package built by Microsoft and packaged in their Sysinternals Repository.
-
Configure Windows (or the service account) to automatically start the Launcher software at login, so on any failure, your system will automatically recover.
Then, start provisioning your system. Build (or identify) an appropriate Windows VM. We recommend 2 CPUs and 4GB RAM as a good starting point. It is not necessary to join the Launcher to the domain, but it may be desirable in your environment. Log in as the designated Launcher user.
Install any additional software your system will require. Normally, this is at least the connection client software for your VDI system. If you are using RDP, that is already included in Windows.
To install the Login Enterprise Launcher software, you will need to download the Launcher Installer from the Appliance UI after the Appliance is set up. When you install that software on a Windows machine and run it, it will connect to the Appliance and register. You do not need to configure a Launcher in the Appliance; it simply shows up.
Each Launcher Installer (the MSI and JSON files together constitute the Installer) is specific to the Appliance from which it was downloaded. If you have multiple Appliances, you will have multiple, separate Launcher Installer packages. A Launcher is bound to a single Login Enterprise system. If you want to direct a Launcher to another Appliance, you will need to run the installer from that Appliance. You cannot have multiple Launchers installed on a single host.
Execute the MSI and allow the software to complete the installation. There are no options for the installer; it simply runs. It already knows what to do. During the installation process, it will download the server certificate from the Appliance and install it locally. If there is a problem making an HTTPS connection to the Appliance, the installer will error out.
-
For more details on the Launcher setup and configuration, see Configuring the Windows Launcher.
-
For the general Launcher Overview and best practices, see Launcher Overview and Best Practices.
After installation, verify that the Launcher shows Connected and that the Appliance shows the Launcher as online. If you configured AutoLogin and a startup script, reboot and verify that your system reconnects.
In the Login Enterprise UI, you can also configure Launcher Groups either by selecting specific Launchers or by specifying a name pattern. This would allow you, for instance, to group Launchers by geographic location if you’re trying to test widely distributed systems and only want to test connections where the client (the Launcher) is geographically near the server (the end-user desktop).
Step 6: Configure End-User VM Pool
Login Enterprise operates by logging into a VM as an interactive user, having our software start, and remotely controlling that VM. To work, you need to configure some kind of remote access to a pool of available VMs. That pool can be as small as 1.
For the end-user VM pool, you need to decide how you want to handle that. Normally, you already have a connection broker. You could set up a special VM pool for testing or allow your Test sessions to run on your normal end-user images.
If you do not already have an existing pool of VMs to use, you can deploy normal Windows machines. There are no particular specifications for these machines. If you decide to embed our Login Processor in your machine image, make sure you do that, and make sure the path matches what you set in your Login Script definition. If you intend to measure the experience of your existing users, provision your test machines with the same hardware and policy configurations as your end users.
Configure your connection broker to allow your set of Test Users to access the VM pool you want.
If you don’t have a broker available or you just want a simple walk-through, you can make a very simple Test by creating a single machine that is allowed to accept RDP connections from your desktops. RDP does not require a real broker; we can simply run MSTSC to connect to the designated machine using the appropriate credentials.
Test the connection manually. Using the name and password of one of your Test Users, manually connect to the desired pool or host. When your account logs in, you should get this error:

You get that error because no Login Enterprise Test is running for the user you have logged in as. If you want to actually work with the desktop, click Stop Engine now. Otherwise, our software will log you off to allow the account/machine to be available for the next Test. If you see that dialog, then the Login Processor is correctly configured.
Step 7: Create and Execute a Test
Before configuring your full test setup with a connection broker (like Microsoft RDS), it's recommended to first verify your environment using the Desktop Connector. This simpler setup allows you to trigger a test manually from your own desktop machine, helping ensure the rest of your configuration is functioning as expected.
Option 1: Run a Test Using the Desktop Connector
The Desktop Connector enables you to run a test without relying on a remote-access system. Instead, you manually launch the test from a desktop session using a downloadable command.
-
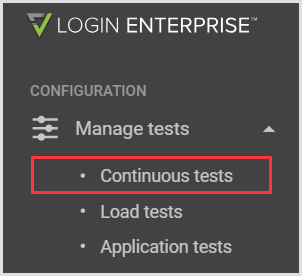
Go to Manage Tests > Continuous Tests in the Configuration section.
-
Click the green + icon to create a new Test.
-
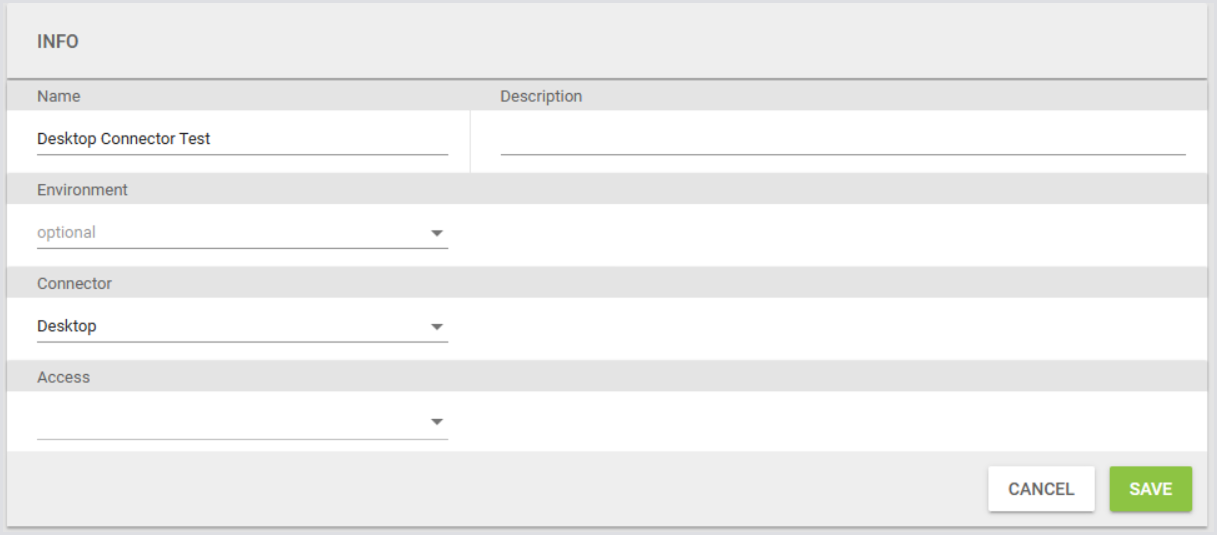
Enter a Test Name and set the Connector to Desktop.
-
Optionally fill in the following:
-
Description
-
Environment
-
Access
-
-
Once the Test is saved, you can add steps and configure the test as you desire. Then go back to the list of Tests, enable your Test by clicking the slider:

-
Click the blue
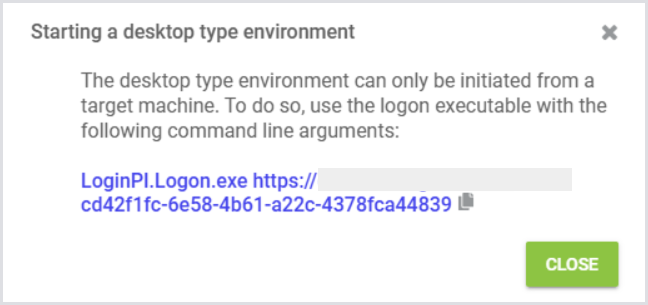
-
Run this command from your desktop session to initiate the Test.
The Desktop Connector does not require additional configuration parameters. It's ideal for:
-
Verifying the basic test setup before configuring full remote access.
-
Troubleshooting or running ad hoc Tests from machines with active user sessions.
-
Situations where remote login automation isn't feasible.
Limitations:
-
No Logon or Latency measurements.
-
Only application-related failures are captured.
-
Notifications and thresholds can still be configured.
-
You cannot change a Test from the Desktop Connector to any other connector, or vice versa.
For more information on the Desktop Connector, see the Desktop Connector.
Option 2: Configure and Run a Test Using Microsoft RDS
Once you've confirmed that the Desktop Connector works, you can move on to configuring a Test using a connection broker such as Microsoft RDS.
Create a simple Test just to verify that we can successfully initiate a login and get results, e.g., a Continuous Test. For this:
-
Go to Manage Tests > Continuous Tests in the Configuration section.
-
Click the green + icon to create a new Test.
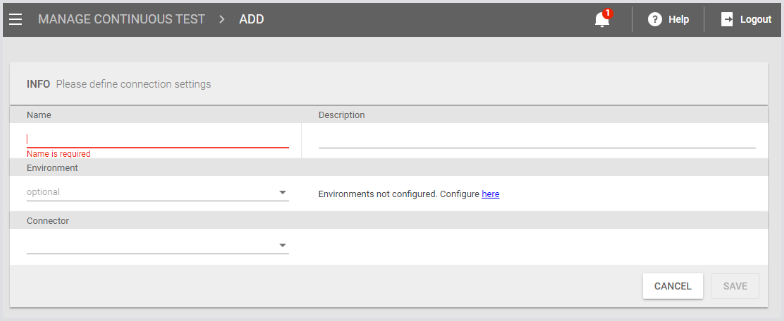
-
Enter a Test Name and choose a Connector. This acts as the connection broker for your remote desktop pool.
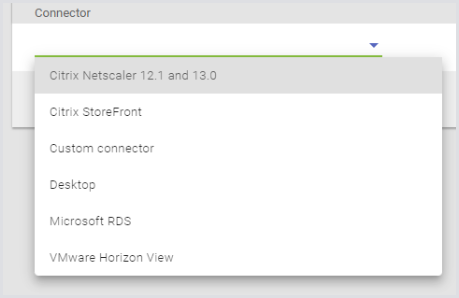
-
Select Microsoft RDS or another broker type suitable for your environment.
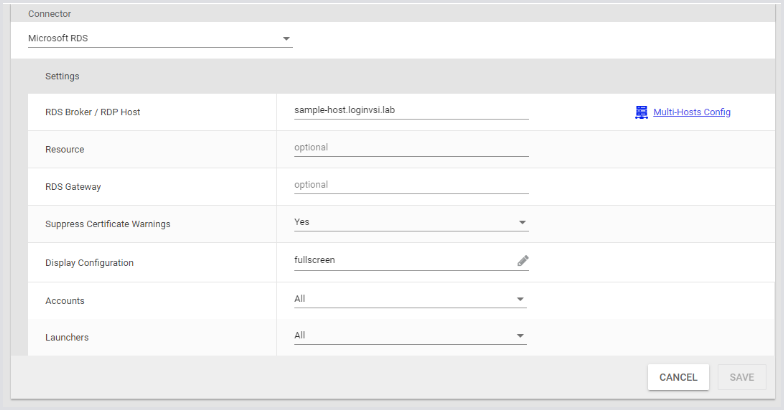
-
For a single-host RDP, just enter the hostname and select the Account and Launcher groups. Select All for both. This means that all of your configured accounts and connected Launchers are available for this Test.
After you hit Save, you will be taken to the full Test Configuration page. For this walk-through, leave most things set to the default. We’ll configure the Test to run one of our preconfigured Test suites and to run one session at a time.
First, tell it what to do. Scroll down to the Actions block:
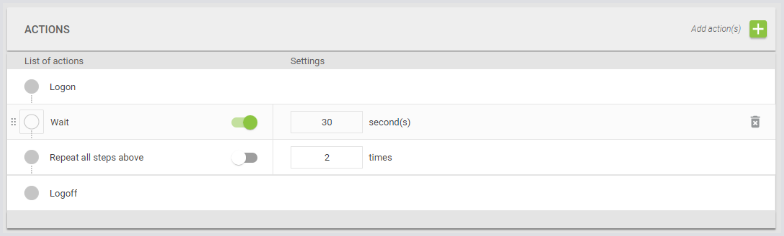
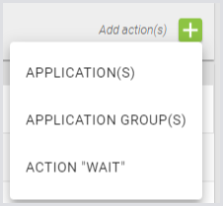
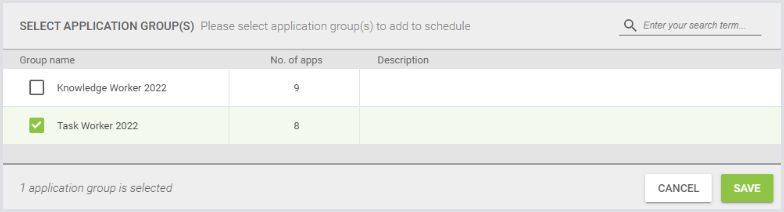
By default, a Test is just ”login, wait 30 seconds, and log out.” Click the Add Actions green + icon. Add an Application Group:
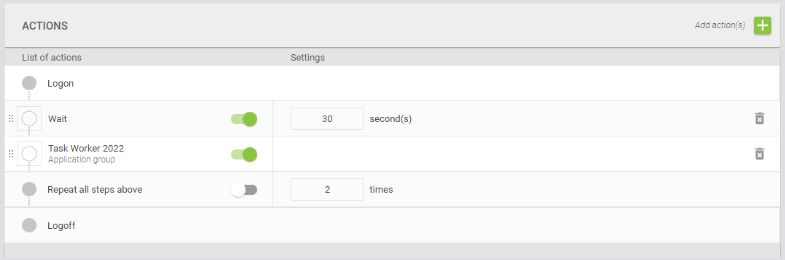
Select Task Worker (a lower-power user) and hit Save.
Then your new Test Group is included in your Actions list:
Now, configure the test schedule to have it run one Test at a time, back-to-back.
.png?cb=a68ac2c4e248257abfe7653200bd7863)
Change the schedule to Run Concurrent Sessions for 1 session.
Don’t enable the schedule yet. The moment you click Enable Schedule, the Tests will start running. Don’t do that until the rest of the Test is configured.
There’s something more interesting to look at: turn on Session Metrics.

Once you’ve finished configuring your Test, remember to click Save to apply the Test
configurations.
At the top of the screen, click Manage Continuous Test so you can see the list and enable our new Test.
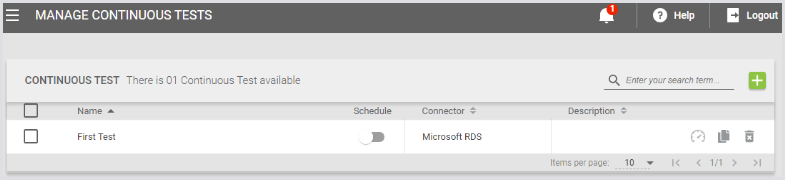
Click the Schedule switch on your Test. It will turn green, and your Test will start.
For more information on Microsoft RDS and other connection options, see Configuring Connectors and Connections.
Step 8: View Results
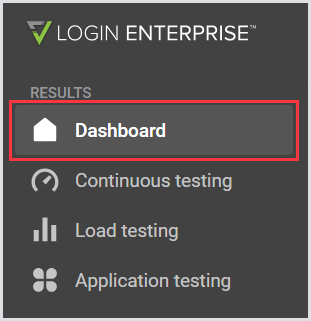
The full set of results available is beyond the scope of this section. As a quick example of what you can do, look at the Dashboard. For this, click Dashboard in the Results menu section.
That shows you a list of your current Tests:
.png?cb=c88c099a254560db94fb758a0f0df2b8)
This is example data from an Appliance with much more than the sample we just built. In this case, you can see there are three Tests currently running. You can see simple bar graphs about login success, login performance, defined latency thresholds, and application Test failures. You can click on one of these tiles to get more details about those metrics.
That will show you which Tests are failing and what events have been reported about your Tests. For instance, if your logins are failing because of a misconfiguration somewhere, click on the tile, look at the Events table, and open up each event for more information.
Instead, go down to the Continuous Tests section of the menu to look at some of the performance graphs. Immediately under the Dashboard menu entry, click Continuous Tests. That defaults to the Charts tab, where you can see metric data for your Test Runs laid out.
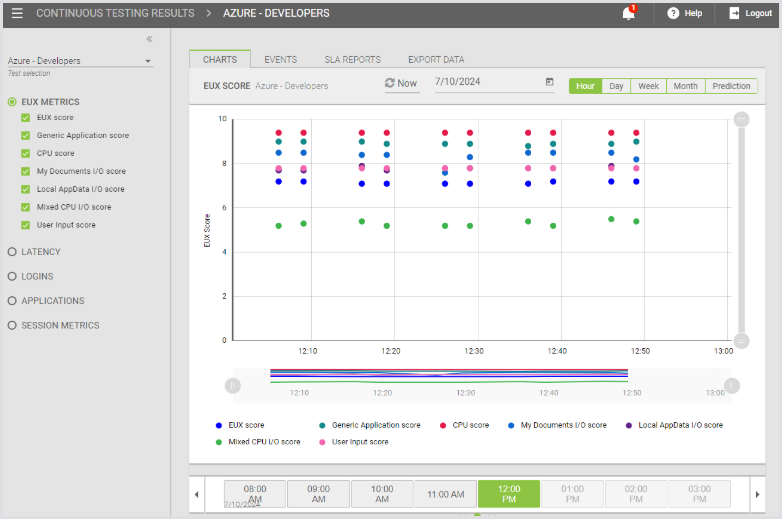
First, note the pull-down at the top left. You need to select which Test you want to look at. For this walk-through, you have only one, so it should be shown by default. In other systems, you should always pick your Test first.
Let’s look at EUX Metrics – the relative performance of our experience-measuring tools. Click EUX Metrics and then select all the metrics. You will see a chart like the one above, where you can see the overall EUX score and the component score of each of our applications. To view a subset of these, you can either uncheck the metric or click on the color in the legend at the bottom.
At the top of the graph, you can choose your date and your reporting period. It defaults to “hours”, with a scrolling selector at the bottom for which hour. You can also look at the entire day, an entire month, or even a linear projection of the view into the future.
For instance, you can look at the Session Metrics for June, like this:
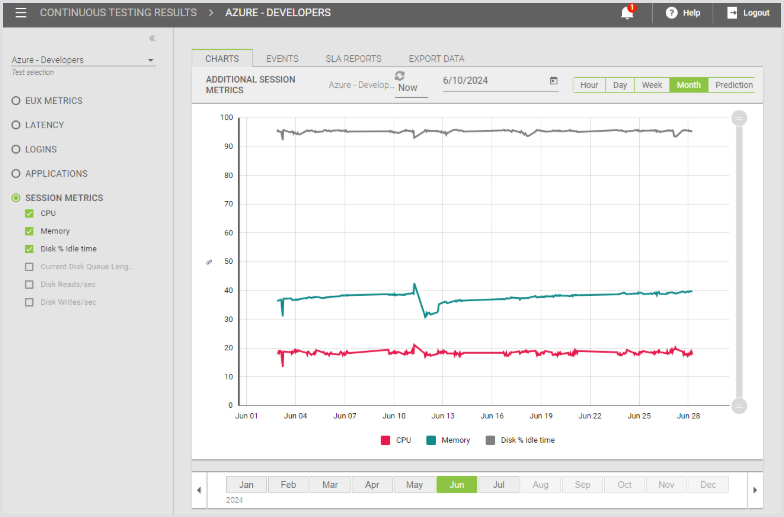
The other metric headings have the same behavior. Select the metric type you want, and that will open up the list of available metrics. Select whatever you want to show in the graph and select your time frame.
The next tab, Events, is where you can get more details about failures in the Tests. Any Test failure, any metric that exceeded a configured threshold, or any login problem will create an Event. If your scripts include CreateEvent commands, those events will appear here, too.
The Events list shows all of the events for all Continuous Tests, rather than allowing you to filter by Test. It is limited to displaying 1 hour of events at a time.
Please note it is 1-hour blocks, i.e., 12-1. It is not possible to specify the hour of time the events are shown for. One hour of events on a large system can still be many thousands.
At the top, you can choose the day, and at the bottom, you can choose the hour, as well as how many events will be displayed per page of the results.
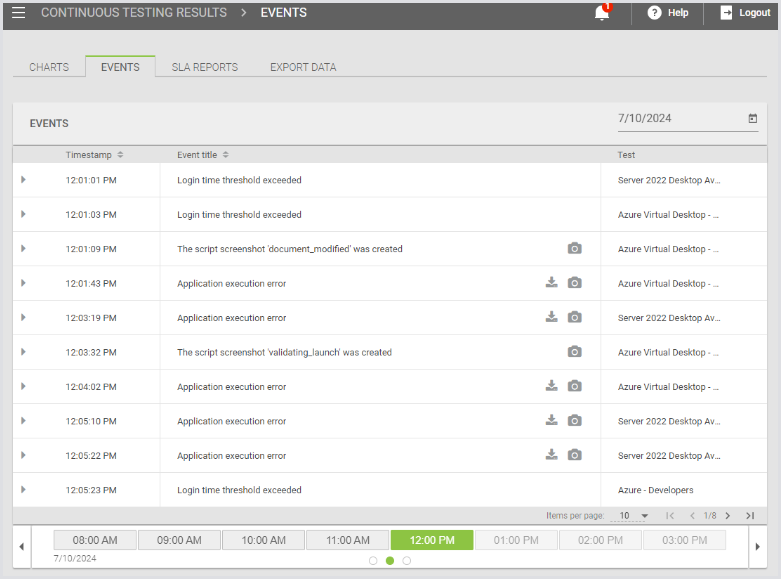
Every error event that is generated by a Test running on an end-user desktop will include a copy of the Engine Log as a downloadable object. See the download link on the right. Many events, including informational events generated by the script, can also include screenshots.
Events that reflect problems outside of the end-user desktop, like login failures, have no logs available.
Tip: For every event here, there is a triangle to the left. Click that to get more details about the error, including any additional messages, as well as the account, host, and Launcher involved.
Conclusion
That’s a very basic walk-through of setting up a new Appliance and getting a simple Test running. There is a lot more detail than can be covered here. We strongly recommend that you take the introductory training lab and explore the Appliance web interface now that you’ve had a basic introduction to its mechanics.