Overview
The Maintenance Menu allows you to manage and troubleshoot your Virtual Appliance. This section provides step-by-step instructions for accessing and using the various options available on the Maintenance Menu.
Accessing the Maintenance Menu
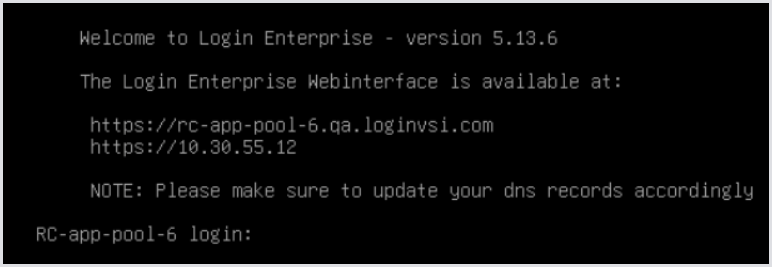
Ensure you are logged in successfully to view the Maintenance Menu. To access the menu, enter your previously defined username and password. Once logged in, you will have access to the following options:
-
Logout - Logs you out of the Maintenance Menu.
-
Reboot - Reboots the Virtual Appliance.
-
System - Provides additional functionalities such as changing the hostname, updating the Admin password, and managing certificates. For more details, see System.
-
Updates - Offers different methods for updating the Virtual Appliance. For more details, see Updates.
-
Network configuration - Allows you to check and modify network interfaces and routes. For more details, see Network Configuration.
-
Troubleshooting - Provides tools and options for diagnosing and resolving issues. For more details, see Troubleshooting.
Using the Maintenance Menu
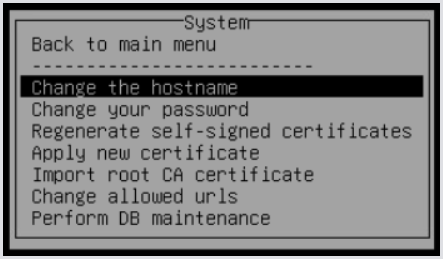
System
The System submenu presents you with additional functionalities, such as:
If you regenerate a certificate, install a new server certificate, or change the hostname, any installed Launchers must be reinstalled whenever your certificate changes.
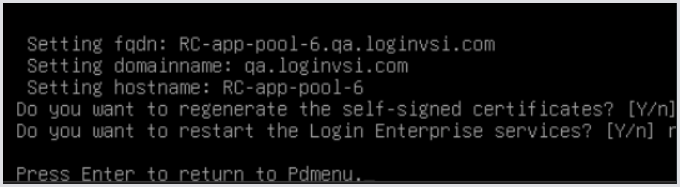
Change the Hostname
This option allows you to change the hostname at the Virtual Appliance level.

When you change the hostname of your Virtual Appliance, it is recommended to regenerate the self-signed certificates, provided you are using them instead of a custom certificate. This ensures that the certificates reflect the new hostname.
Best practice: After changing the hostname, regenerate the self-signed certificates and restart the relevant services.
Change Your Password
This option opens a wizard to change the Admin password of the Virtual Appliance.

Changing the password affects both the login credentials for the Maintenance Menu and the Login Enterprise web interface, as both use the same account (admin).
Reasons to change the password:
-
To revoke access for employees who are no longer with the company.
-
To comply with security policies that require password changes after a specified period.
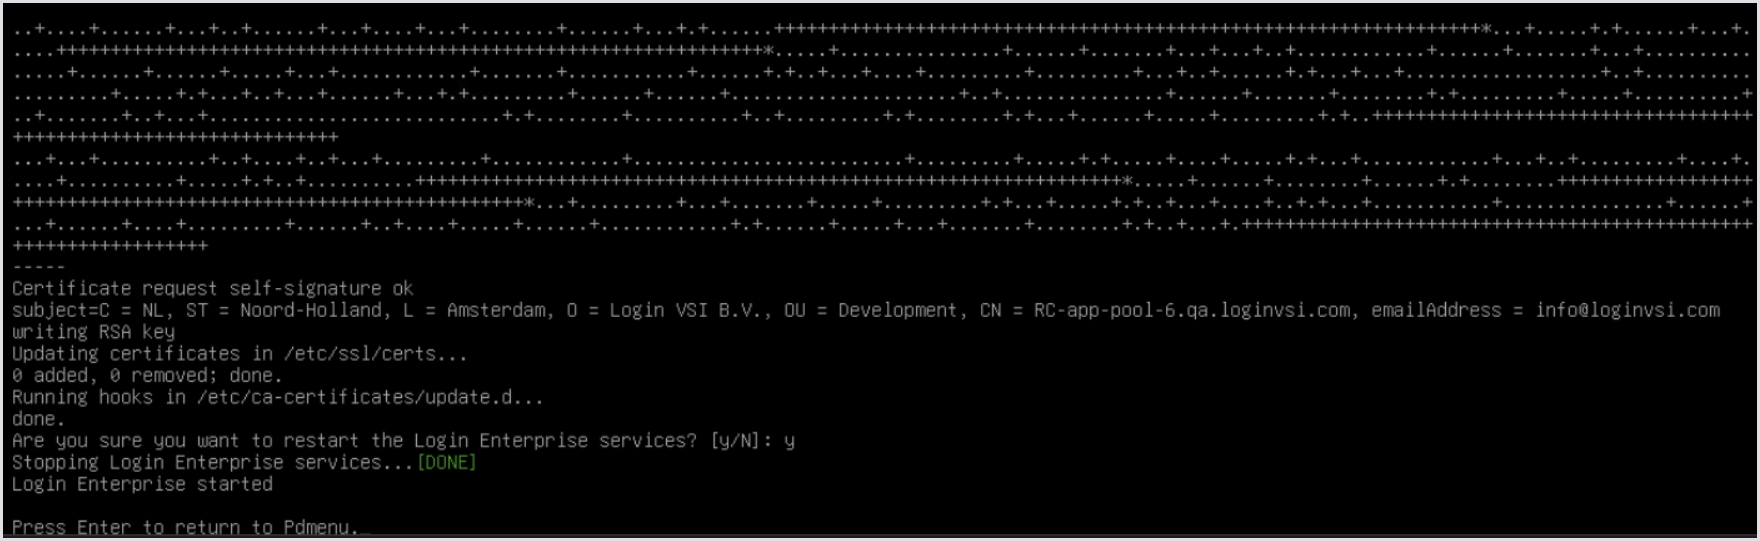
Regenerate Self-Signed Certificates
This option allows you to regenerate the self-signed certificate in use.
Reasons to regenerate SSL certificates:
Configuration changes: If you change the appliance's hostname, IP address, or other network settings, the existing certificate may become invalid. Regenerating self-signed certificates ensures they align with the updated configuration and maintain secure connections.
Compliance: Certain security policies or audits may require the periodic regeneration of certificates to ensure that communication channels remain secure and up to date.
Apply a New Certificate
This option allows you to add a custom PFX certificate to the Virtual Appliance. For more information, see Installing a New Certificate.
Import the Root CA Certificate
Use this option to import a Root Certificate Authority (CA) certificate when applying custom certificates. This is essential for establishing trust between your custom PFX certificate and the system. For more information, see Importing a Root CA Certificate.
Change Allowed URLs
This option allows you to add or modify URLs that the Virtual Appliance listens to.
In some scenarios, you may prefer to use a URL other than the hostname or IP address of the Appliance. Following the steps below will help ensure your Virtual Appliance is accessible via the desired URL and that your environment is properly configured to recognize it.
Connecting to the Appliance Console
-
Open a connection to the Virtual Appliance console.
-
Log in to the Appliance and select System.
Сhanging Allowed URLs
Before you proceed, make sure to stop running your Tests.
-
From the System menu, select Change Allowed URLs (Allowed URLs refer to the new URL where the Virtual Appliance will be accessible).
-
This takes you to the built-in GNU nano editor. The values are semicolon-delimited.
-
Delete any unnecessary URLs and add the new URL as needed.
Make sure your URLs are valid and that you do not have a ; (semicolon) at the end of the line. Semicolons must only be used between each URL in the list. For example:
-
Press Ctrl + O to save the changes, then hit Enter to confirm overwriting the existing file.
-
Press Ctrl + X to exit GNU nano.
-
From the main menu, select Reboot to restart the Appliance.
After rebooting, verify access to the new IP address of the Virtual Appliance front end using a web browser:
Ensure that the rest of your environment recognizes the new Appliance URL so that all parts of the network can connect to it.
Updating Launchers
After configuring the new URL, ensure that you update the Launchers to the latest version. Even if the version number remains the same, Login Enterprise updates the Launcher files with the new URL name.
For more detailed information, see Launchers Overview and Best Practices.
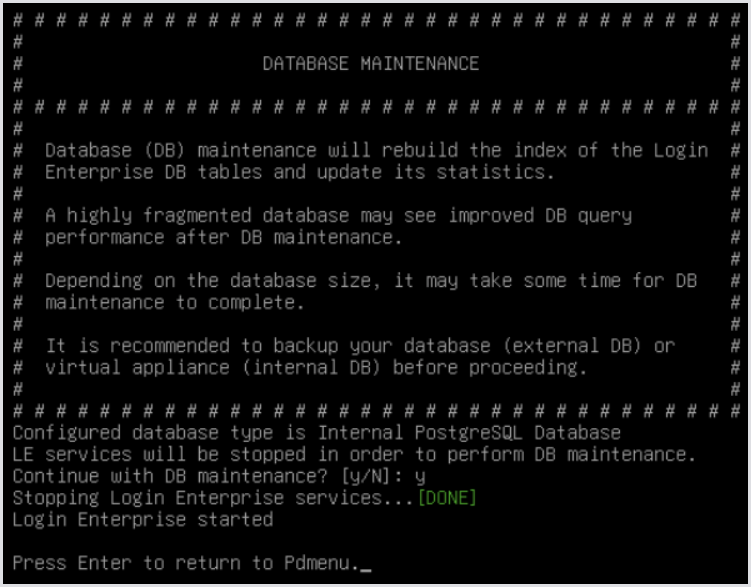
Perform DB Maintenance
This option optimizes your database by rebuilding indexes and updating statistics, which improves query performance and reduces fragmentation. This process automatically adapts to the type of database in use, whether it’s the internal PostgreSQL database or an external Microsoft SQL database, depending on your setup.
Login Enterprise services will be temporarily stopped during maintenance. It’s important to schedule this process accordingly. Always back up your database or Virtual Appliance before proceeding to prevent potential data loss.
Updates
The Updates submenu provides different methods for updating the Virtual Appliance:
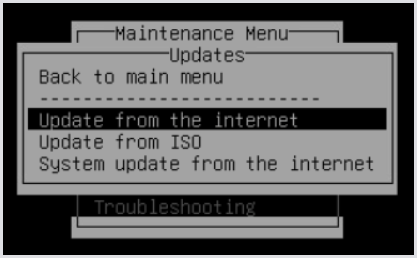
Update from the Internet
This option initiates an update over the internet, bringing the virtual appliance to the latest available version. For more information, see Online Update of Login Enterprise.
Update from ISO
This option initiates an update from an attached ISO applied to the VM. For more information, see Offline Update of Login Enterprise.
System Update from the Internet
This option initiates Debian system updates over the Internet. For more information, see System Update of the Login Enterprise Operating Environment.
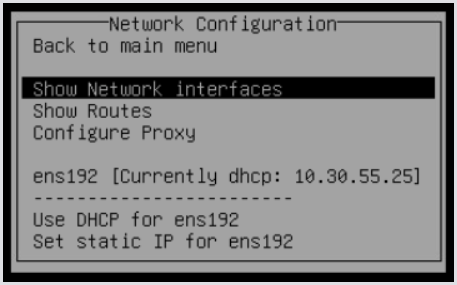
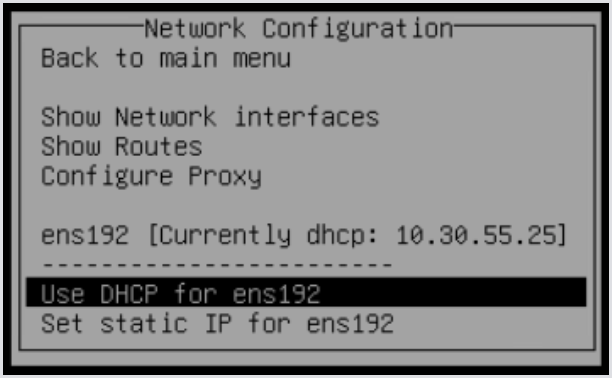
Network Configuration
The Network configuration submenu provides options for checking network interfaces and routes, as well as changing network modes.
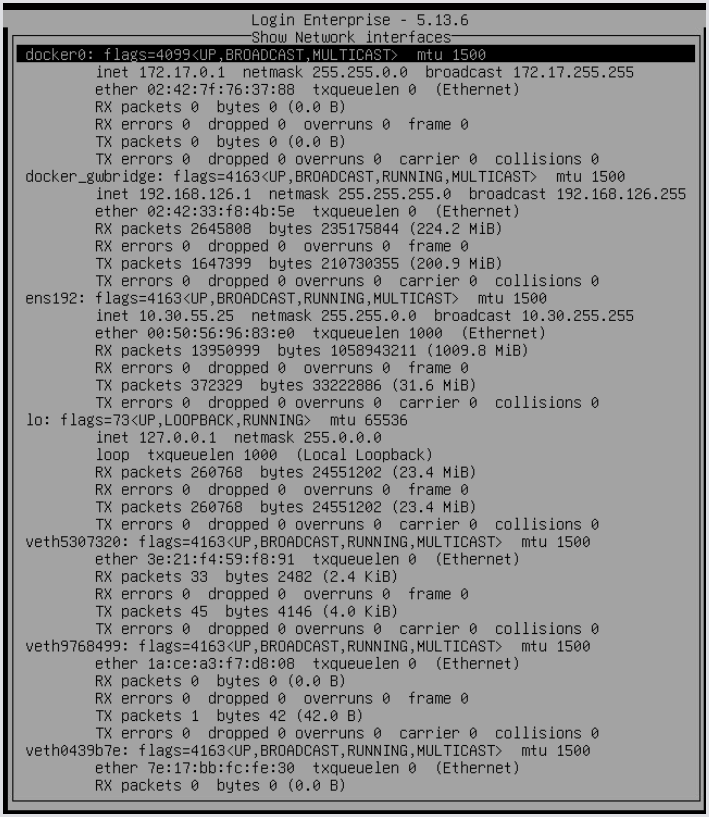
Show Network Interfaces
This option allows you to verify specific details, such as:
-
Interface status (UP/DOWN) - Ensure the network interface is active. If it’s down, the device will not communicate.
-
IP address - Verify the correct IP assignment. An incorrect or missing IP can cause connectivity issues.
-
Subnet mask and gateway - Check for proper network routing. Mismatched settings can prevent access to other devices or networks.
-
MAC address - Confirm the correct hardware identifier for security or access control.
-
Link speed/duplex: Ensure the network operates at expected speeds and in full-duplex mode to avoid performance issues.
-
Errors/packet loss - Look for network errors or dropped packets, which may indicate hardware or configuration issues.
-
Active interface - Verify that the correct interface, e.g., wired or wireless, is being used.
These checks help quickly identify and resolve connectivity, configuration, or performance issues.
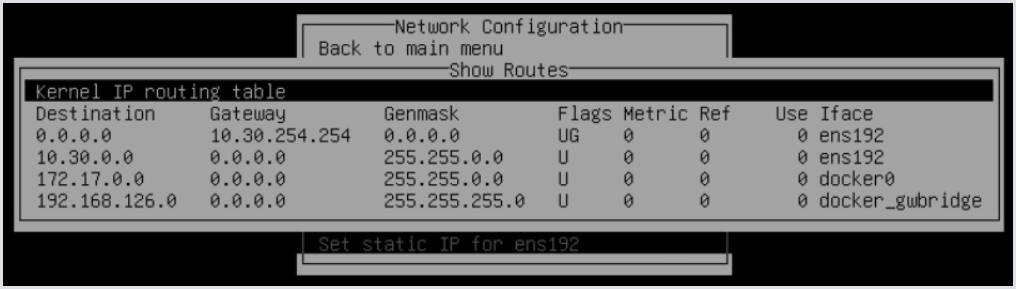
Show Routes
This option allows you to review networking details, such as the following:
-
Routing table: Confirm active network routes to ensure traffic is routed correctly to both internal and external networks.
-
Default gateway: Validate the correct default gateway for routing outbound traffic.
-
Subnet routes: Ensure specific routes to critical subnets or VPNs are configured and functioning properly.
-
Troubleshooting: Diagnose network connectivity issues by verifying that routes to particular destinations exist and identifying any incorrect routes.
-
Interface assignment: Verify which network interfaces are managing specific routes to ensure proper traffic management.
These checks help maintain network efficiency and facilitate troubleshooting.
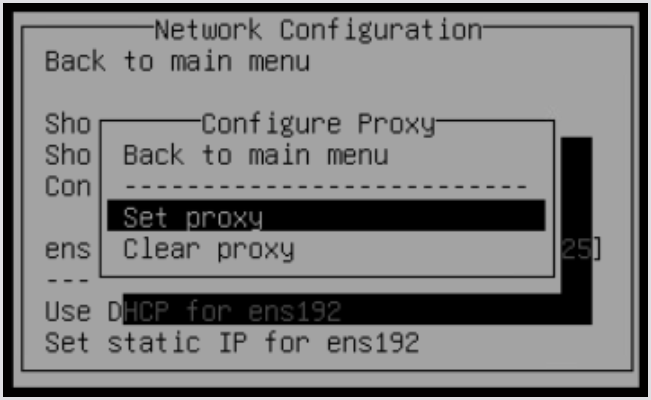
Configure Proxy
This option allows you to manage proxy settings for your network configuration.
-
Set proxy: Configure the proxy settings to direct network traffic through a specified proxy server.
-
Clear proxy: Remove any existing proxy settings to revert to a direct connection.
Managing these settings can help optimize network performance and enhance security.
Use DHCP
Select this option to automatically obtain an IP address and network settings from a DHCP server. This simplifies network configuration and allows for dynamic address allocation. For more information, see Initial Appliance Configuration.
Set Static IP
Select this option to manually configure a fixed IP address for the Virtual Appliance. This is useful for ensuring consistent network identification, especially for servers or devices that require a stable connection.
The steps below will help you change the IP address of your Login Enterprise Virtual Appliance and update the allowed URLs accordingly.
Changing the IP address may be necessary for various reasons, such as reconfiguring network settings, migrating to a different network, or resolving IP conflicts.
After changing the IP address, you must manually update the ALLOWED_URLS list to include the new IP address.
Changing the IP Address
-
Access the Maintenance Menu:
Console or SSH into the Appliance to access the Maintenance Menu.
-
Navigate to Network Configuration:
Select Network Configuration, then choose the Set Static IP option.
-
Enter networking details:
Follow the prompts to enter the networking details. A new field will appear each time you press Enter.
-
Completion confirmation:
Once you’ve entered all necessary information, the screen will display a confirmation message.
Updating the Allowed URLs
For information on updating the allowed URLs, see Changing Allowed URLs.
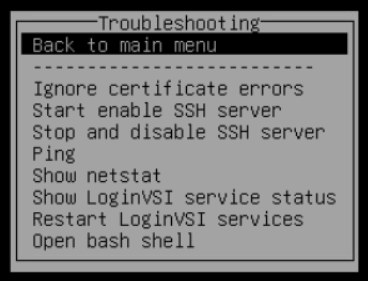
Troubleshooting
The Troubleshooting submenu provides options to help diagnose and resolve issues. The options are as follows:
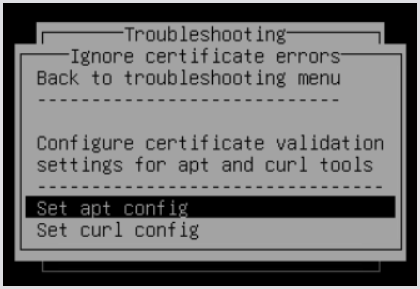
Ignore Certificate Errors
This option allows you to configure certificate validation settings for apt and curl. By adjusting these settings, you can choose to ignore certificate errors, which may be useful in certain troubleshooting scenarios or when working with self-signed certificates.
-
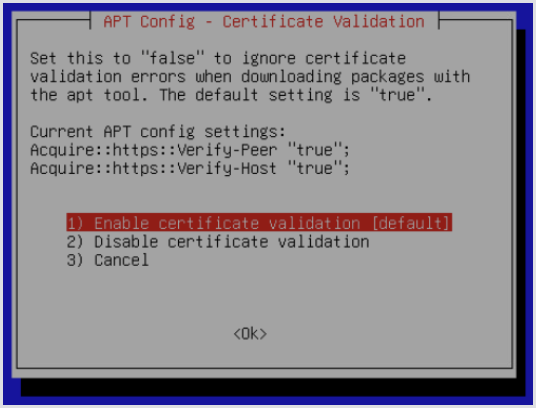
APT config menu:
-
Acquire::https::Verify-Peer and Verify-Host are set to "true" by default, meaning
aptvalidates certificates when downloading packages over HTTPS. -
Disable certificate validation turns both settings to "false," allowing downloads without SSL checks. Useful for trusted internal repos or testing environments.
-
-
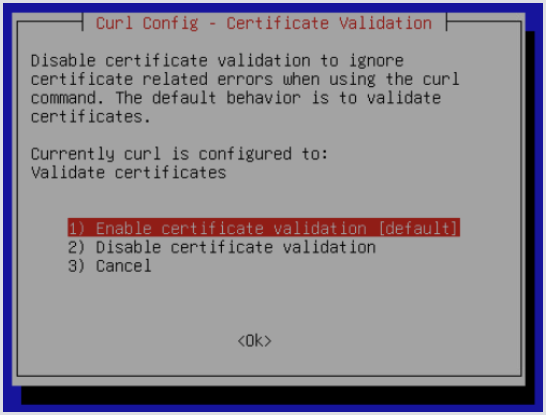
cURL config menu:
-
Validate certificates is the default for
curl, ensuring SSL validation for HTTPS requests. -
Disable certificate validation allows
curlto skip SSL checks, equivalent to using--insecure. This can be used in testing or for trusted servers.
-
Important: Both options reduce security and should be used cautiously in production environments, as ignoring certificate errors can expose your system to potential risks.
Both options reduce security, so they should be used cautiously in production.
Start Enable the SSH Server
Select this option to start the SSH service, allowing remote SSH access to the appliance. Highlight this option and press Enter on your keyboard to run it.
Stop and Disable the SSH Server
Select this option to stop the SSH service and disable remote access, preventing further SSH connections. Highlight this option and press Enter on your keyboard to execute it.
Use the appropriate option based on your security needs. Enabling SSH allows remote access for management, while disabling SSH enhances security by blocking such access.
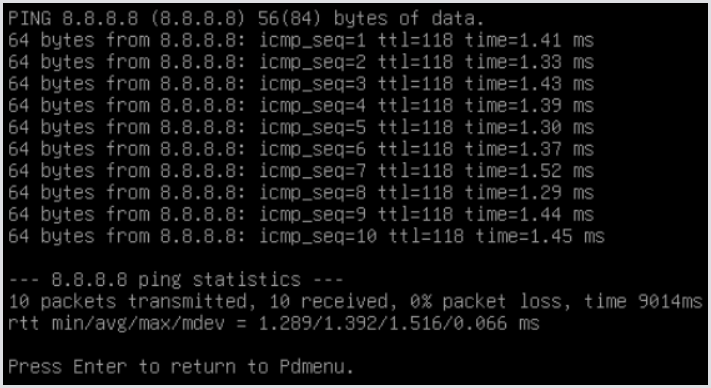
Ping
The Ping option allows you to test network connectivity by sending ICMP echo requests to a specified address or hostname. When selected, a field will appear where you can enter the desired IP address or hostname to check if the destination is reachable.
This tool helps you quickly verify network status and diagnose connection issues.

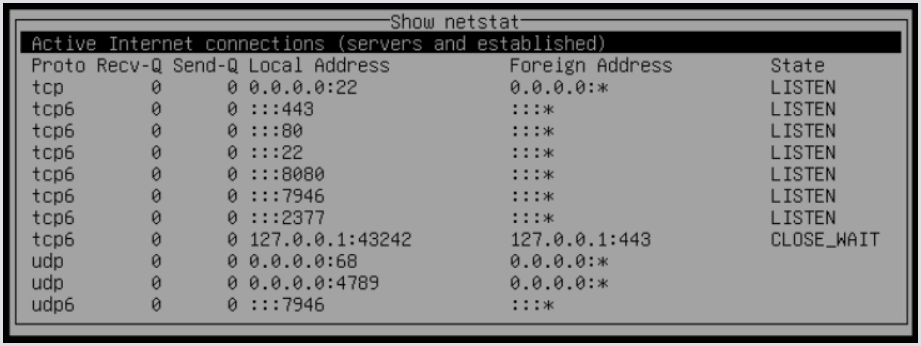
Show Netstat
The Show Netstat option provides an overview of networking details without requiring any configuration. This section is designed for users who know what they’re looking for in terms of network diagnostics.
-
View network connections: Quickly see active network connections and their status.
-
Interface statistics: Check statistics for each network interface to monitor performance.
-
Routing information: Access routing details to understand how traffic is managed.
-
Troubleshooting: Identify potential issues and unauthorized connections, helping to resolve connectivity problems efficiently.
This option allows for easy monitoring of network performance without the need to manually enter netstat commands.
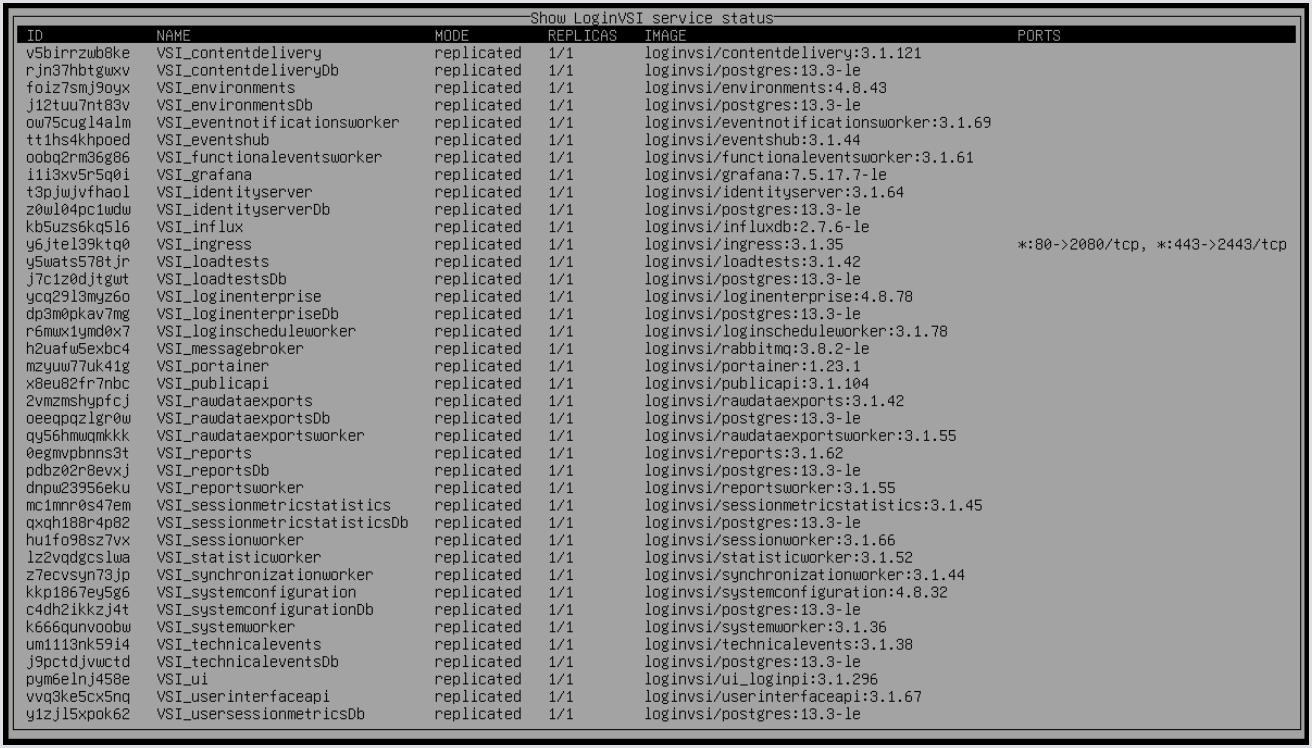
Show LoginVSI Service Status
This option displays the Docker containerized microservices hosted by the virtual appliance. This section functions similarly to viewing the "Login Enterprise Services" page in the Login Enterprise user interface.
-
View microservices: See a list of all active microservices running in Docker containers.
-
Service status: Check the current status of each microservice.
This option is for viewing purposes only; no configuration changes can be made here.
Restart LoginVSI Services
The Restart Services option allows you to restart services running on the Virtual Appliance.
Reasons to restart services:
-
Recover from service crashes: Restore functionality after a service failure.
-
Apply configuration changes: Implement changes made to service settings.
-
Troubleshoot system issues: Address problems by refreshing services.
-
Improve performance: Enhance overall performance by restarting services.
This option provides a quick way to restore functionality with minimal downtime.

Open a Bash Shell
The Open Bash Shell option provides access to a command prompt, allowing you to type commands directly. This interface is minimal and is primarily intended for users who know in advance what tasks they want to perform.
-
Direct command-line access: Gain access for advanced troubleshooting, manual configurations, service management, or running scripts.
-
Flexibility: Execute Linux commands as needed.
It may not be common for a Virtual Appliance administrator to perform tasks in this shell, so familiarity with command-line operations is required.
To exit the shell, type exit and press the Enter key.