Overview
While we recommend reviewing the details below, here's a video on updating your Login Enterprise Virtual Appliance and Launchers.
The Login Enterprise upgrade can be initiated from the VM console or an SSH session. You can upgrade with or without Internet access. If you want to upgrade directly from the Internet, ensure the following URLs are whitelisted in your environment:
https://loginvsidata.s3-eu-west-1.amazonaws.com/LoginPI3_ISO/public/
https://loginvsidata.s3.eu-west-1.amazonaws.com/LoginPI3_ISO/public/
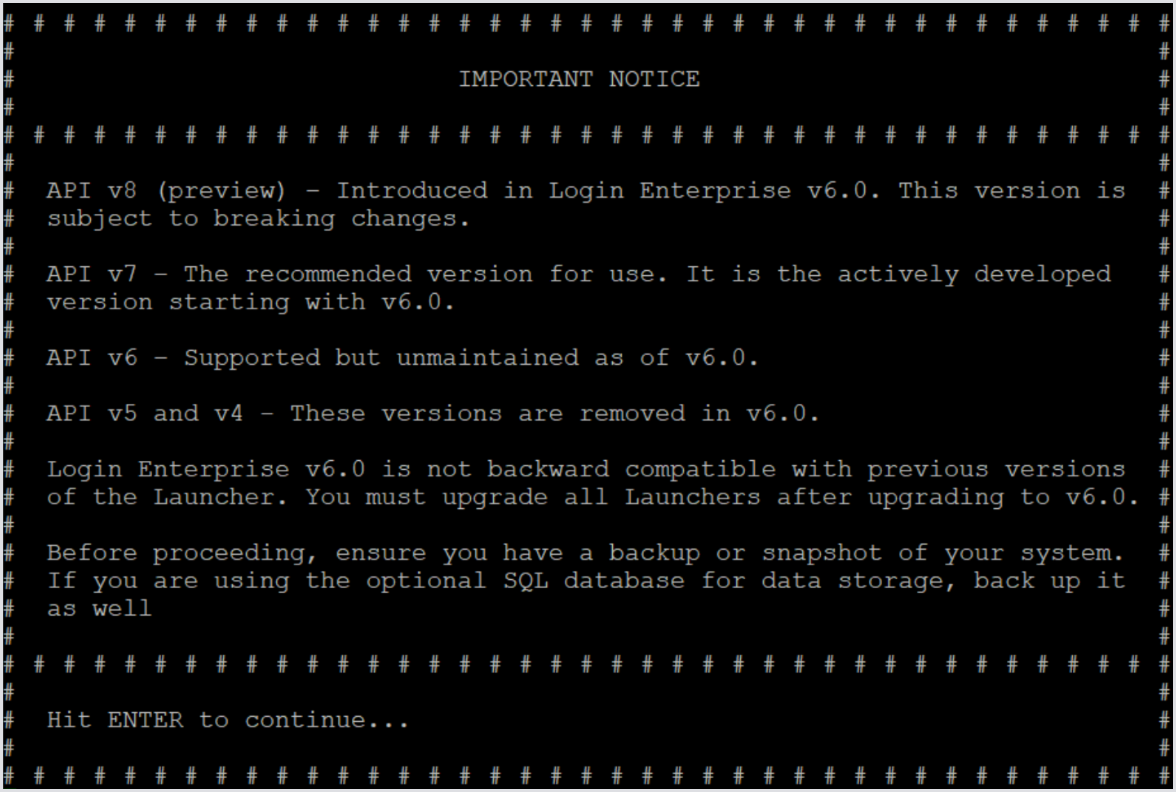
We recommend backing up the Appliance before performing the update. One suggested method is to take a snapshot using the hypervisor management system.
Login Enterprise Upgrade Path
When upgrading your Login Enterprise Virtual Appliance, it’s essential to follow a recommended upgrade path based on your current version and the underlying Debian version. This will help ensure a smoother transition and minimize potential compatibility issues.
|
Current Version |
Upgrade Path |
Target OS |
|---|---|---|
|
3.x |
→ 4.0–4.6 → 4.7–5.8 → 5.9–5.14 |
Debian 9 → Debian 10 → Debian 12 |
|
4.0 |
→ 5.8 → 5.9–5.14 |
Debian 10 → Debian 12 |
|
5.0 |
→ 5.14 → any 6.x release |
Debian 12 |
Key notes:
-
Upgrading directly from versions 3.x or 4.0 to 5.14 without following this path is not recommended, as updates from Debian 9 to 12 are unsupported.
-
While you can choose to stay on an older Debian version, for example, Debian 9 or 10, when running Login Enterprise 5.14, updating Debian is strongly recommended for optimal performance and security.
-
Version 6 requires Debian 12, so you must allow the System Upgrade to Debian 12 before you can upgrade to any version 6 release.
Important considerations:
-
The upgrade will not migrate the old license from the 3.x legacy database, nor will it carry over SLA report schedules configured in 4.0. After upgrading, you will need to upload a new license due to format changes and reconfigure your SLA report schedules (This only applies when updating from 3.x/4.0 directly to 5.14).
-
All configuration and licensing information is preserved in all upgrades after 4.3.
-
Version 5 Launchers are not supported in version 6: you must upgrade your Launchers when you upgrade the Appliance.
-
Please review the release notes for any version-specific updates or changes.
If you have any questions or concerns about updating the Virtual Appliance, feel free to contact our support at support@loginvsi.com.
Updating Login Enterprise from v5 to v6
For detailed steps, see Updating the Appliance from v5 to v6.
Debian Linux Upgrades
Starting in 5.9, Login Enterprise is based on Debian Linux 12. Systems upgrading from before 5.9 have the option to migrate to Debian 12 during the upgrade. However, you can also choose to remain on Debian 10.
If you are still on Debian 10, any upgrade to 5.9 and above that includes a “System Update” will migrate you to Debian 12. If you are already at Debian 12, System Update just performs a normal security/patching update like the menu entry below. So in any version, simply upgrade and select the option to perform a System Update to migrate to Debian 12.
If you are already at Login Enterprise version 5.14 and wish to upgrade Debian, you can perform an upgrade to the same version. That is, attempting to upgrade 5.14.7 to the latest (also 5.14.7) will run, and then offer to perform the System Update.
Upgrading to Login Enterprise 6.0 and later requires that you are already at Debian Linux 12. Please perform a Debian Linux 12 upgrade before attempting to upgrade to Login Enterprise 6.0.
Update Notifications
When a new version of the Virtual Appliance is available, Login Enterprise shows a system notification on the Dashboard page.
Upgrade notifications are only available for Appliances with Internet access. Notifications will not be displayed for offline Appliances.
Below is an example of a system notification:
Configuring Login Enterprise Proxy Settings
Before performing an online update, configure the proxy settings on the Virtual Appliance.
For detailed steps, see Configuring Proxy Settings on the Appliance.
Once the proxy configuration has been successfully set up, access the Maintenance Menu. From there, navigate to the Updates sub-menu, where you will find options for upgrading both the Login Enterprise software and the Debian OS. For details, see the steps below.
Online Update of Login Enterprise
-
Open the Appliance console and log in to access the Maintenance Menu.
-
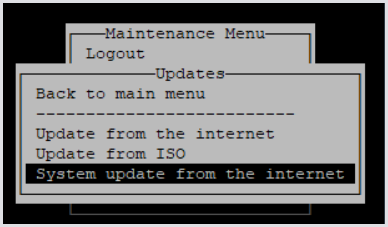
In the Maintenance Menu, select Updates.
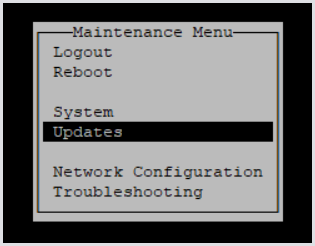
-
In the Updates menu, select Update from the Internet.
-
Wait until the ISO file download is complete.
-
Afterward, you'll see the following message:
Press Y to perform the update, or N to keep the current version.
-
Press Enter to continue.
-
Press Y to continue with the update.
-
Press Y to perform database maintenance or N to skip it.
-
Press Y for a system OS update or N to skip it.
10. Once the update is initiated, please wait for it to complete. Press Enter once finished to return to the menu.
For optimal performance, reboot the Login Enterprise Virtual Appliance after the update is complete.
Your Login Enterprise Appliance is now updated. Remember to update/upgrade all existing Launchers after each Appliance update.
You need to confirm the update multiple times: steps 5, 6, and 7.
Offline Update of Login Enterprise
If the Appliance doesn’t have access to the internet, you can perform the updates using a locally mounted ISO file. Please refer to your Hypervisor vendor for instructions on successfully mounting an ISO to the virtual Appliance.
We recommend shutting down the Virtual Appliance, attaching the ISO, and then starting the Appliance. Once the machine is started, log in to the Appliance as usual.
-
In the Maintenance Menu, select Updates.
-
In the Updates menu, select Update from ISO.
Afterward, you'll see the following message:
-
After pressing Enter, you'll be prompted to confirm the update.
Typing 'N' in the menu will cancel the update sequence, while typing 'Y' will initiate the update process.
Once the update is initiated, please wait for it to complete. Press Enter when finished to return to the menu.
For optimal performance, reboot the Login Enterprise Virtual Appliance after the update.
Your Login Enterprise Appliance is now updated. Remember to update/upgrade all existing Launchers after each Appliance update.
Offline Update Without a Virtual CD-ROM Drive
In some cases, certain hypervisors may not offer a virtual CD-ROM device to attach the ISO file to. However, you can still manually perform the update by copying the ISO file into the Appliance itself.
-
Using an SFTP client (such as WinSCP, ensuring you specify the SFTP protocol), upload the Login Enterprise update ISO to the
/tmpdirectory. -
Log in to the Appliance as the
adminaccount via SSH or the console, and navigate to Troubleshooting > Open bash shell menu entries, to get to the Linux Bash prompt. -
Create the mount directory if it does not already exist:
mkdir /mnt/cdrom -
Mount the ISO you uploaded.
mount -o loop /tmp/enterprise-update.iso /mnt/cdrom -
Once that file is mounted, run the update process manually with this command:
loginvsid update offline -
Reboot the Appliance. After the reboot, the ISO file will no longer be mounted, and you can delete it from
/tmpto save space. (The/tmpfolder is not special; you could instead choose to upload it to any other unprotected folder, such as/home/admin).
System Update of the Login Enterprise Operating Environment
Within Login Enterprise, there's a built-in feature in the update menu called 'System update from the Internet.' This option will download and install security patches and other software updates for all installed Linux/Debian software. We recommend integrating this into your default update schedule for infrastructure servers.
It will not perform the major Debian 10 to Debian 12 upgrade. That must be done through a full Login Enterprise upgrade.
To utilize this update, navigate to the Virtual Appliance and log in until you see the Maintenance Menu.
-
In the Maintenance Menu, select Updates.
-
In the Updates menu, select System update from the internet.
Upon selection, it will promptly begin downloading and installing the latest updates from the internet.

After completion, press Enter to return to the Maintenance Menu.
For optimal performance, reboot the Login Enterprise Virtual Appliance after the update completes.
Congratulations, you have now successfully updated the Appliance system.
Disk Cleanup in the Appliance Upgrade Process
This feature is designed to address excessive memory usage on the Appliance disk. Two primary factors contribute to this issue:
-
Old Docker images: These may remain in storage even after they are no longer used.
-
Unused blocks on a mounted filesystem: These can accumulate over time and take up space.
To prevent unnecessary memory usage, the cleanup of old Docker images is performed during each Virtual Appliance update, just before you’re prompted to confirm the Debian update.
The second issue, unused blocks on the mounted filesystem, can be addressed using the fstrim command. This command trims the disk and discards any blocks that are no longer in use by the mounted filesystem.
The underlying device must support physical discard operations for this to work. To verify this, the value in the /sys/block/{device_name}/queue/discard_max_bytes file must not be zero. The script used for this implementation will perform this check before executing any trim operation.
Executing fstrim too frequently may negatively impact the lifespan of lower-quality SSD devices. For most desktop and server systems, a trimming frequency of once a week is generally sufficient.
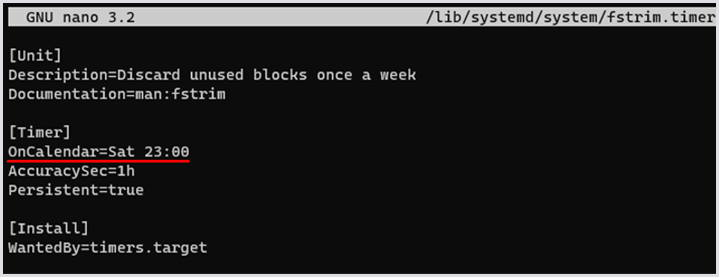
Changing the schedule
The script checks for support of discard operations and then enables a system timer for weekly trimming (by default, this is scheduled for Mondays at 12 PM UTC) if it is not already enabled.
If you prefer a custom schedule, you can modify the timing by editing the fstrim.timer file:
nano /lib/systemd/system/fstrim.timer

The timer is set up during the initial run startup, ensuring it applies both after updates and for new deployments.
If the timer has not been enabled, the script will execute the first trim operation itself. This is done to eliminate concerns that the initial scheduled trim might interfere with testing results, as it could execute while testing is in progress. By running the first trim when no services are active, subsequent scheduled trims can complete more quickly.

This feature operates quietly, meaning the process is fast, runs in the background, and requires no user interaction. The only indications that cleanup has been performed are terminal messages and entries in the log files. The response text from the cleanup of old Docker images is logged in loginvsi/update.log, while the output from filesystem trimming can be found in loginvsi/startup.log.

Updating Launchers
Launchers do not update automatically. You must manually update the Launchers, which is a straightforward task. We strongly recommend updating the Launchers after each Appliance update.
-
Disable all active environments to prevent them from launching sessions during the update process.
-
Log in to the Launcher machine and close the 'Login Enterprise Launcher' application.
-
Once completed, you can download the new Launcher files from the Login Enterprise sidebar menu > Launchers > Download Launcher setup, e.g., https://myvirtualappliance/configuration/launchers location.
.png?cb=eb68e563114e616f3c24057e2447eda7)
-
After downloading, extract the ZIP file and run the 'Setup.msi'.
-
Once installed, you can enable the environments to resume operation, and the Appliance will continue from where it left off.
For more detailed information, see Launchers Overview and Best Practices.
Additional Resources
-
To learn how to back up and recover your Appliance, see Performing Appliance Backup and Recovery.
-
For information on the Login Enterprise Windows Launcher, see Configuring the Windows Launcher.
-
For information on the Debian update, see Updating Debian on the Appliance.
-
For the Login Enterprise licensing information and updates, see Managing Licenses.
-
To learn about SLA reporting, see SLA Reports.