Overview
The Provisioning Policies page provides an overview of all Windows 365 provisioning policies across tenants where the feature is enabled.
You can use this page to:
-
Search and review existing policies
-
Understand how Cloud PCs are configured
-
Delete policies that are no longer needed
Search
Use the search field to locate a specific policy by: Tenant, Name, Image, Created by, Azure network connection, etc.
Provisioning Policies Table
The table lists all provisioning policies with the following columns:
|
Column |
Description |
|---|---|
|
Tenant |
The tenant where the policy is applied |
|
Name |
Name of the provisioning policy |
|
Image |
The OS image assigned to the policy |
|
Experience |
Whether users get a full desktop or access to cloud apps only |
|
Image status |
Status of the image assigned to the policy |
|
Created by |
Administrator or service that created the policy |
|
License type |
Type of license assigned to the policy |
|
Azure network connection |
The Azure network used by Cloud PCs created with this policy |
|
Assigned |
Indicates whether the policy is currently assigned to users or groups |
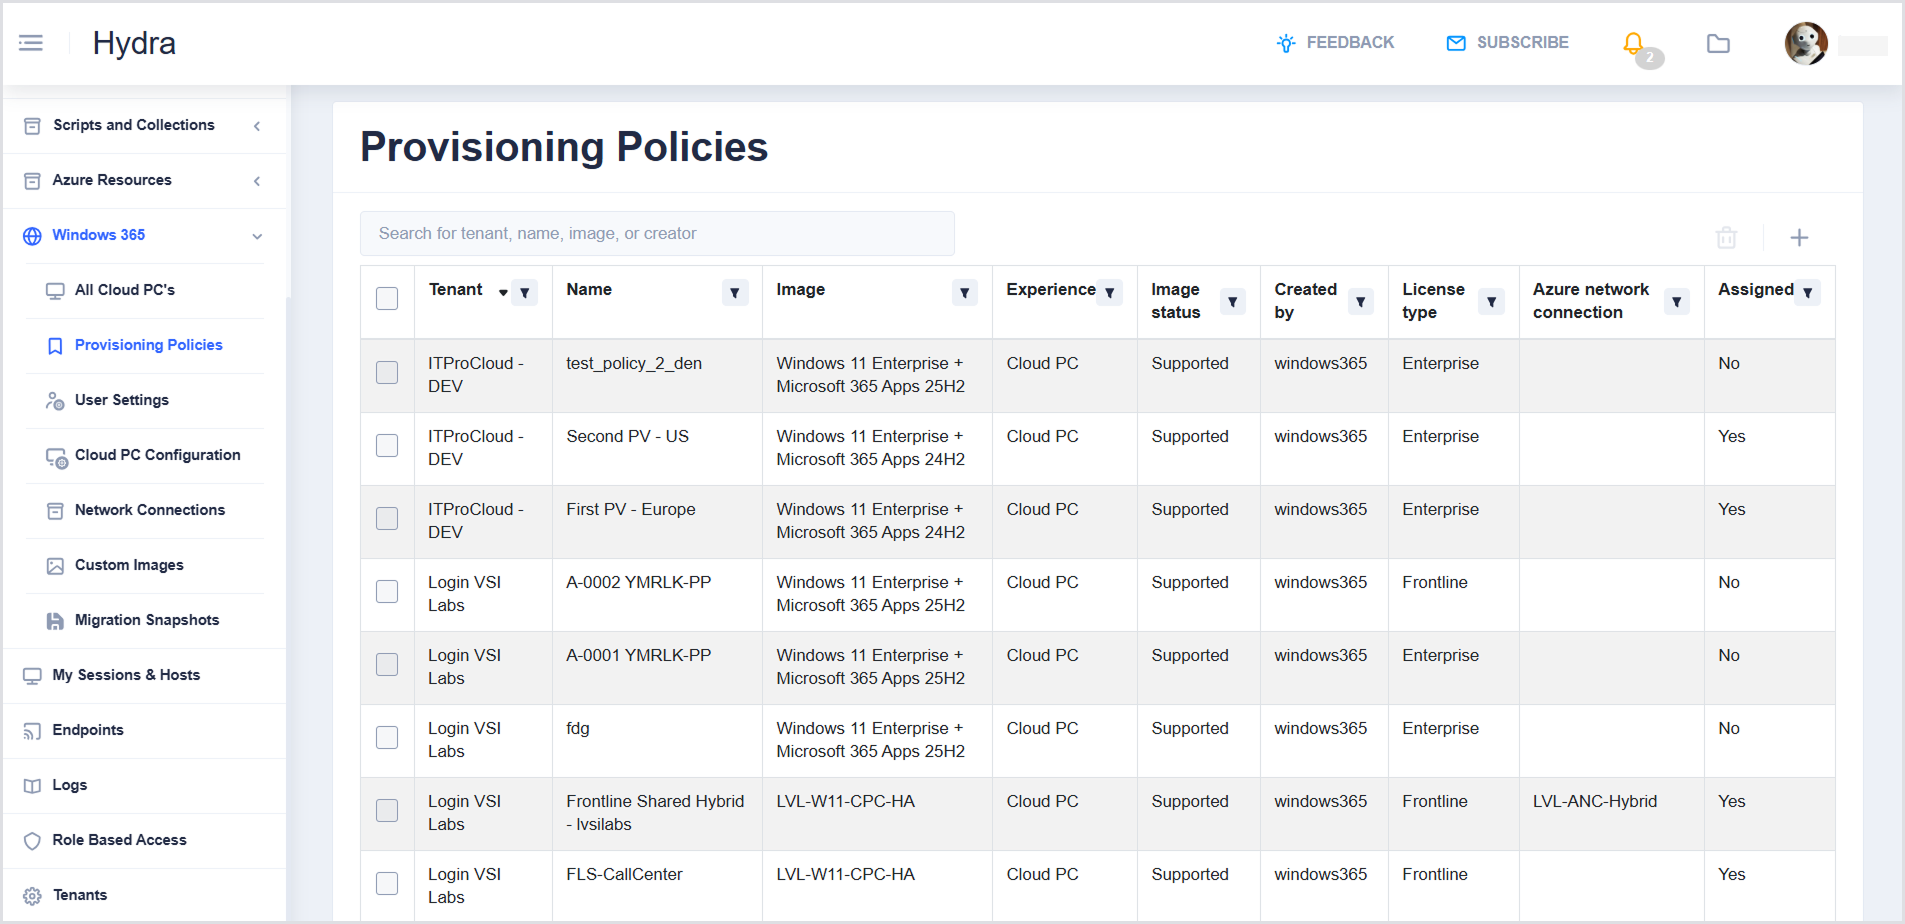
Each column has a Filter icon that allows you to search, select all, or select specific values for that column.
Creating a Provisioning Policy
To create a new provisioning policy, click the + icon in the top-right corner of the table. The Create a provisioning policy window opens with several tabs guiding you through the setup.
Settings
This is where you define the core behavior of the Cloud PCs created by this policy.
General
-
Tenant: Select the tenant where the policy will be applied
-
Name: Enter a name for the policy
-
Description: (Optional) Add a description
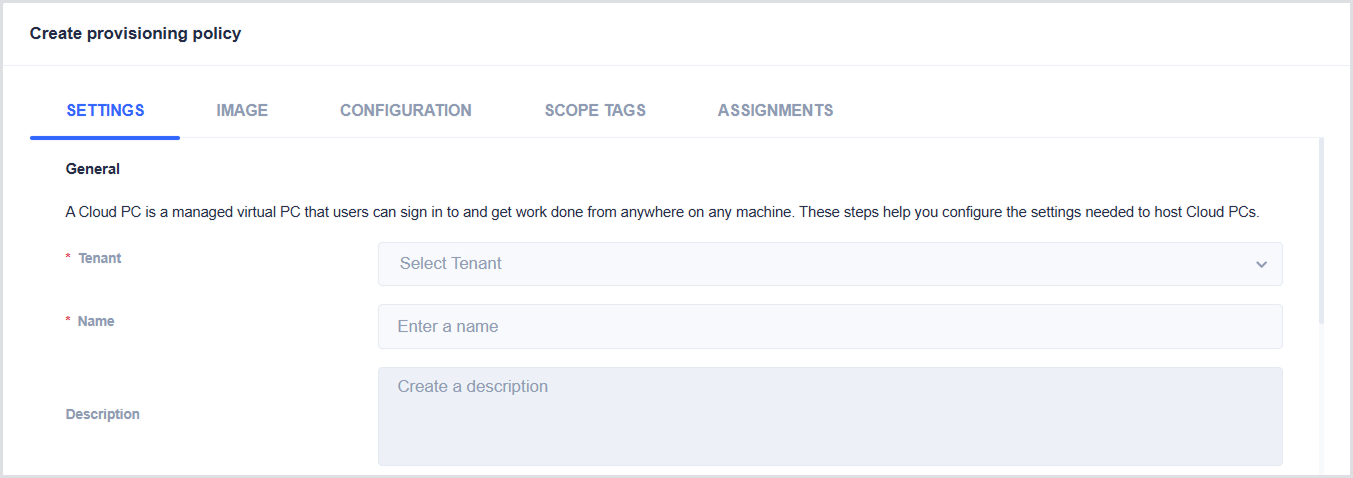
Experience
Select how users will access their Cloud PCs:
-
Full Cloud PC desktop: Users get a complete Windows desktop experience.
-
Cloud apps only: Users access individual applications running in the cloud.

License Type
The available license options depend on the experience you selected:
-
For Full Desktop Access, you can choose from 3 license types, such as:
-
Enterprise
-
Frontline
-
Dedicated
-
Shared
-
-
Reserve
-
For detailed information on License Types, see Licence Type Definitions.
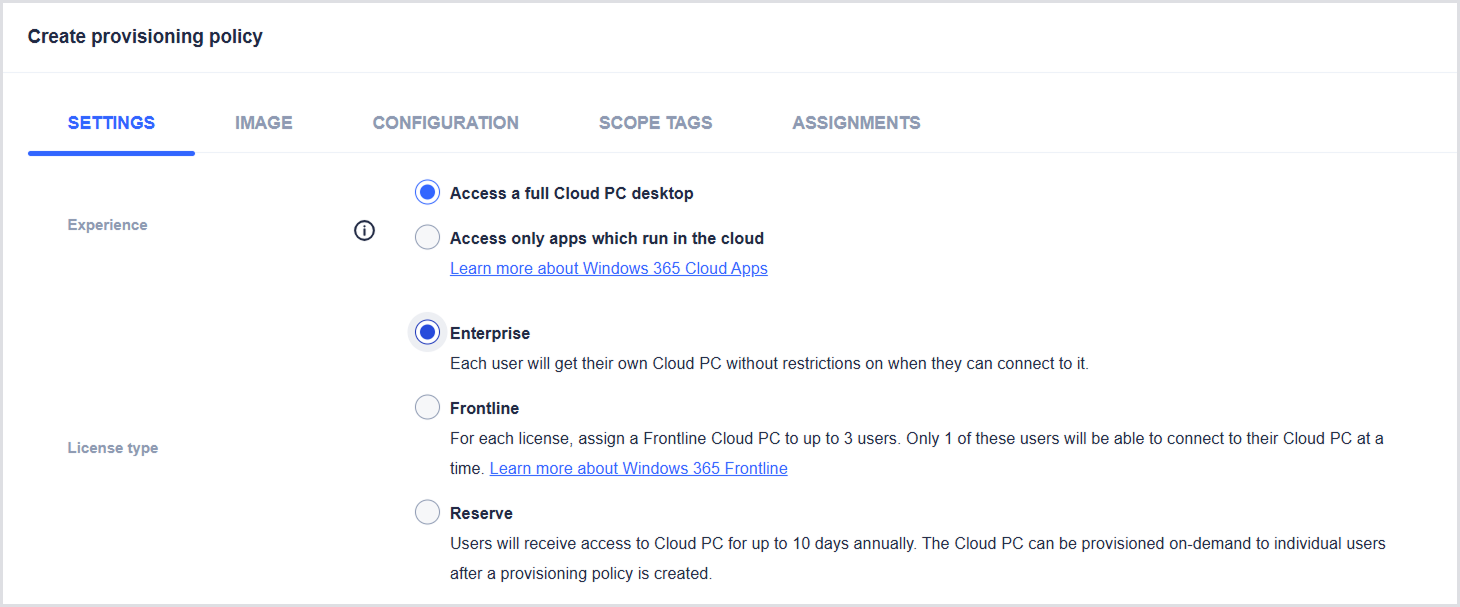
-
For Cloud Apps Only, a Frontline (Shared type only) is used.
Depending on the type of license selected (Enterprise or Frontline), you need to provide the join type details.
Join Type Details (Enterprise / Frontline Only)
This is where you need to select the join type for the Cloud PCs assigned to this policy. For details on the join types, see the Microsoft documentation.
-
Join type allows you to specify how the Cloud PC will be connected to the Microsoft Entra ID:
-
Microsoft Entra Join
-
Network:
-
Depending on the selection, configure:
-
Microsoft hosted network: Geography, Region groups/regions, and enable Microsoft Entra SSO.
-
Azure network connection: Select the connection and enable Microsoft Entra SSO. For more information, see Network Connections.
-
-
-
-
Hybrid Microsoft Entra Join
-
Azure network connection: Select the connection and enable Microsoft Entra SSO.
-
-
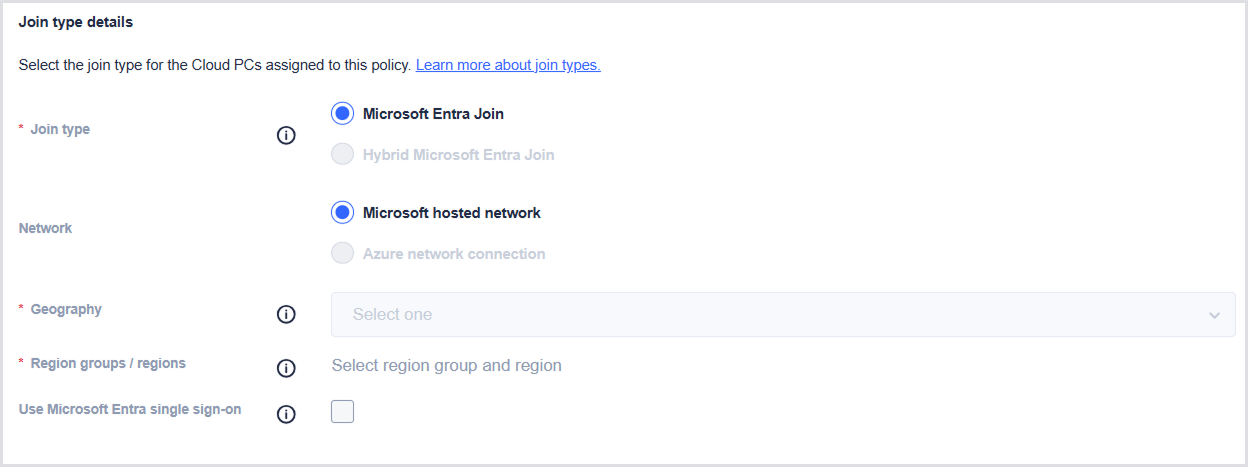
If you select the license type as Reserve, additional configuration is as follows:
-
Geography: Select a region
-
Use Microsoft Entra single sign-on: Select the checkbox if you want to use a single prompt to authenticate users for Windows 365 and their PCs.

-
Finally, click Save. The next step is to select an Image.
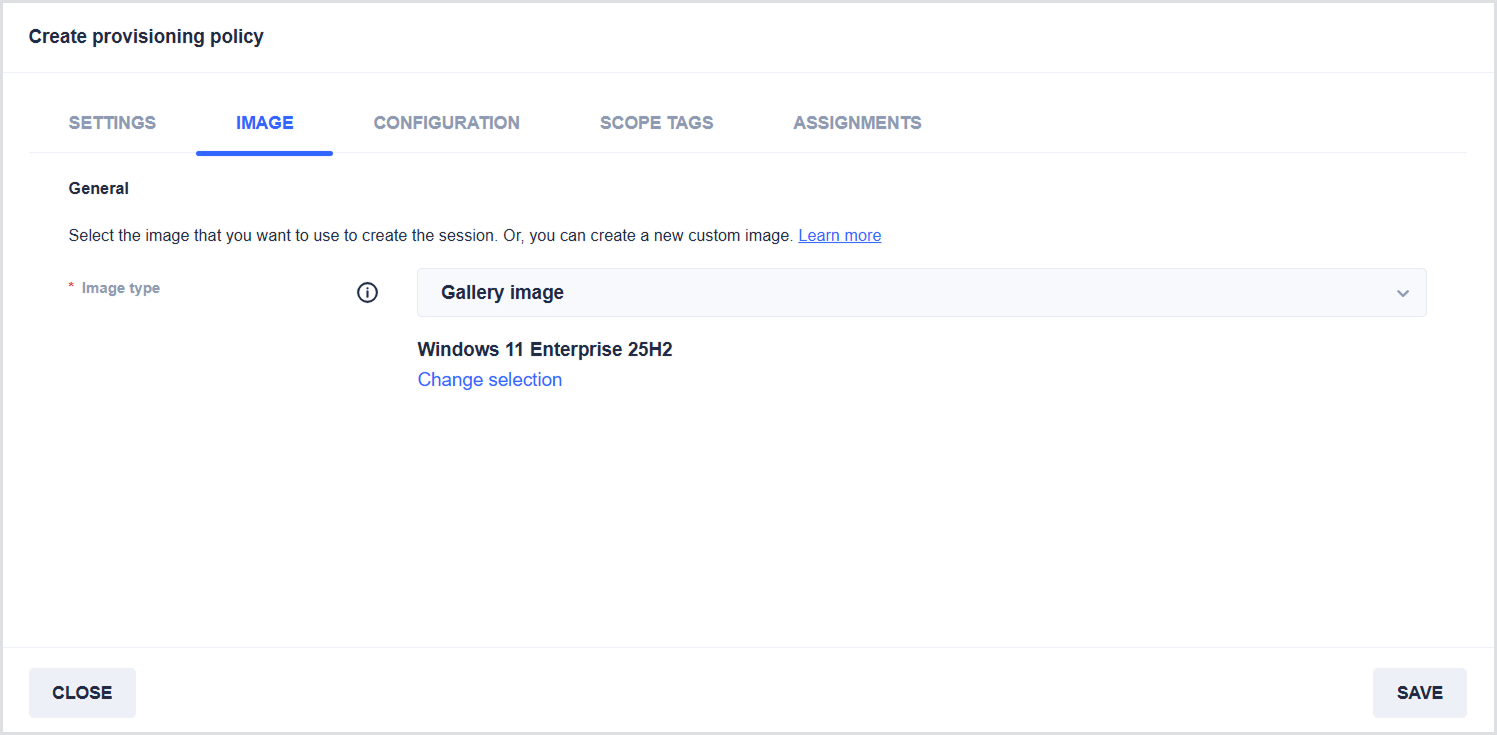
Image
In this step, you select the image that will be used to provision Cloud PCs. To select an image:
-
Next to Image type, select the type of image:
-
Gallery images: Provided by Microsoft.
-
Custom images: Created and uploaded by your organization. For more information, see Custom Images.
-
-
Click Select image.
-
From the list, choose the image you want to use, then click Select.
-
Click Save.
After saving, proceed to the next step: Configuration.
Configuration
In this step, you configure how Cloud PCs are set up, including Windows settings, Cloud PC naming, and Windows Autopilot (Preview).
Windows settings
In Language & Region, select the preferred language and region (or country) for Cloud PCs. Your selection will apply to all Cloud PCs created using this policy.

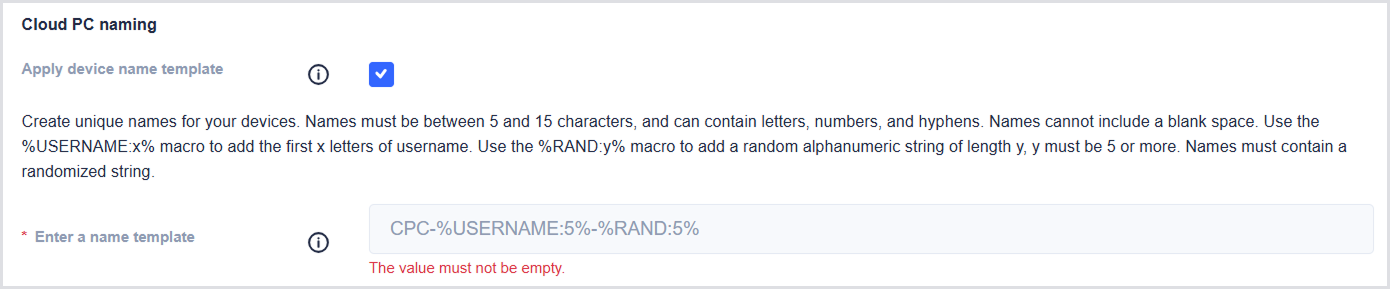
Cloud PC naming
You can define a naming template for Cloud PCs created with this policy. To configure device naming:
-
Select the Apply device name template checkbox.
-
In the Enter a name template, provide a naming pattern using the following rules:
-
Must be between 5 and 15 characters.
-
Can include letters, numbers, and hyphens.
-
Spaces are not allowed.
-
Must include at least one randomized string.
-
Supported macros:
-
%USERNAME:x%Inserts the first x characters of the username. -
%RAND:y%Inserts a random alphanumeric string of length y (y must be 5 or more).
-
-
-
Windows Autopilot (Preview)
Use this section to link an Autopilot device preparation policy to ensure Cloud PCs are ready for users after provisioning.
-
In Autopilot Device preparation policy, select Automatic Device Proflie from the dropdown.
Note: Only 'Automatic' device preparation policies are supported.
-
In Minutes allowed before device preparation fails, select a value between 30 and 360 minutes.
-
This defines how long Windows 365 waits for apps and scripts to complete before timing out
-
-
Select Prevent users from connecting to Cloud PC upon installation failure or timeout to control user access:
-
Selected:
-
Cloud PCs that fail preparation are marked as Failed
-
Users cannot connect
-
-
Not selected:
-
Cloud PCs are marked as Provisioned with warnings
-
Users can still connect
-
-
-
Click Save.
After saving, proceed to the next step: Scope Tags.
Scope Tags
In this step, you assign scope tags to control which administrators can view and manage this provisioning policy. To add scope tags:
-
In the Search field, type the name of a tag to find it
-
Select the checkbox next to the desired tag(s)
-
Or select the checkbox to choose all available tags.
-
After selecting the required scope tags, proceed to the final step: Assignments.
.png?cb=3ad8bbc2cc0a6e0dc513e8e9b90513b5)
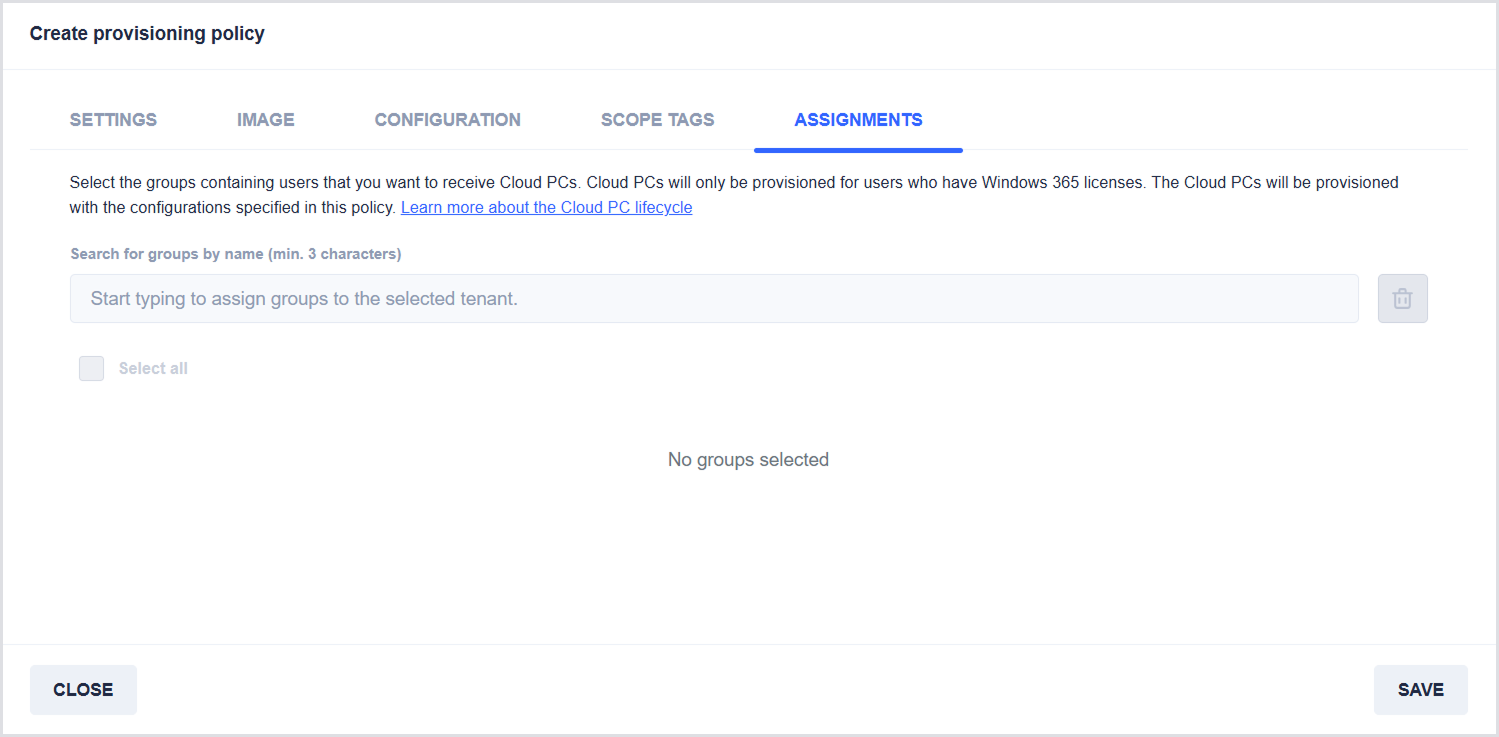
Assignments
In this step, you select the groups whose users will receive Cloud PCs.
Cloud PCs are provisioned only for users who have valid Windows 365 licenses and will be configured according to this provisioning policy. To assign groups:
-
In the Search field, type the name of a group to find it.
-
Select the checkbox next to the desired group(s).
-
Or select the checkbox to choose all available groups.
-
-
Click Save to apply the provisioning policy configuration.
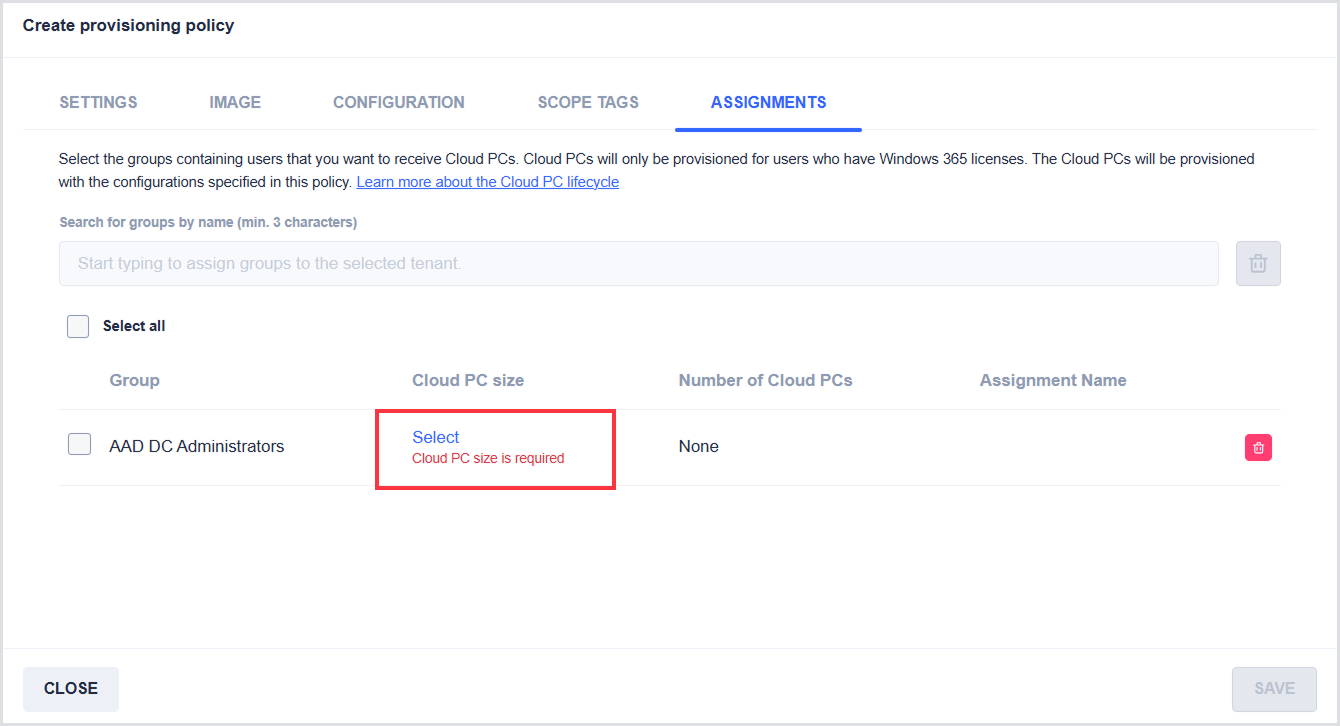
Frontline License Scenario
If you selected a Frontline license type in the Settings step, additional configuration is required when assigning groups.
After adding a group:
-
Under Cloud PC size, click Select.
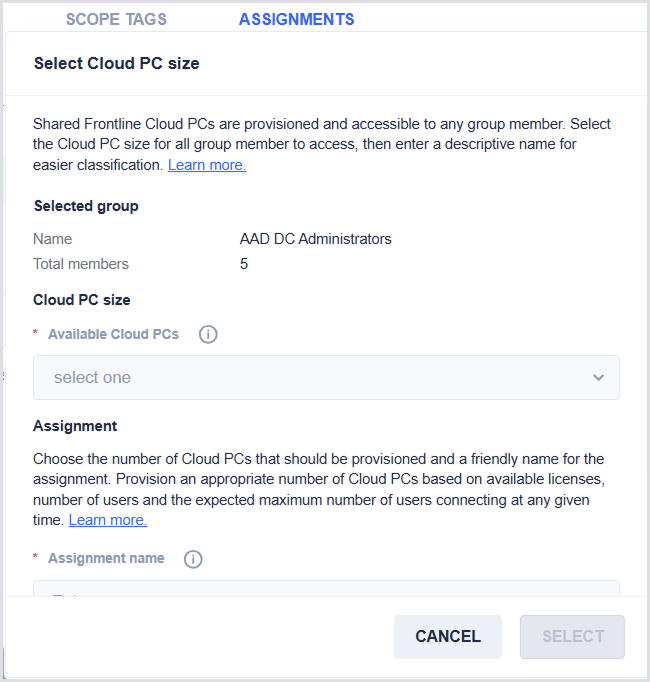
-
In the Select Cloud PC size window:
-
Under the Selected group, view the selected group details:
-
Name
-
Total members
-
-
In Cloud PC size, choose a Cloud PC size from the available options. Note: Availability may take time to update after recent changes.
-
In the Assignment, configure how shared Cloud PCs will be allocated:
-
Assignment name
-
Enter a friendly name to help identify this assignment in reports within the Intune portal.
-
The name cannot contain the following characters:
< > ( ) $ | , ; " ^ -
The name cannot start or end with spaces.
-
-
Number of Cloud PCs
-
Specify how many Cloud PCs to provision.
-
Must be between 0 and 900.
-
Cannot exceed the number of available shared licenses.
-
-
-
-
Click Select to confirm the assignment.
Appendix
License Type Definitions
-
Enterprise: Each user will get their own Cloud PC without restrictions on when they can connect to it.
-
Frontline: For each license, assign a Frontline Cloud PC to up to 3 users. Only 1 of these users can connect to their Cloud PC at a time. For information on Windows 365 Frontline, see the Microsoft documentation.
-
Type
-
Dedicated: Recommended for users who need part-time access to their Cloud PCs or follow a set schedule, such as shifts. A single license lets you provision up to three Cloud PCs that can be used non-concurrently, each assigned to a single user. Provides one concurrent session.
-
Shared: Recommended for users who use Cloud PC for a short period of time and do not require data to be preserved. A single license lets you provision one Cloud PC that can be shared non-concurrently among a group of users. Provides one concurrent session.
-
-
-
Reserve: Users will receive access to Cloud PC for up to 10 days annually. The Cloud PC can be provisioned on demand to individual users after a provisioning policy is created.