Overview
The Hydra Proxy is an agent that executes actions on Azure Local and Azure Virtual Desktop (Hybrid) on behalf of the Hydra Instance. It acts as an extension for orchestrating hypervisors and enables features that are not available natively in Azure, such as local image creation on Azure Local.
Architecture
The Hydra Proxy runs on a server in the data center and orchestrates or interacts with local hypervisors for a custom location. A single Hydra Proxy installation can support multiple “custom locations” and nodes. You can install multiple Hydra Proxies for redundancy.
The Hydra Proxy communicates with the Hydra instance over WebSocket/HTTPS by using an outbound connection to http://<your-hydra-instance>.azurewebsites.net.
Technically, the Hydra Proxy is a Hydra Agent running in a specific mode. As a result, the application that hosts the Hydra Proxy must be configured to allow WebSocket connections.
The Hydra Proxy must be installed on a Windows Server. The server must be secured, and only a valid administrator should be able to log in. Never use a multi-user or terminal server.
Prerequisites for the computer hosting the Hydra Proxy
Install the following Windows features and capabilities:
Enable-WindowsOptionalFeature -Online -FeatureName Microsoft-Hyper-V-Tools-All
Enable-WindowsOptionalFeature -Online -FeatureName Microsoft-Hyper-V-Management-PowerShell
Add-WindowsCapability -Online -Name Rsat.FailoverCluster.Management.Tools~~~~0.0.1.0
A restart is required after installation.
Enabling Hydra Proxy in the Hydra Instance
To enable the feature, first activate it at the Global settings level:
-
Open Global settings from the application menu in the upper-right corner.
-
Select the checkbox next to Enable Hydra Proxy (Support Preview).

Enable Hydra Proxy in the Tenant menu
Then, enable the feature at the Tenant level:
-
Open the Tenant configuration from the application’s left-hand menu.
-
Select the checkbox next to Enable Hydra Proxy Support Preview.
-
The tenant menu will display the Get Hydra Proxy option, along with the download link and configuration settings.

-
Download the Hydra Proxy (Hydra Agent) and copy the installation parameter for later use.
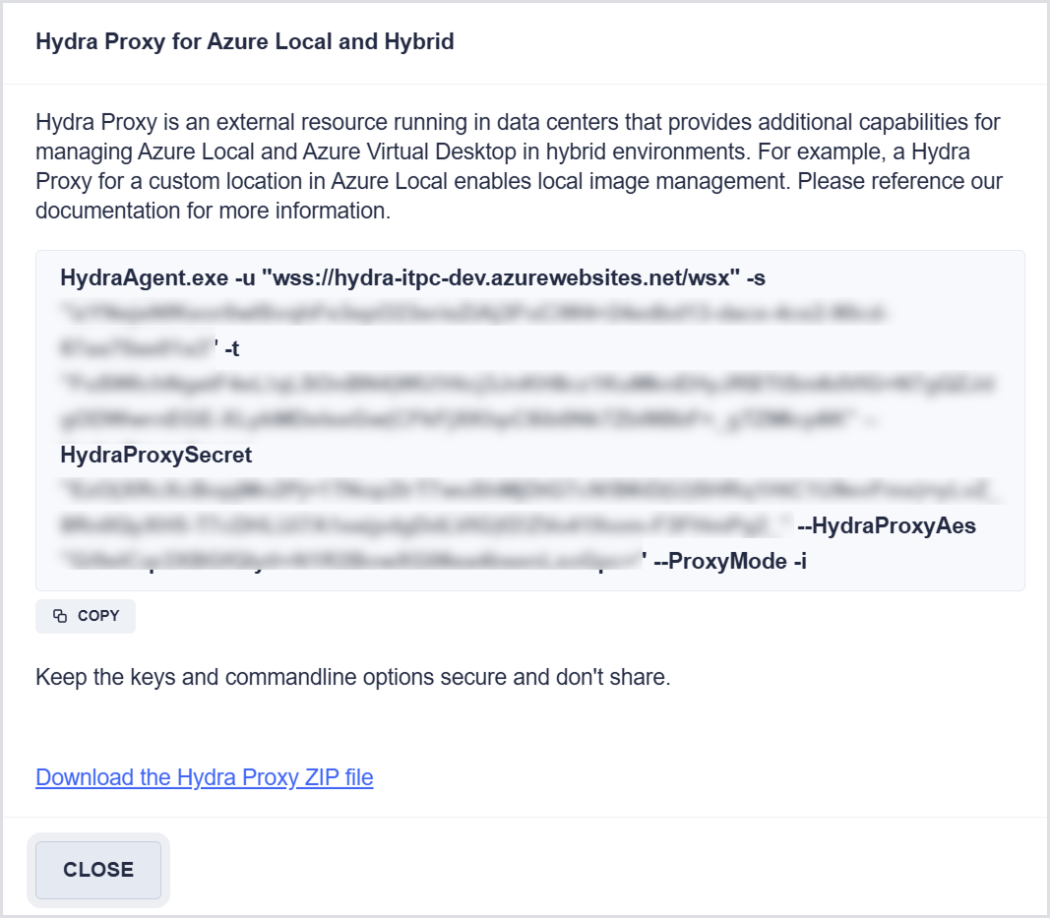
Only Full Admins in Hydra can get and configure this data.
Installing the Hydra Proxy
-
Create a folder for the Hydra Proxy, e.g., C:\Program Files\Login VSI\Hydra Proxy, and extract the file from the ZIP archive into it.
-
Create the configuration file named HydraProxy.json in the same folder, and open it in a text editor.
-
Paste the configuration content into the file and modify it as needed.
Here’s an example of HydraProxy.json:
{

  "CustomLocations": [

    {

      "LocationType": "AzureLocal",

      "LocationId": "/subscriptions/dcdce2ee-c9c0-4765-acd5-197126d21978/resourceGroups/Azure-Stack-HCI/providers/Microsoft.ExtendedLocation/customLocations/Cologne",

      "LocationName": "Cologne",

      "ClusterNodes": [

        "azlocal01.itprocloud.de", "azlocal02.itprocloud.de"

      ],

      "ClusterShares": [

        "C:\\ClusterStorage\\UserStorage_1\\e9fa154a447fff7",

        "C:\\ClusterStorage\\UserStorage_2\\e4d1dcac690e49a"

      ]

    }

  ]

}
-
LocationId must match the resource ID of the custom location shown in Azure LocationType: AzureLocal.
-
LocationName is the last part of the LocationId.
-
ClusterNodes specifies the fully qualified domain names (FQDN) of the Azure Local nodes.
-
ClusterShares specifies the path of the UserStorage folder, plus a random identifier.
First Test
-
To test the Hydra Proxy connection to Azure Local, run an administrative PowerShell as a user with local administrator permissions on the Azure Local nodes (e.g., azlocal01.contoso.com)
For security reasons, it is not recommended to teach Windows to access the nodes in your user context. If necessary, this can be done using the following commands:
cmdkey.exe /add:azlocal01.contoso.com /user:domain\username /pass:xxxxxxxxxxxxxxxx
cmdkey.exe /add:azlocal02.contoso.com /user:domain\username /pass:xxxxxxxxxxxxxxxx
You can validate the connection by opening a file share on a node and running:
\\azlocal01.contoso.com\c$
-
Start the Hydra Proxy using the command line you captured from the Tenant menu, but omit
/ito prevent installation. This allows you to run it interactively.
The expected output, including the number of VMs detected on Azure Local, should look as follows:
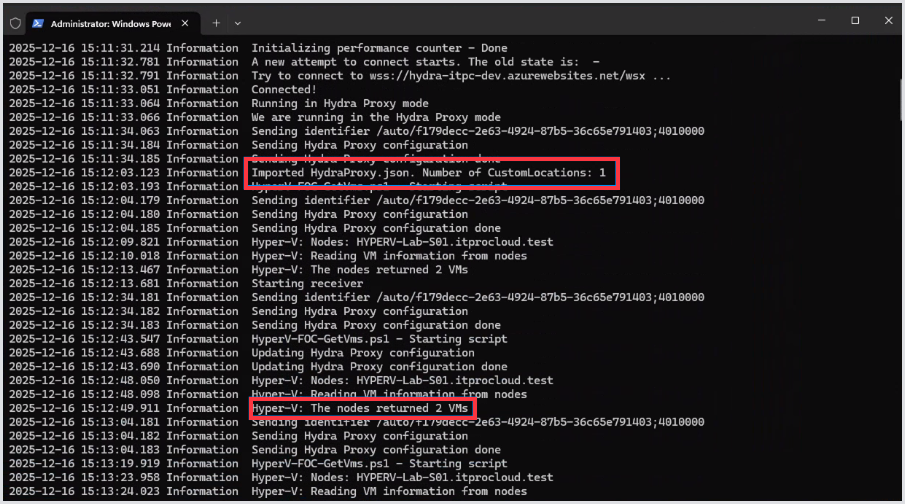
If the number of returned VMs is 0, and you know this is incorrect, first verify that you can retrieve the data using an administrative PowerShell session in the same context:
Get-Vm -ComputerName azlocal01.contoso.com
-
If the data is correct, confirm that the Hydra Proxy can communicate with the Hydra backend. Open the Hydra instance in a browser and add the path, as shown in this example:
https://<your-hydra-instance>.azurewebsites.net/debug/ws
The Hydra Proxy should appear after a few seconds. Refresh the page if it does not appear immediately.
-
Let the Hydra Proxy run.
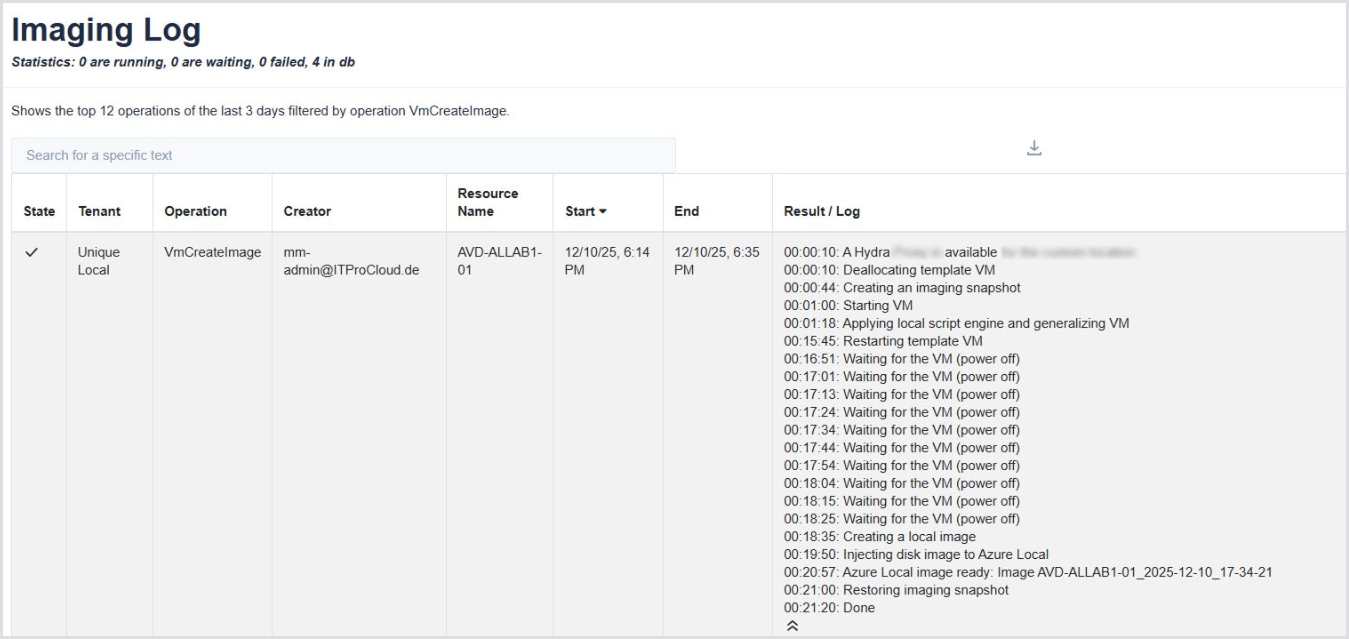
Creating a local image
You can capture an ARC-enabled VM that appears in the Azure Portal using the Hydra Proxy.
-
In Hydra, go to Image Builder > Create an Image and select your tenant.
-
If the Hydra Proxy is working correctly, the Hybrid Imaging Location list box will display your custom locations.
-
Select a custom location supported by the Hydra Proxy. The Virtual Machine selector will then show the local VM instead of Azure VMs.
-
Select your Template VM on Azure Local, choose a resource group to store the image, and click Create Image.
Installing the Azure Proxy
The Hydra Proxy can be installed using the full command-line string, including /i. This creates a scheduled task named “ITPC-AVD-Hydra-Helper”. A logfile is written to the installation folder, with additional logs to “C:\windows\System32\LogFiles\HydraProxy”.
While the scheduled task runs in the system context (and no longer in your context), this may prevent the Proxy from accessing Azure Local. To resolve this, change the task to run under a functional user account with local administrator permissions on both the server hosting the Hydra Proxy and the Azure Local nodes.
Alternatively, you can run the same cmdkey commands in the system context. This is not recommended because it grants any service or application running in the system context access to the nodes.
To run cmdkey in the system context, use PSExec from Microsoft.