Overview
The Web Recorder v1 is a tool integrated into the Script Editor to capture user interactions within web applications. Web scripts recorded with the new Web Recorder use Playwright. This version supports a subset of actions and is optimized for browser-based apps. Some features are still under development, and limitations are described in the related section.
-
For general information on the Script Recorder and related use cases, see Using the Script Recorder.
-
For an overview of Playwright functions, the specific commands used to automate and interact with web applications using Web Recorder v1, see Web Recorder Functions (Playwright). In most cases, you do not need to work with those functions directly if the recording plays back successfully as captured. That page is intended primarily as an advanced reference for users who need to review, adjust, or extend recorded functions.
Getting Started
Download the latest Script Editor package containing the Web Recorder v1 from your admin or setup email. For details, see Downloading and installing the Script Recorder.
Creating a New Application
-
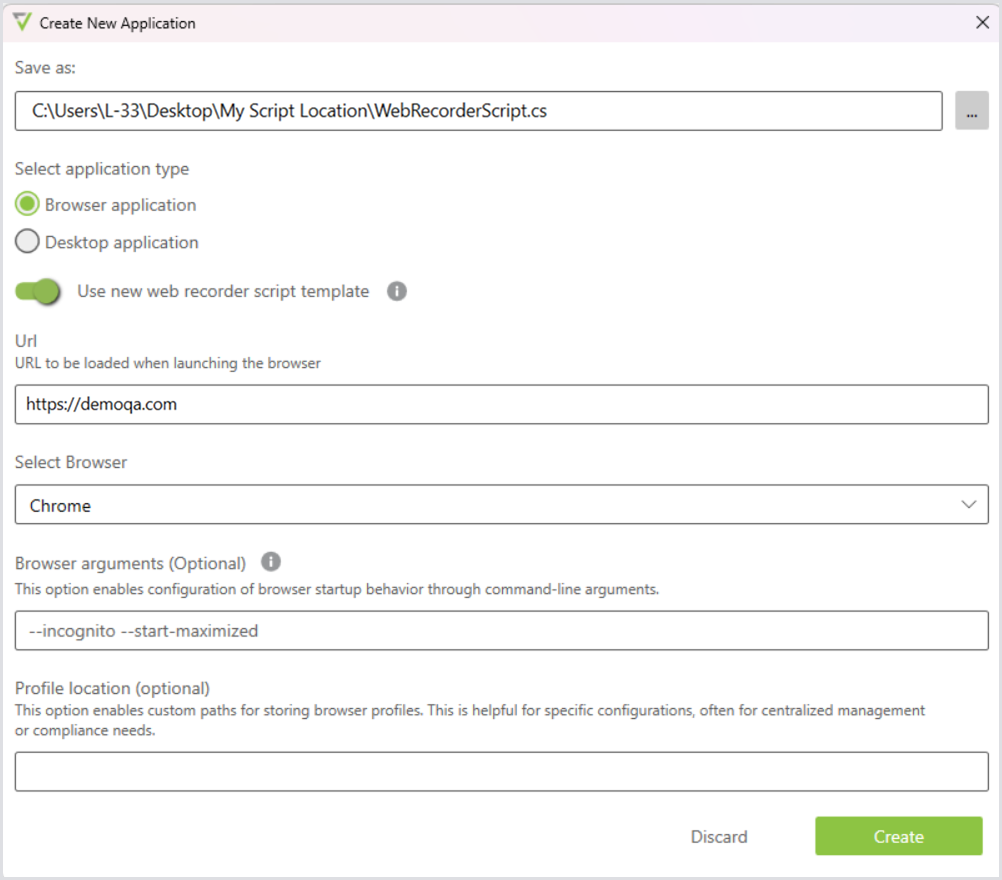
In Script Editor, click Create a new Login Enterprise Application.
-
Click the three-dot icon to the right of Save as, choose a folder for the script, and enter a file name.
.png?cb=57336d1e742a60413903ea6834aac358)
-
In the Select application type, select Browser application.
-
Next to Use new web recorder script template, enable the toggle to use the Web Recorder, which creates the web script in Playwright format.
-
In the URL, enter the start page of your web application.
-
In the Browser, select your preferred browser, e.g., Chrome.
-
In Browser arguments (Optional), configure how the browser starts by entering command-line arguments, if needed. For example, you can add flags to enable specific features or disable extensions. For more information, see Using Browser Arguments via a Magic Comment.
-
In the Profile location (Optional) field, enter a custom path for storing the browser profile if your environment requires centralized management or compliance-related configurations. Otherwise, leave this field blank.
-
Click Create to generate the script template. Once the template is created, the Record button appears; click it to start the new recording session.
The Web Recorder uses the default browser installed on your machine.
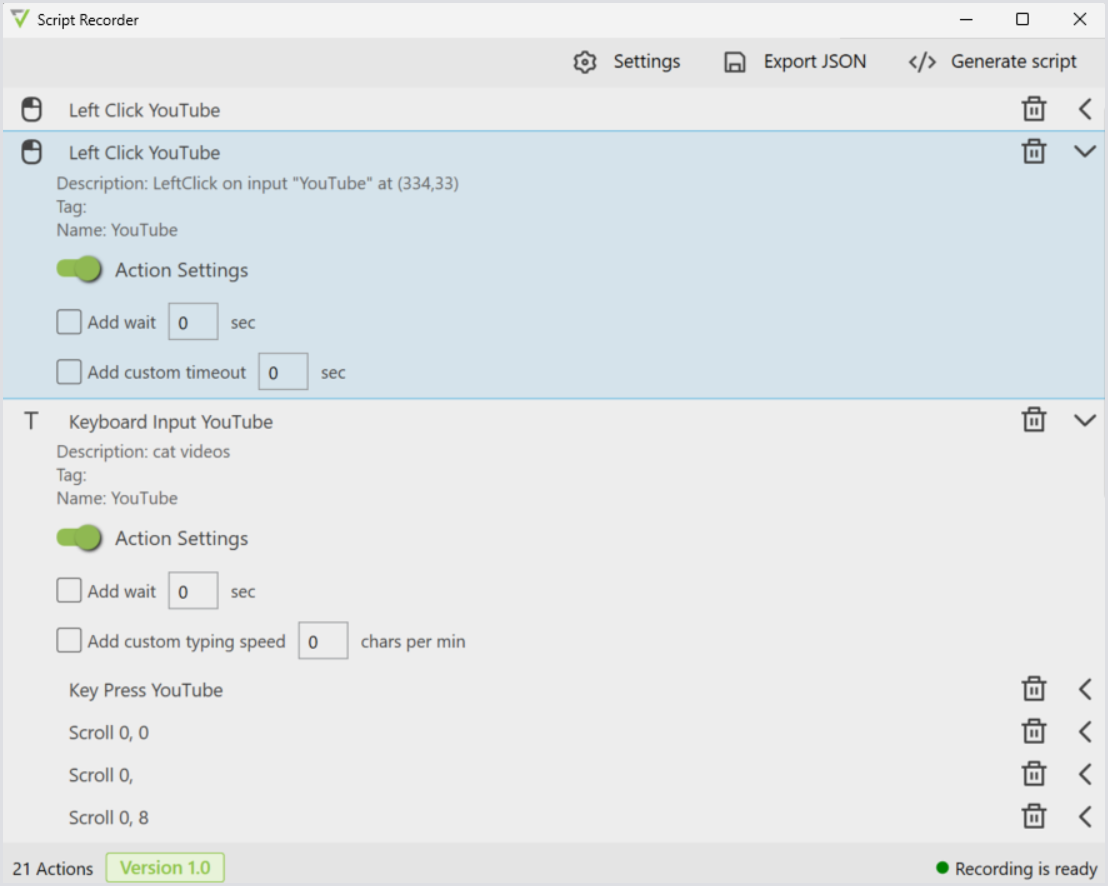
Starting the Recording: Recording the Script
-
Click Record in the Script Editor toolbar to begin recording.
.png?cb=d3f38831f98deda909cbac703f24317d)
-
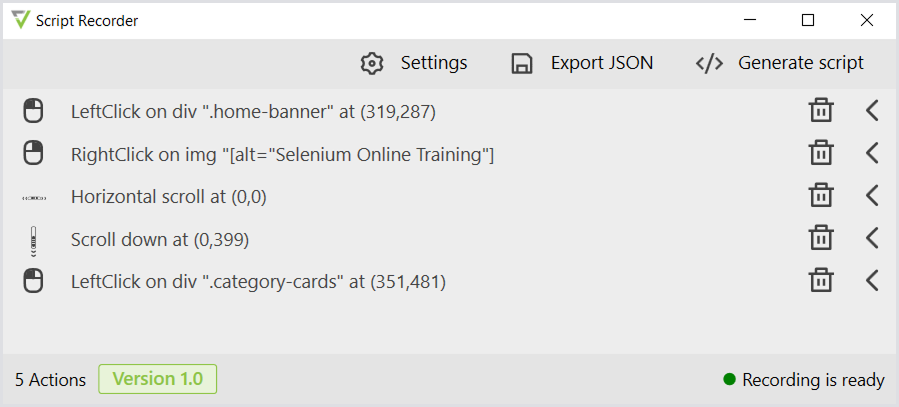
Supported actions:
-
Mouse scroll
-
Left click
-
Right click (Browser context menu clicks are not supported)
-
Double click
-
Typing and special keys (Enter, arrows, etc.)
-
Hover actions using the hotkey Alt + H
-
Browser JavaScript popups (alert, confirm, prompt)
-
Interactions within iFrames
-
Browser arguments
-
-
When hover capture is enabled, all hover events are recorded until you disable it. Use this feature carefully, as there are no visual indicators when it is active. Hovering over an element before enabling the hotkey will not capture it; you must move away and back.
-
You can adjust waits and timeouts after the recording is complete and before generating the script. By default, the recorder applies a 2-second wait and a 5-second timeout to each step. You can change these default values in the General Settings, or modify them per step by expanding the step and updating the values manually.
Stopping the Recording: ScriptResultWindow
-
Click Stop to end the recording.
-
The recorded script appears in the ScriptResultWindow.
Settings
You can adjust general settings and settings specific to each action. General settings apply to all actions. Per-action settings apply only to the chosen action.
General
-
Waits: Adds a pause after each recorded step in the script.
-
CPM (Characters Per Minute): Adjusts typing speed. The default is 300 characters per minute. If you leave this box unchecked, the default value will be used. If you select this checkbox, the CPM value will appear in the script.
-
Timeout: Specifies how long the script will attempt to locate the recorded UI element before a timeout occurs and the script stops. The default timeout is 5 seconds. You can set a different timeout value in the corresponding field if needed.

Action
-
Typing
-
Waits
-
CPM
-
-
All Other
-
Waits
-
Timeout
-
Waits add a pause after a step and are mainly used to make script execution more realistic. Avoid adding waits between timed (Timer) actions if they would artificially increase the recorded measurement.
Timeouts define how long a function should keep retrying before it fails. Set a timeout to the maximum realistic time that the action should take in your environment.
-
Click Generate Script in the top-right corner of the window, then click Copy to Clipboard.

-
Paste the recorded script between the
StartBrowserandStopBrowserfunctions. -
Click Run to execute the script.
.png?cb=a184c8993c8523ef73103b556e878fbc)
Exporting the Script as JSON
This option provides additional information on script failures, facilitating feedback submission and analysis.
Importing the Script as JSON
Alternatively, if you already have an existing script recording (JSON file), click Import recording in the Script Recorder top menu and proceed with the steps described above.
If you have questions or need additional information on specific Script Recorder functions, feel free to get in touch with our support at support@loginvsi.com.
Restrictions and Limitations
|
Aspect |
Details |
|---|---|
|
Supported applications |
Browser-based only. Browser apps such as Teams and Spotify are not supported. |
|
Supported functions |
Not all functions are supported in the new template. For details, see the Web Recorder Functions (Playwright). |
|
Framework used |
Uses the Playwright framework. Mixing Playwright scripts with Selenium or WinApps scripts is unsupported. |
|
Missing features |
Run and record toggle, click coordinate settings, and mouse movement playback (from WinApps recorder). |
|
Unsupported actions |
Mouse drag, multi-tab recording, right-click browser menu, key combinations (e.g., Ctrl+C/V). |
|
UI feedback |
No blinking highlights on components during recording. |
|
Wildcard selectors |
Not supported. |
|
Web Recorder script template |
Code snippets captured by X-Ray are not supported. |
Recommendations
|
Recommendation |
Explanation |
|---|---|
|
Browser installation |
The Web Recorder will use the browser installed on the machine where the script is run. To ensure reliable playback, make sure a supported browser is installed on all machines where the test will run. |
|
Script management |
Export and import scripts regularly. |
|
Script compatibility |
Avoid mixing different script engines and script types within your projects. |
|
Cookie pop-ups |
We recommend waiting a few seconds before interacting with cookie pop-ups, as the recorder may need time to detect them. |
|
Hover recording |
Alt + H captures the hover action for the element your cursor is on at the moment you press the hotkey. Place your cursor on the desired element and press Alt + H to record the hover. |
|
New recordings |
Web scripts created with the new Web Recorder use Playwright. Older Selenium-based web workloads are still supported for backward compatibility. However, for new recordings, we recommend using the new Web Recorder because the Playwright-based format is more modern and generally more resilient. |
Tutorials
Using Browser Arguments via a Magic Comment
You can pass arguments to the browser by using a magic comment in your script. This allows you to control how the browser behaves during recording and playback.
The most common use cases include:
-
Recording and playing back web applications in incognito or private mode.
-
Recording and playing back with the browser window maximized.
This feature also supports any other valid browser arguments.
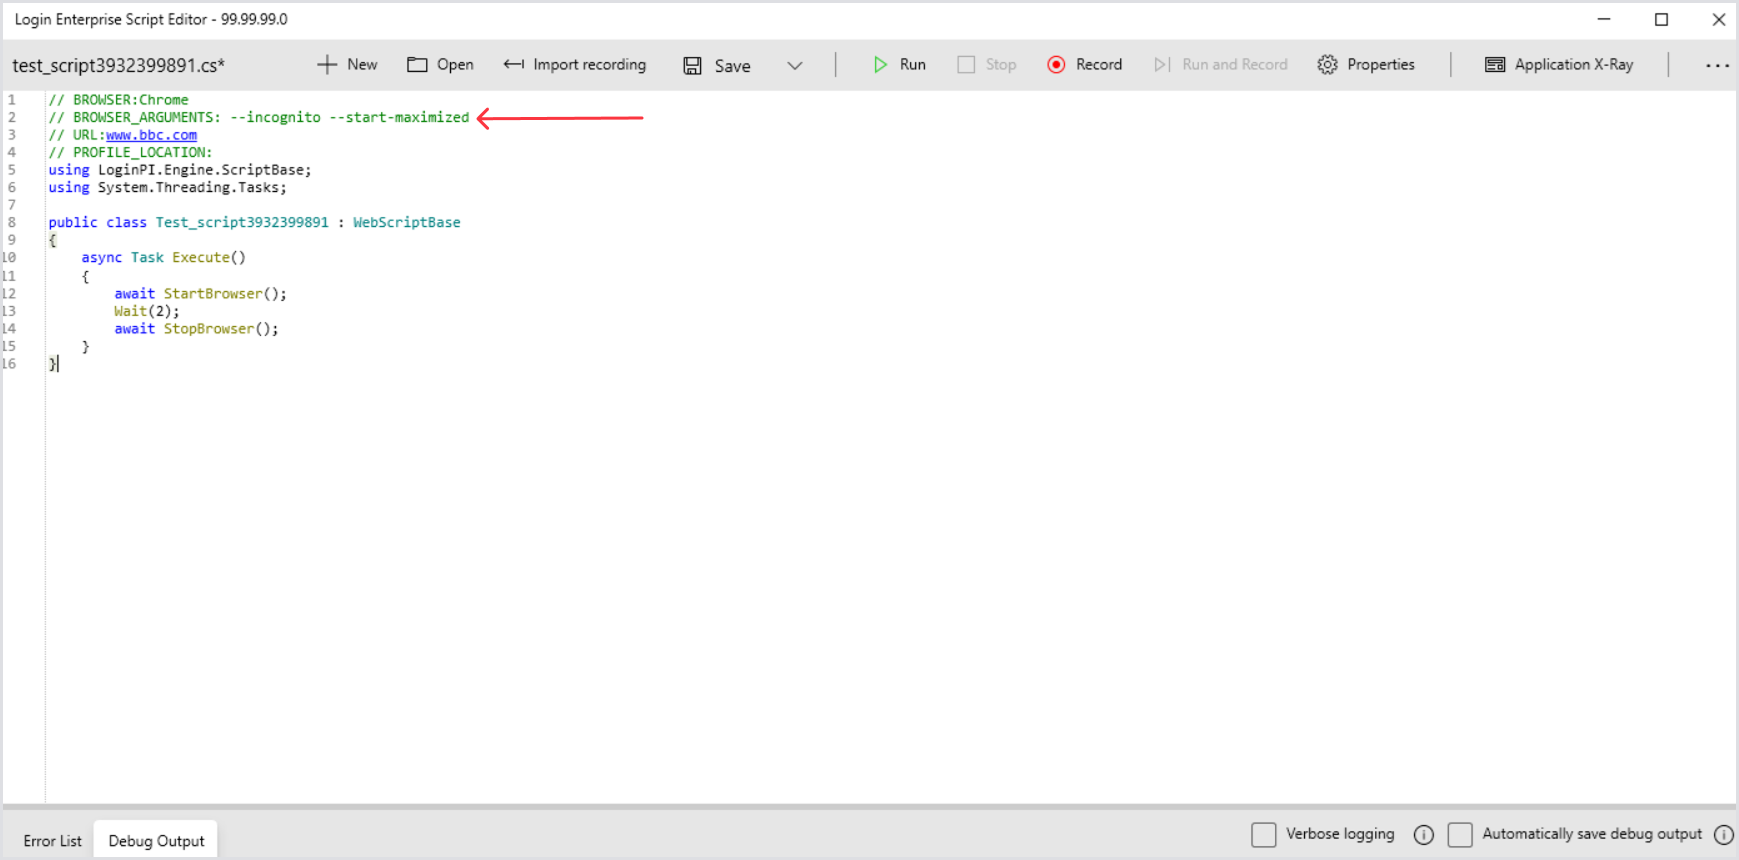
How to Use
Insert the magic comment at the top of your script with the appropriate browser arguments. See the screenshot below for an example.
Browser arguments may vary depending on the browser type.
Make sure to use the format required by your browser.
Examples
Chrome
--incognito --start-maximized
Edge
--inprivate --start-maximized