
Installing the Hydra Preview Version
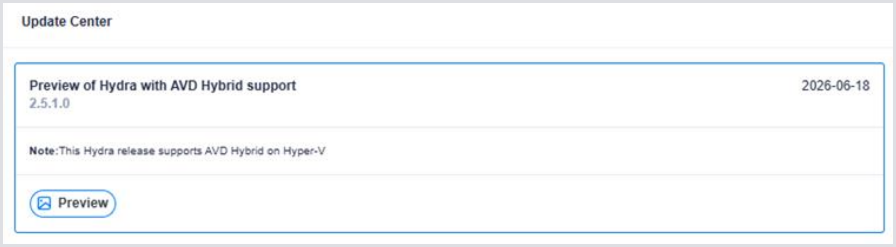
Hydra version 2.5.1 is the preview version of Hydra supporting Microsoft’s Public Preview of AVD Hybrid on Hyper-V nodes and clusters. If we have received your Azure Tenant ID and Hydra Instance name, you should see the Preview version available for installation in the Hydra Update Center. For this, click on the avatar icon in the top left of the Hydra UI and select Update Center.
Using the Hydra Proxy
We are using our Hydra Proxy feature to perform operations on-premises on behalf of the Hydra instance running in Azure. For more information on Hydra Proxy, see Installing and Using the Hydra Proxy (Preview).
When using AVD Hybrid, the Hydra Proxy is responsible for:
-
Starting VMs
-
Stopping VMs
-
Restarting VMs
-
Deleting VMs and their disks
-
Creating new VMs / session hosts, including
-
Azure Connected Machine Agent (ARC) Installation
-
Azure Virtual Desktop (AVD) Agent
-
Domain join (AD and Entra)
-
Azure Monitoring Agent (if selected)
-
-
Imaging of existing Golden Master VMs (note: a Golden Master VM must have the ARC agent installed)
-
Etc.
Grouping Hybrid Locations in Hydra Proxy Configuration File
The Hydra Proxy can handle multiple groups of Hyper-V nodes (servers) as a “Hybrid Location”. All nodes in a group are represented by their Location ID. That is similar to custom locations as it relates to Azure Local. The group of nodes can also be part of a failover cluster.
Note: Don’t mix clusters and nodes across different Hybrid Locations.
Preparing Hyper-V Nodes
All Cluster Nodes and stand-alone Hyper-V servers must be configured similarly:
-
At least one Network Switch with the same name across all nodes
-
One or more local folders to store the virtual machines. (Note: SYSTEM, SERVICE, and Administrators should have FULL CONTROL access to those folders):
-
C:\LocalStorage (for nodes without cluster shares)
-
C:\ClusterStorage\UserStorage_1 (for nodes with cluster shares)
Preparing an Image Gallery
Hyper-V Virtual Machine images are sysprep’d VHDX files. Hydra needs a shared resource to store those files. For a stand-alone Hyper-V server Hybrid Location, a local folder would work. For clusters with multiple nodes, use a cluster share, or a share on a file server. (Note: SYSTEM, SERVICE, and Administrators should have FULL CONTROL access to those folders). If a network share is used, add the Everyone full permission (to let the NTFS permission apply). To access the network share, each node needs permission to this share in the right context.
Examples:
-
C:\LocalStorage\Images
-
C:\ClusterStorage\UserStorage_1\Images
Installing the Hydra Proxy
-
To start, enable and install the Hydra Proxy (always use the newest version for this preview). For steps, see Installing and Using the Hydra Proxy (Preview).
Note: Follow the documentation through the step that creates the HydraProxy.json file. Then, continue to step 2 below.
-
For AVD Hybrid, add a new custom location.
Here is an example:
{
   "CustomLocations":[
      {
         "LocationType":"HyperV",
         "LocationId":"almere-datacenter",
         "LocationName":"Almere",
         "ClusterName":"HYPERV-ALMERE.almere.nl",
         "ClusterNodes":[
            "HYPERV-ALMERE-0.almere.nl",
            "HYPERV-ALMERE-1.almere.nl",
            "HYPERV-ALMERE-2.almere.nl"
         ],
         "ClusterShares":[
            "C:\\LocalStorage",
            "D:\\ClusterStorage\\UserStorage_2"
         ],
         "Networks":[
            {
               "Name":"External-vSwitch"
            },
            {
               "Name":"Internal High Security"
            }
         ],
         "ImageGalleries":[
            {
               "Name":"Default",
               "GalleryLibraryPath":"C:\\LocalStorage\\Images\\Repository.json"
            },
            {
               "Name":"AdvancedRemote",
               "GalleryLibraryPath":"C:\\LocalStorage\\Images\\Repository-Secure.json"
            },
            {
               "Name":"On-Share",
               "GalleryLibraryPath":"\\\\HYPERV-ALMERE-0\\Images-FileShare\\Repository-Share.json"
            }
         ]
      }
   ]
}
Custom location properties:
|
Property |
Description |
|---|---|
|
LocationType |
The configuration type for different environments. Choices are currently:
|
|
LocationId |
A given name of the location: LocationId can only include alphanumeric, underscore, parentheses, hyphen, period (except at end), and Unicode characters that match the allowed URL-safe characters. |
|
LocationName |
A given short name. |
|
ClusterName |
If a failover cluster is representing the Hybrid Location, use the FQDN of the failover cluster (also handle this name like the cluster nodes in the documentation (giving permission) – Note: We will add the functionality to publish a VM to the failover cluster soon. |
|
ClusterNodes |
Specifies the fully qualified domain names (FQDN) of the nodes / Hyper-V servers. |
|
ClusterShares |
A list of the local folders or cluster shares from Preparing Hyper-V Nodes. |
|
ImageGalleries |
A list of image galleries. |
|
ImageGallery.Name |
A given name of the location: ImageGallery.Name can only include alphanumeric, underscore, parentheses, hyphen, period (except at end), and Unicode characters that match the allowed URL-safe characters. |
|
ImageGallery.GalleryLibraryPath |
Path to the folder for the gallery, including the name of a JSON file. This file will contain the content of the gallery. The JSON file must not exist. It will be created automatically (or add an empty text file with an open and closed square bracket: “[]”). Example: C:\LocalStorage\Images\Repository.json |
|
Networks |
A list of the network switches. Each node must have a switch with the same name. |
|
Network.Name |
Name of the network switch. |
-
Continue with Installing and Using the Hydra Proxy (Preview) and skip the test of creating a local image on Azure Local.
-
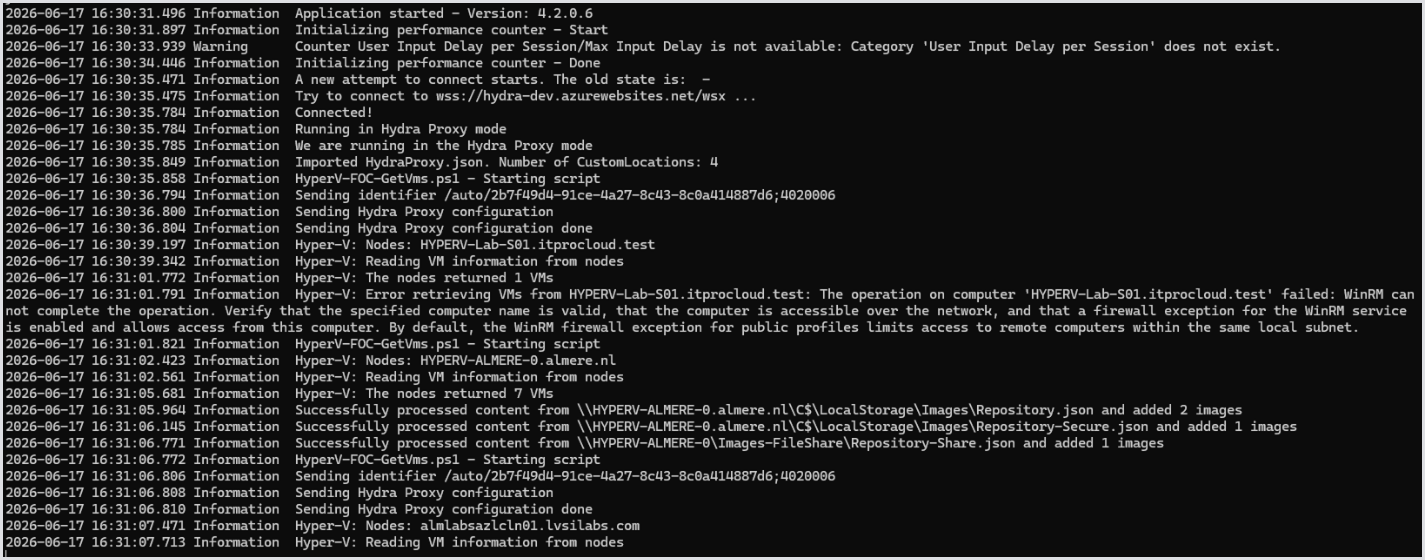
Ensure that the Hydra Proxy is running. For testing purposes, we recommend running it as an administrator:
Configuring a Host Pool for AVD Hybrid
Create a new Host Pool for your AVD Hybrid deployment in Hydra (Azure Resource > Virtual Desktop) or in the Azure Portal. Please ensure the following configurations:
-
Enable the validation environment option.
-
If not already done, grant the Hydra service principal the appropriate permissions (such as our custom role Hydra - Resource Access Role). For more information on roles, see Assigning Roles in Hydra.
-
In the Azure Portal, enable the Host Pool's System-assigned managed identity for later use. To learn more, see the Microsoft documentation.
.png?cb=f0b44924cee01af979bc95b7f084a7c4)
-
If you haven’t already, create a service principal with a secret in https://portal.azure.com/#view/Microsoft_AAD_IAM/ActiveDirectoryMenuBlade/~/RegisteredApp. The new service principal is needed for the automated ARC deployment.
-
Add a name, like ARC.Onboarding.
-
Generate a secret and store it for later use.
-
Store the application ID for later use.
-
-
Create or use a resource group for our ARC objects and add the account ARC.Onboarding (from the previous step) to the resource group with the role “Azure Connected Machine Onboarding” (for a new resource group, also add the Hydra service principal).
-
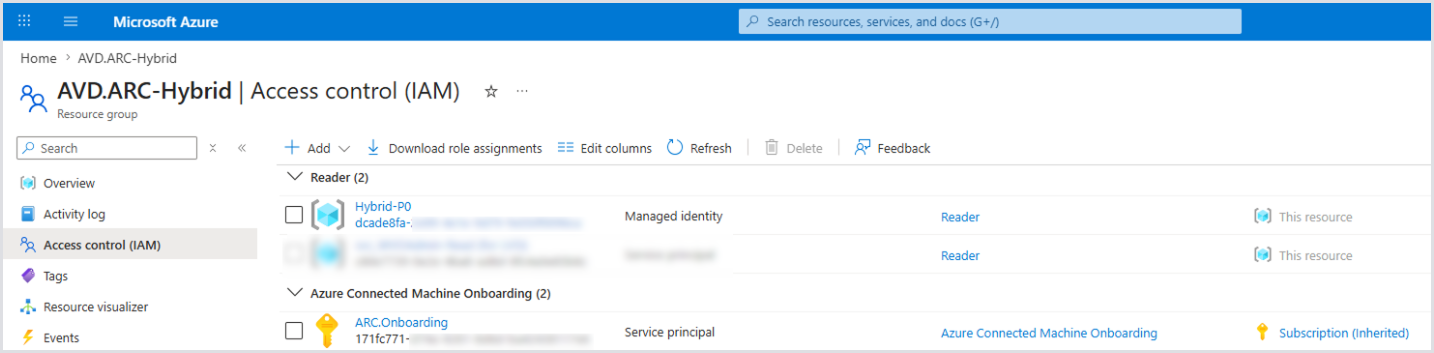
Add the managed identity of the Host Pool as a “Reader” to the resource group for the ARC objects.
Example: Permissions on the resource group for the ARC objects:
Preparing a Golden Master
Before we can capture an image to roll out new session hosts, we need a new Golden Master VM on one of our nodes. If you want to use Entra ID-only joined hosts, we recommend Windows Server 2025.
-
Create a new VM with your operating system on a Hyper-V node
-
Rename the computer hostname to match the name of the VM in Hyper-V (!)
-
Install necessary updates
-
Install your applications
-
Install the Azure Connected Machine Agent (ARC)
-
Choose Onboard in the Azure Portal for more instructions: https://portal.azure.com/#servicemenu/Microsoft_Azure_ArcCenterUX/AzureArcCenterHub/servers
-
If asked for a resource group to store the ARC object, select the same resource group referenced in “Configuring a Host Pool for AVD Hybrid.”
-
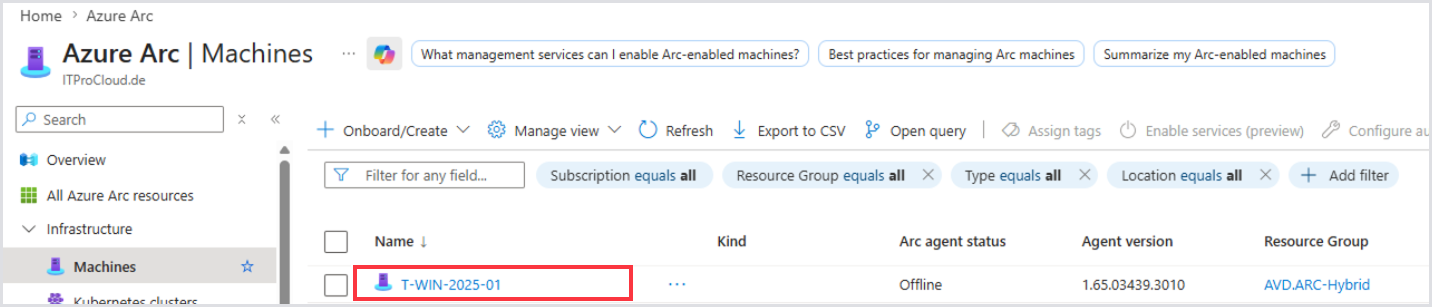
The ARC object should be visible in Azure:
Capturing an Image
-
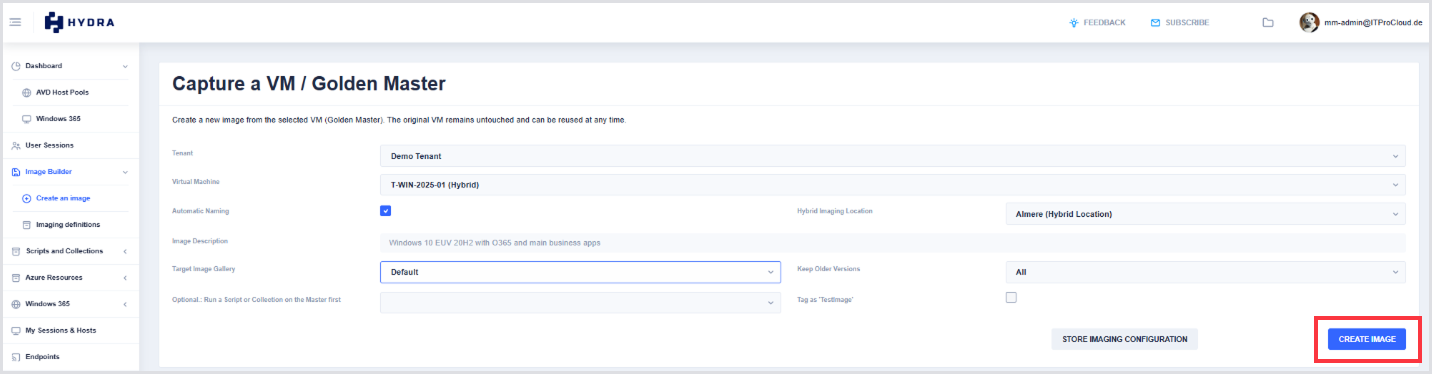
Go to Imaging in Hydra and select your tenant. If the Hydra Proxy is connected and configured successfully, you should be able to select your Hybrid Location in the drop-down list “Hybrid Location”.
-
After that, select your Golden Master from the Virtual Machine list and your Target Image Gallery (that is the name from your HydraProxy.json configuration):
-
Click Create Image to start the imaging process.
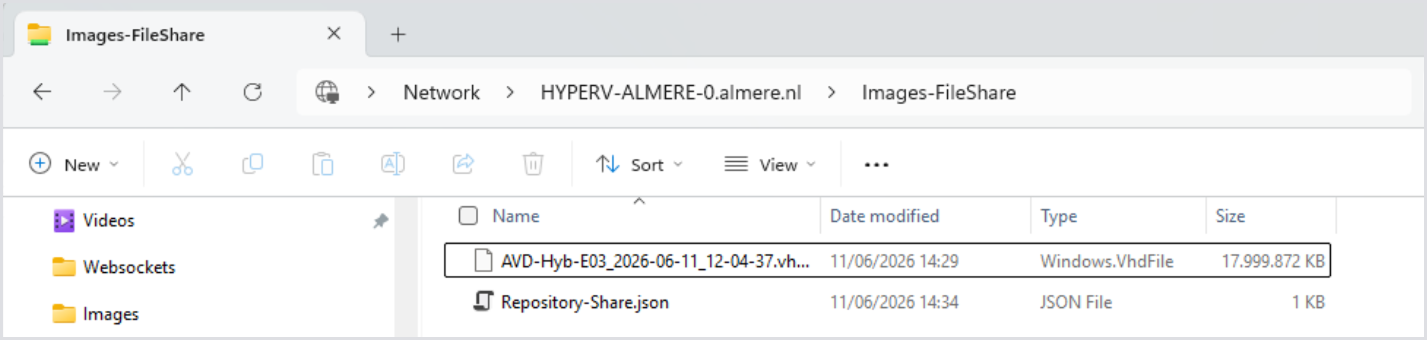
The image is stored in the folder and added as an entry to the JSON file. Example:
Rolling Out a Host in a Pool
-
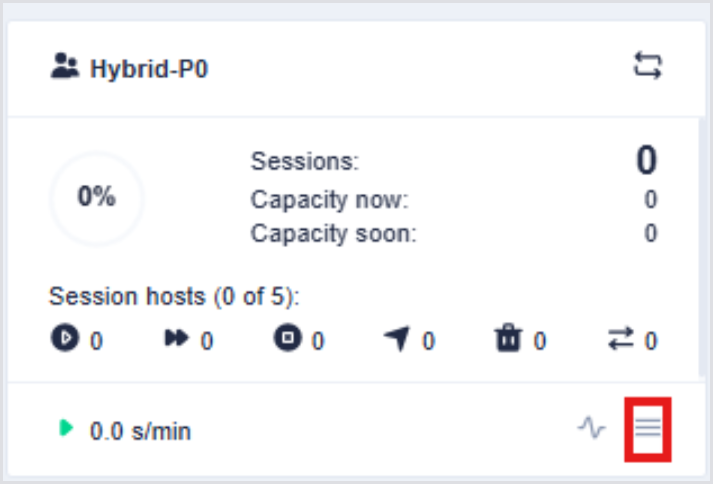
To adjust the rollout configuration in Hydra, click on the menu icon in the Host Pool tile:
-
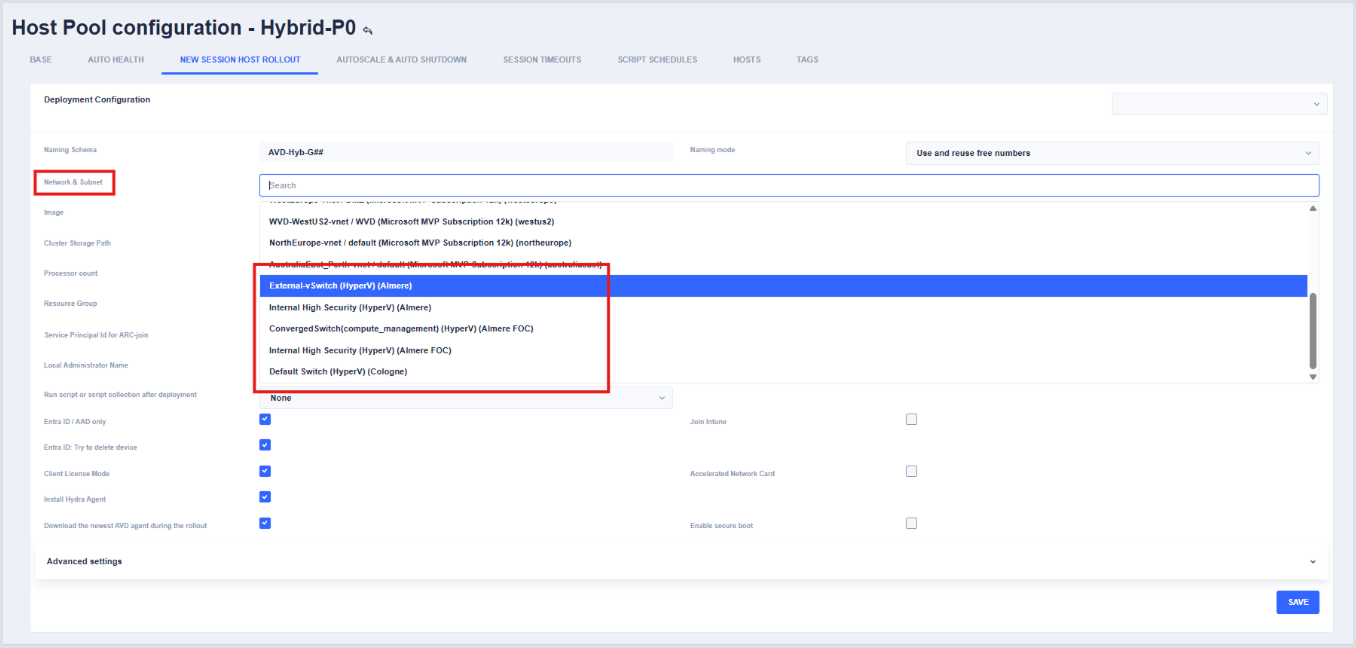
Selecting a network switch from Hyper-V is the trigger for Hydra to let you configure the settings related to AVD Hybrid. You can find the switches (similar to the name in the HydraProxy.json) at the bottom of the list:
-
Fill out the missing parameters to describe how a session host should be built in this pool. There are some AVD Hybrid-specific settings in Host Pool Configuration > New Session Host Rollout:
|
Field |
Description |
|---|---|
|
Image |
Contains a list of images available for the Hybrid Location |
|
Cluster Storage Path |
A list of available storage paths. Auto can be used to let Hydra decide where to store the data of the next VM. |
|
Node |
A specific node or auto. Auto will use the host with the least number of VMs. |
|
Service principal for ARC join |
The service principal and secret from the previous step to join a computer as an ARC object (the resource group is the target for the ARC object). |
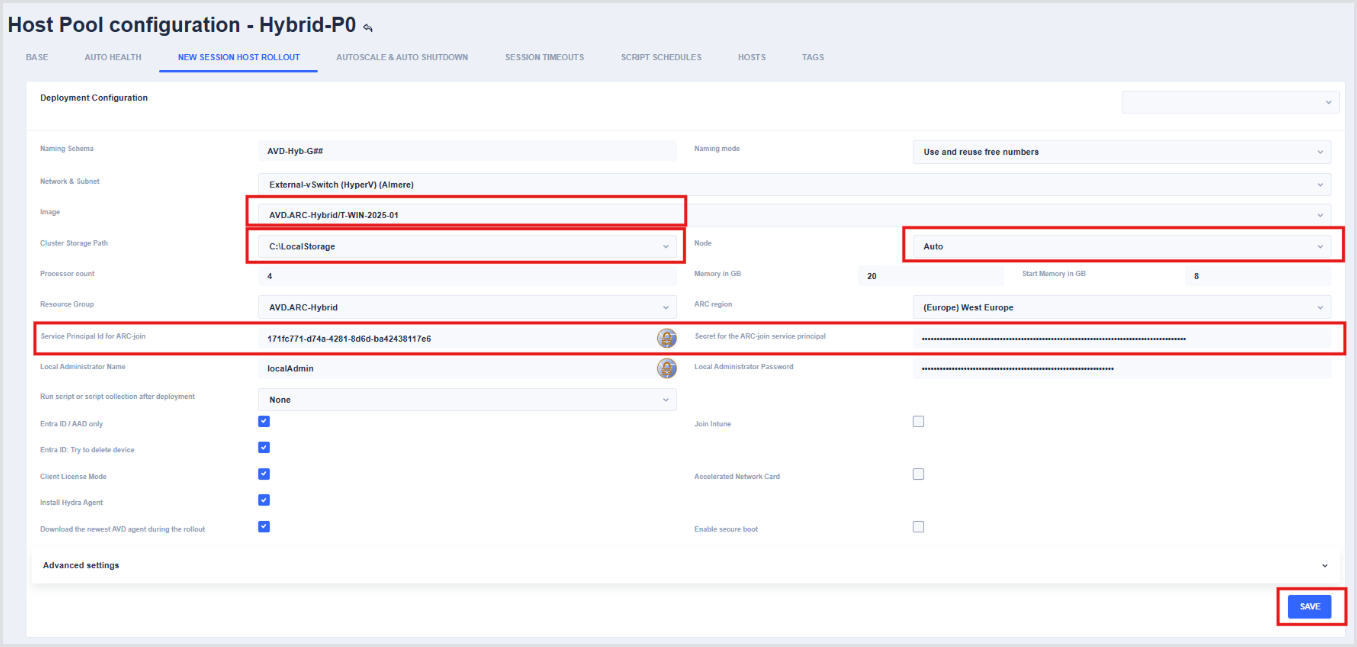
Note: In New Session Host Rollout > Advanced Settings, there is an option to use an incremental disk. We don’t suggest this for performance reasons.
The local administrator's name is not forced yet. It will be inherited from the Golden Master. All local administrators on the newly deployed session hosts will get the new administrator password.
-
Click Save to apply the changes.
Rolling Out New Hosts: Starting, Stopping, Restarting
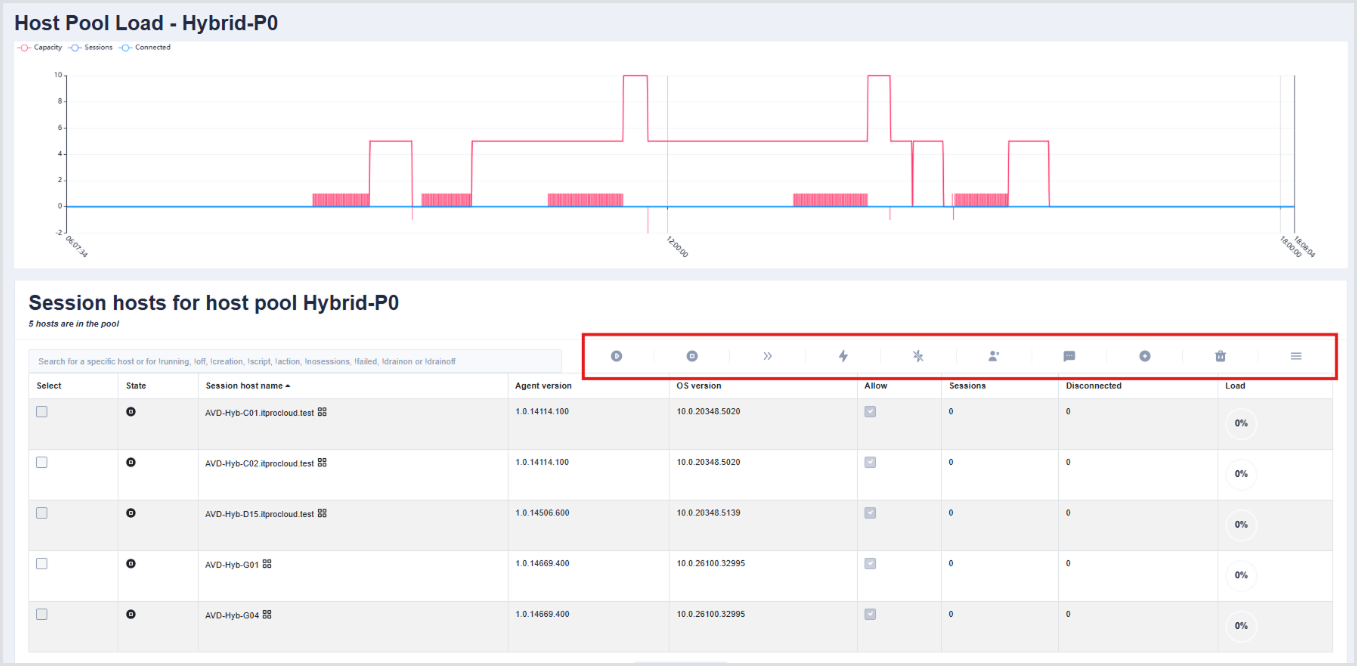
Clicking on the Host Pool tile opens the session host list. There are several actions to start, stop, restart, or roll out a new host (similar to native Azure Virtual Machines):
Known Limitations
-
Currently works only in Azure Global (not GOV-cloud tenants).
-
The configured local admin username for a rollout is ignored. The name is the same as on the Golden Master (Administrator).
-
All local administrator accounts of the Golden Master are reset to the configured local admin password.