
Overview
Public APIs' primary use case is importing data into other applications, such as Splunk. This way, you can merge Login Enterprise data in your preferred dashboard or data collector to have all data centralized. The Public API of Login Enterprise is built on the REST Web API standard. You can use the APIs to pull data from the Login Enterprise instance. This data can then be used for your specific goal.
Note:
-
Applies to Appliance v6.0 and higher: v4 and v5 of the Public API have been removed.
-
Applies to Appliance v4.6 and higher: v3 of the Public API has been removed.
-
Applies to Appliance v4.5.x and higher: v1 and 2 of the Public API have been removed.
Use Cases
-
Bulk Administration: Using the API makes managing your Login Enterprise environment at scale much easier. Instead of manually handling one-off tasks in the web interface, you can create, modify, and maintain multiple Tests or user accounts in a fraction of the time. For example, you might rely on tools like Postman to send automated requests that create or update a range of Tests in a single go.
-
Data Retrieval and External Analysis: The API provides quick, programmatic access to your Login Enterprise instance's Test results and performance metrics. This data can be fed directly into external analytics or reporting platforms, such as Microsoft Power BI, to generate custom dashboards, track long-term trends, and compare different Test sets. This approach helps ensure you’re getting the most out of your data, whether you’re looking for insights or just need a better way to visualize results.
-
Scheduling, Starting, and Stopping Tests: By tapping into the API’s capabilities, you can set up Test runs according to your own schedule, kick off Tests on demand, or pause them as needed, all without clicking through the web interface. This gives you the flexibility to integrate testing into your existing workflows and processes, making it easier to keep Tests running smoothly at all times.
-
Integration with Third-Party Systems for Alerts and Maintenance: The API also simplifies integration with platforms like ServiceNow, making it possible to automatically create and manage ITSM tickets when critical issues arise. If a published desktop resource becomes unavailable, for example, you can have a ticket created automatically for quick follow-up. Beyond alerting, it’s easy to connect to third-party automation platforms to perform maintenance tasks, such as restarting a problematic desktop, so you can address problems before they affect users.
Accessing Public API/Swagger UI
Login Enterprise provides a web-based mechanism to access the API for testing and validation, using the open-source Swagger suite of tools. Using the built-in Swagger page, you can explore and test using all of the API functions in Login Enterprise. You do not need to generate an API token to use Swagger; it will inherit the permissions of your web user.
-
In the Login Enterprise sidebar menu, navigate to Other > Access control.
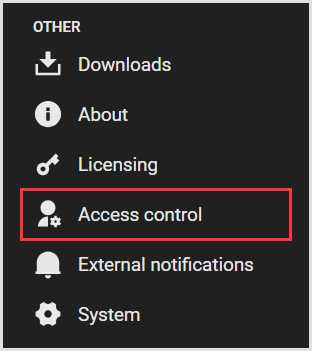
Note: In Login Enterprise v5 and earlier, the Public API is available under External notifications.
-
Select Public API from the tab menu, and click the Public API documentation link (this will redirect you to the API Reference).

-
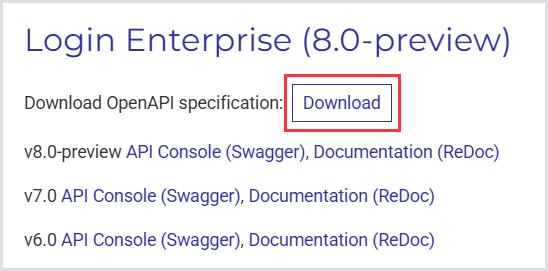
To interact with the API, choose a version (v7.0 or v8.0-preview), and click on the API Console (Swagger) link. This will open the Swagger interface.
.png?cb=0abcbe00db395b213d18e1f7917f635c)
-
To see the API documentation in the ReDoc interface, click on the Documentation (ReDoc) link for the version you want:
.png?cb=35f6c4e6d94796a0e4bad324c0c672a0)
-
To download our full OpenAPI specification, click Download:
System Access Tokens
API tokens use RBAC to access the API using the permissions of a specific role. RBAC tokens are assigned to one role, and API calls made with the token use the permissions granted by that role.
Tokens created before version 6.7 are called Legacy tokens. They use one of the legacy access levels: Read-only, Configuration, or Schedule.
The System tokens page shows the available API tokens. Use this page to review token details, check token status, view role permissions, and delete tokens that are no longer needed.
|
Column |
Description |
|---|---|
|
Token Name |
The name of the token. |
|
Status |
The current status of the token, such as Active. |
|
Type |
The token type:
|
|
Role |
The role assigned to the token. Note: Legacy tokens show N/A because they are not assigned to an RBAC role. For information on RBAC, see Role-Based Access Control (RBAC). |
|
Created |
The date when the token was created. |
|
Last used |
The date when the token was last used. |
|
Token lifetime |
Indicates the token lifetime:
|
|
Expiration date |
The date when the token expires, if applicable. |
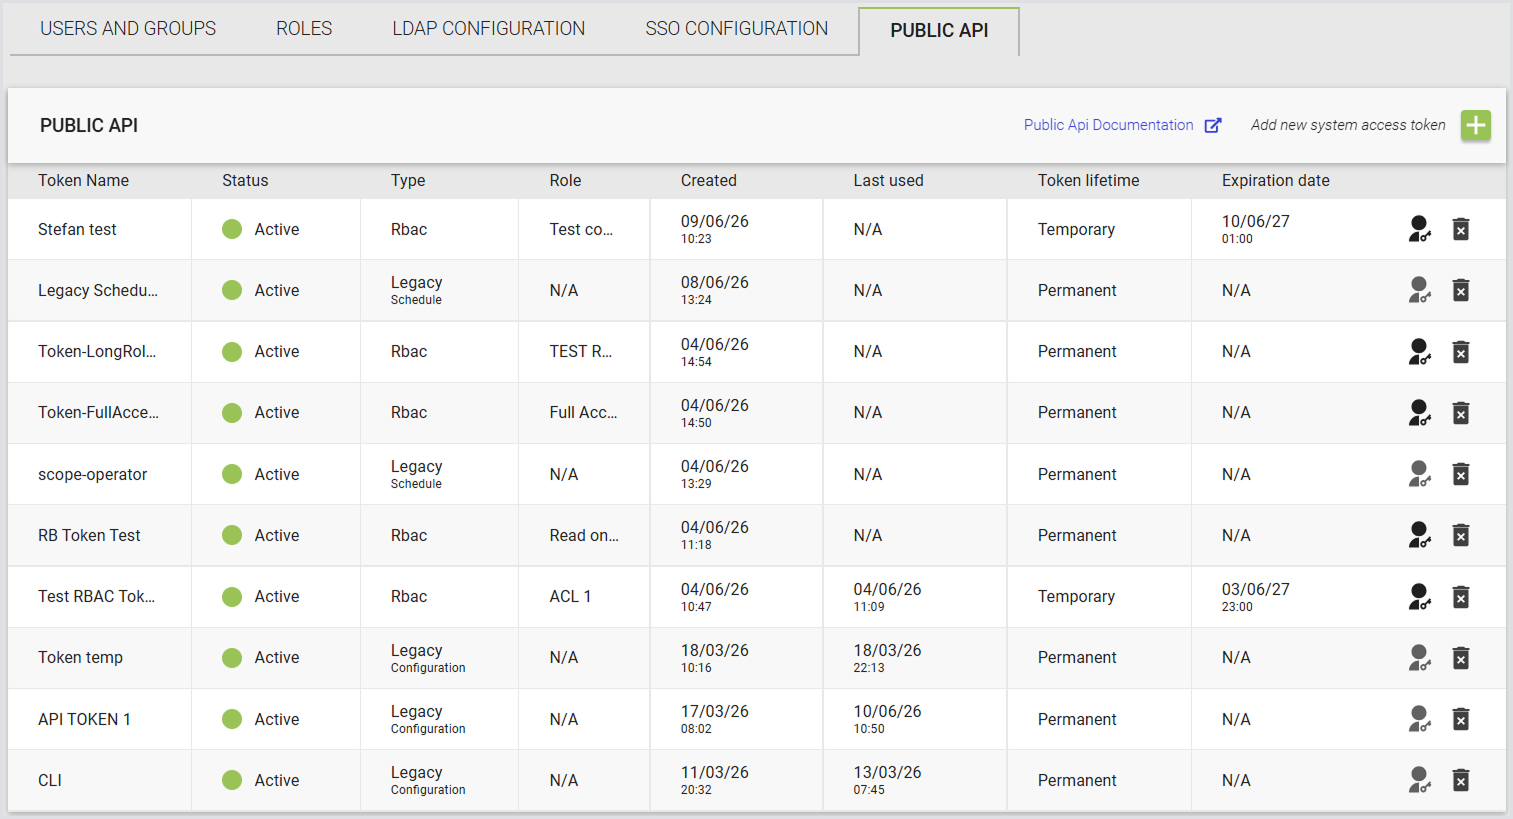
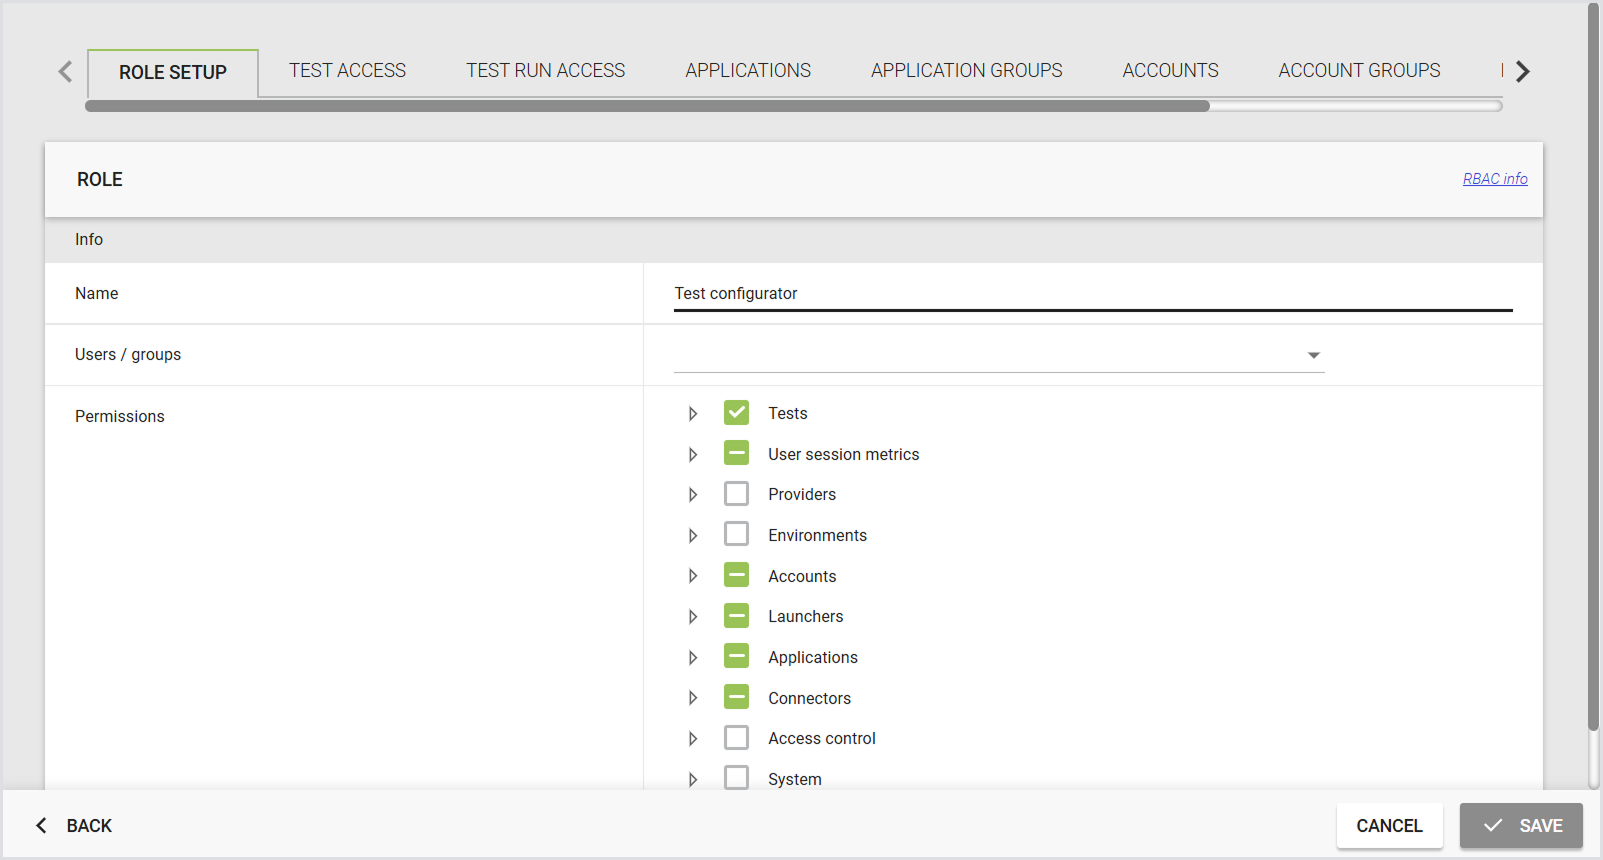
To view a role's permissions, select the human icon next to the expiration date. The permissions list shows the permissions included in the assigned role, such as Test Configurator.
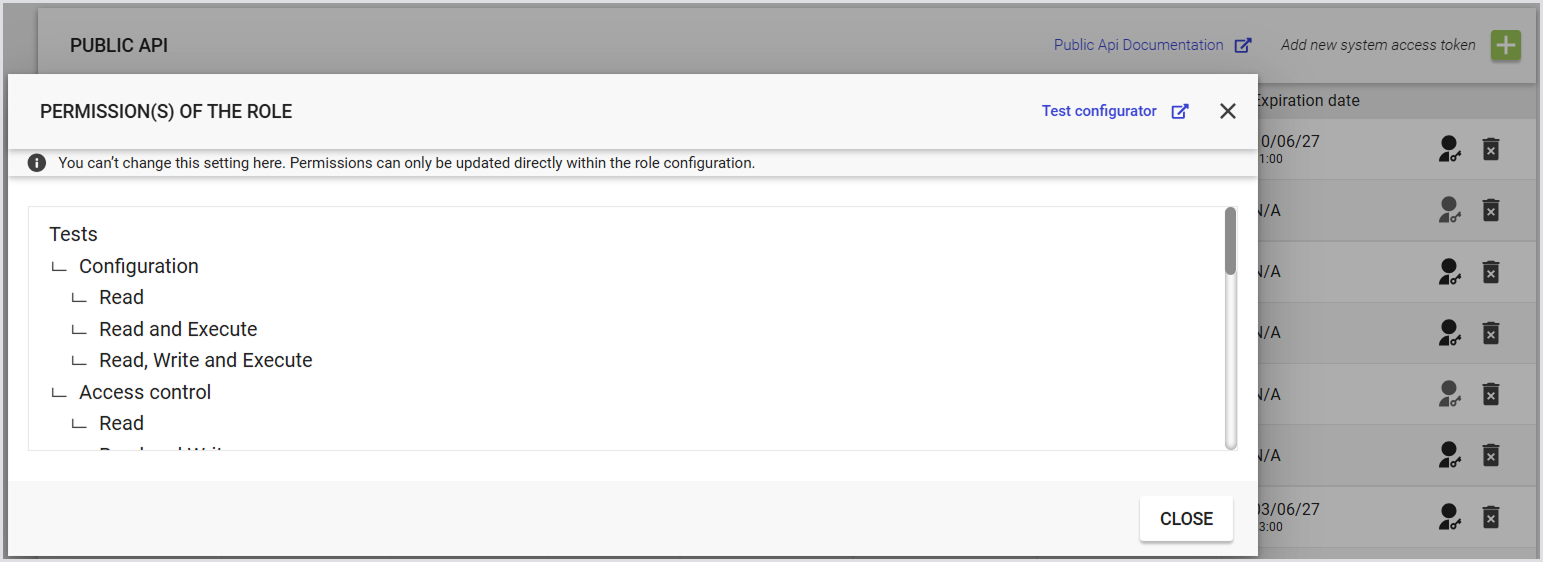
To review or change the permissions for the assigned role, click on the role name in the top right corner of the Permissions of the role window.
.png?cb=99ec49dc31829054449752dc1e10d9bc)
The Role Setup page opens, where you can review or change the role configuration.
To delete a token, select the Delete icon next to the token.
Adding a System Access Token
-
In the Public API, click the “+“in the top right to add a token.

-
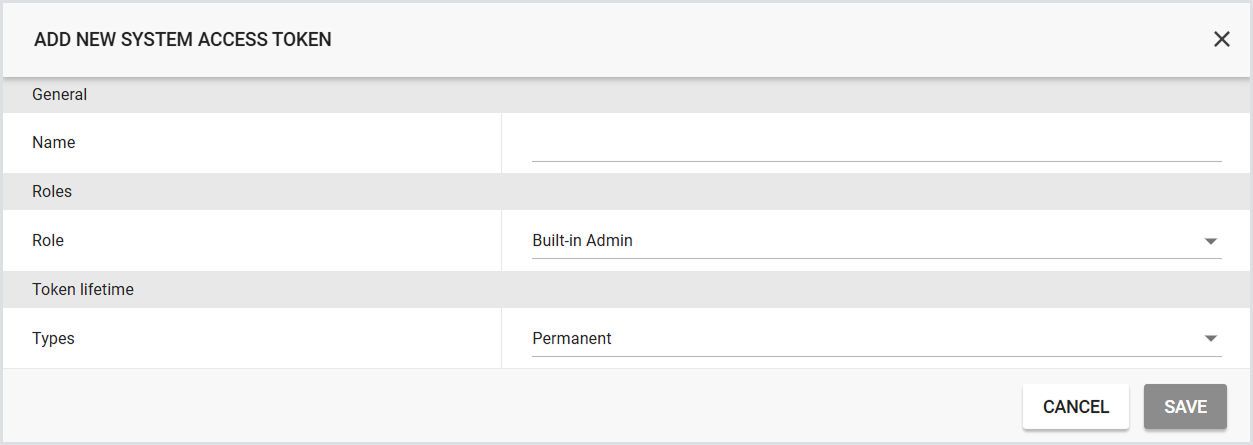
In the Add new system access token window, provide the following:
|
General |
|
|---|---|
|
Name |
The name of the token. |
|
Roles |
|
|
Role |
Select a role. This field is required. Built-In Admin is selected by default. For details on roles and permissions, see Role-Based Access Control (RBAC). |
|
Token lifetime |
|
|
Types |
The token lifetime: Permanent or Temporary. If you select Temporary, specify an expiration date. |
-
Click Save.
Note: System access tokens can't be updated after they're created. To change the permissions used by a token, update the permissions for the assigned role or create a new token with a different role.
Legacy System Access Tokens
Legacy system access tokens were created before RBAC tokens were introduced. These tokens use one of the legacy access levels: Read-only, Configuration, or Schedule.
Existing legacy tokens remain valid and unchanged. However, new system access tokens are created as RBAC tokens.
Common Examples
Creating a Test
You can use a PowerShell script to create a Continuous Test in your environment using the RDP connector with the multiple-host function. The script also attaches an Account Group and Launcher Group, as well as an RBAC Role, if they are configured. To learn how to do this, see Creating Account Groups, Creating Launcher Groups, and Role-Based Access Control (RBAC).
Tip: You can download the script from Additional Resources (Look up the file named “CreateTestExample_RDPHosts.ps1.”)
Requirements
To use this script, you will need the following information:
-
Virtual Appliance URL: ($BaseURL)
-
API Token: ($ConfigToken). The role assigned to the token must include the required permission. For details, see Managing Roles and Permissions.
-
Account Group Name: ($AccountGroupName)
-
Launcher Group Name: ($LauncherGroupName)
-
Role Name: ($RoleName)
These values should be specified at the top of the script:
## Script Variables
$baseUrl = "loginenterprise.myenvironment.nl"
$ConfigToken = "BifSUhkFfEKkLb7tqnYUtYiNBkaJA4OgrdemwoLM71Q"
$AccountGroupName = "Account Group Name"
$LauncherGroupName = "Launcher Group Name"
$RoleName = "Role Name"
The section following the script variables sets up SSL connection certificates. By default, the script ignores certificate errors, allowing it to work with both self-signed and official certificates. For more information on certificates, see Managing Certificates on the Appliance.
Script functions
The script is built using three functions:
-
get-AccountGroupID: Checks if the configured Account Group name exists in the Virtual Appliance and returns its ID if found.
-
get-LauncherGroupID: Checks if the configured Launcher Group name exists in the Virtual Appliance and returns its ID if found.
-
get-RoleID: Checks if the configured Role name exists in the virtual appliance and returns its ID if found. You can also specify the UUID of the Role instead.
-
Create-Test: Sends the API request to create the Test entry based on its own
$CreateBodyand the retrieved Account, Launcher Group, and Role IDs.
To modify the Test type, connector, and other parameters of a Test case, adjust the $CreateBody variable:
$CreateBody = @"
{
    "type": "ContinuousTest",
    "name": "Your Test Name",
    "description": "My New Test",
    "connector": {
        "type": "Rdp",
        "hostList": [
            {"enabled": true, "endpoint": "Host1"},
            {"enabled": true, "endpoint": "Host2"},
        ],
        "suppressCertWarn": "True",
    },
    "accountGroups": [$Global:AccountGroupId],
    "launcherGroups": [$Global:LauncherGroupId]
}
"@
Additionally, there are 2 global definitions: $header and $body:
-
$headeris used for all API requests and defines the authorization method. -
$bodyis used to find the Account Group ID and Launcher Group ID.
## Script Variables
$baseUrl = "loginenterprise.domain.lab"
$ConfigToken = "PublicAPIToken"
$AccountGroupName = "Account Group Name"
$LauncherGroupName = "Launcher Group Name"
# Optional, can also specify Role UUID instead
$RoleName = "LDAP Admins"

# WARNING: ignoring SSL/TLS certificate errors is a security risk
$code = @"
public class SSLHandler
{public static System.Net.Security.RemoteCertificateValidationCallback GetSSLHandler()
    {return new System.Net.Security.RemoteCertificateValidationCallback((sender, certificate, chain, policyErrors) => { return true; });}
}
"@
Add-Type -TypeDefinition $code

# WARNING: ignoring SSL/TLS certificate errors is a security risk
[System.Net.ServicePointManager]::ServerCertificateValidationCallback = [SSLHandler]::GetSSLHandler()

# this is only required for older version of PowerShell/.NET
[Net.ServicePointManager]::SecurityProtocol = [Net.SecurityProtocolType]::Tls -bor [Net.SecurityProtocolType]::Tls11 -bor [Net.SecurityProtocolType]::Tls12

# Define global authorization header for the script
$Header = @{
    "Accept"        = "application/json"
    "Authorization" = "Bearer $ConfigToken"
}

#Define global Body statements for finding the Launcher and Account group name
$Body = @{
        "orderBy" = "name"
        "direction" = "desc"
        "count" = "100"
        }

## The Get-AccountGroupID function grabs all of the existing account groups and compares the configured name ($AccountGroupName) with the list
## If the configured name is found in the list it returns the ID of that account group ($global:AccountGroupID)
function get-AccountGroupID {

    #Parameters of the API command that combines all values and selects the target API
    $Parameters     = @{
        Uri         = 'https://' + $baseUrl + '/publicApi/v8-preview/account-groups/'
        Headers     = $Header
        Method      = 'GET'
        body        = $Body
        ContentType = 'application/json'
    }

    #Execute the command using the parameters and placing them in the $request object.
    $request = Invoke-RestMethod @Parameters

    #setting counter to 0
    $i=0

    #Go through the array of items generated by the rest command
    ForEach ($item in $request.items)
    {
        $i++
        # Check each entry in array to check if the configured name exists in the array, if not it does nothing.
        If($item.name -like $AccountGroupName){
           $global:AccountGroupID = '"' + $item.groupId + '"'
           Write-Host 'Found Account group match:'$item.groupId
           Break
        }

        # if the end of the array is reached and no match is found, report and continue
        ElseIf($i -ge $request.items.count){
            Write-Host 'No Account Group name match found for'$AccountGroupName ', Continuing script...'
            # set value to null so test is still created without an account group
            $global:AccountGroupID = $null
        }

    }

}

## The Get-LauncherGroupID function grabs all of the existing launcher groups and compares the configured name ($LauncherGroupName) with the list
## If the configured name is found in the list it returns the ID of that launcher group ($global:LauncherGroupID)
function get-LauncherGroupID {

    #Parameters of the API command that combines all values and selects the target API
    $Parameters     = @{
        Uri         = 'https://' + $baseUrl + '/publicApi/v8-preview/launcher-groups/'
        Headers     = $Header
        Method      = 'GET'
        body        = $Body
        ContentType = 'application/json'
    }

    #Execute the command using the parameters and placing them in the $request object.
    $request = Invoke-RestMethod @Parameters

    #setting counter to 0
    $i=0

    #Go through the list of items generated by the rest command
    ForEach ($item in $request.items)
    {
        $i++
        # Check each entry in array to check if the configured name exists in the array, if not it does nothing.
        If($item.name -like $LauncherGroupName){
           [string]$global:LauncherGroupID = '"' + $item.id + '"'
           Write-Host 'Found Launcher group match:'$item.id
           Break
        }
        # if the end of the array is reached and no match is found, report and continue
        ElseIf($i -ge $request.items.count){
            Write-Host 'No Launcher Group name match found for'$LauncherGroupName ', Continuing script...'
            # set value to null so test is still created without an account group
            $global:LauncherGroupID = $null
        }

    }

}

## The Get-RoleID function grabs all of the existing roles and compares the configured name ($RoleName) with the list
## If the configured name is found in the list it returns the ID of that account group ($global:RoleID)
function get-RoleID {

    if (-not $RoleName) {
        $global:RoleID = $null
        return
    }
    try {
        $throwaway = [guid]$RoleName
        Write-Host "Using $($RoleName) as RoleID"
        $global:RoleID = $RoleName
        return
    } catch {
        # Otherwise proceed with the lookup
    }
    #Parameters of the API command that combines all values and selects the target API
    $Parameters     = @{
        Uri         = 'https://' + $baseUrl + '/publicApi/v8-preview/auth/roles/'
        Headers     = $Header
        Method      = 'GET'
        body        = $Body
        ContentType = 'application/json'
    }

    #Execute the command using the parameters and placing them in the $request object.
    $request = Invoke-RestMethod @Parameters

    #setting counter to 0
    $i=0

    #Go through the array of items generated by the rest command
    ForEach ($item in $request.items)
    {
        $i++
        # Check each entry in array to check if the configured name exists in the array, if not it does nothing.
        If($item.name -like $RoleName){
           $global:RoleID = '"' + $item.id + '"'
           Write-Host 'Found Role match:'$item.id
           Break
        }

        # if the end of the array is reached and no match is found, report and continue
        ElseIf($i -ge $request.items.count){
            Write-Host 'No Role name match found for'$RoleName ', Continuing script...'
            # set value to null so test is still created without an account group
            $global:RoleID = $null
        }

    }

}

function create-test {
## Create Body of API to create the new test, contains all required fields to create a new test.
## This example makes use of the host function of the RDP connector
## for more info check the API documentation on the External Notifications > Public API Page.

$CreateBody = @"
{
    "type": "ContinuousTest",
    "name": "Your Test Name",
    "description": "My New Test",
    "connector": {
        "type": "Rdp",
        "hostList": [
            {"enabled": true, "endpoint": "Host1"},
            {"enabled": true, "endpoint": "Host2"},
        ],
        "suppressCertWarn": "True",
    },
    "accountGroups": [$Global:AccountGroupId],
    "launcherGroups": [$Global:LauncherGroupId],
    "roles": [$Global:RoleID]
}
"@

    #Parameters of the API command that combines all values and selects the target API
    $Parameters     = @{
        Uri         = 'https://' + $baseUrl + '/publicApi/v8-preview/tests/'
        Headers     = $Header
        Method      = 'POST'
        body        = $CreateBody
        ContentType = 'application/json'
    }

    #Execute the rest command, if a test with the same name already exists it will generate an error. This command does not need an AccountGroupId or LauncherGroupId to work
    Invoke-RestMethod @Parameters
}

#execute each function
get-AccountGroupID
get-LauncherGroupID
get-RoleID
Create-test
Starting a Test
A custom PowerShell script to start a Test is included with every Virtual Appliance release starting with v4.1. In v4.3 and later, specific example scripts are available for Continuous Testing, Load Testing, and Application Testing.
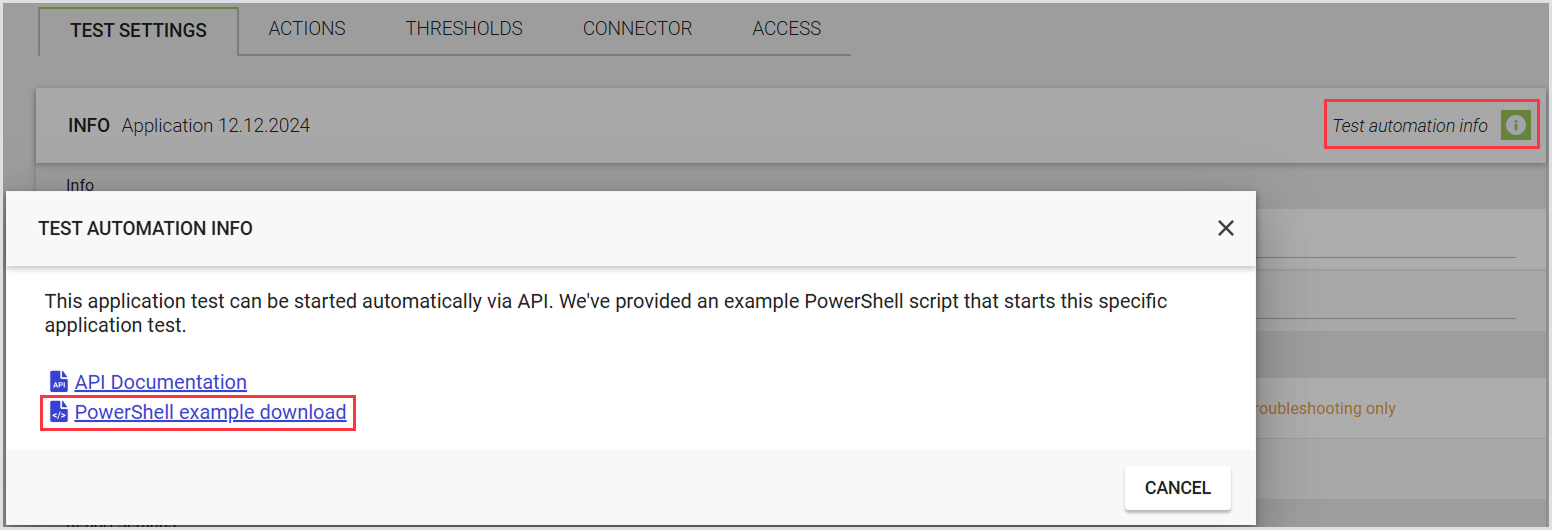
When you create an Application Testing scenario, you will find relevant information in the top right corner by clicking on Test automation info. A window with two links opens:
-
One for the Public API of your Appliance.
-
Another is for downloading the example PowerShell (.ps1) file.
Tip: You can also download the script from Additional Resources. Look up the file named “ExampleScript_ScheduleControl.ps1.”
Note:
-
If you download the script from your own Appliance, the script will be pre-configured for your environment and Virtual Appliance.
-
If you download it from Additional Resources, you will need to configure the following 3 values:
[string]$accessToken = "U49-UKj5rtzP5cuL-PcsQsAQxtbGhwVT3OZesdLlUAE"
[string]$baseUrl = 'https://MyLoginEnterpriseApplianceURL/publicApi'
# Test id
$testId = '3a9f24a1-232f-4849-8a37-56117ba82734'
-
$accessToken: The role assigned to the token must include the required permission. For details, see Managing Roles and Permissions.
-
$baseUrl: The URL of your Virtual Appliance.
-
$testId: The GUID of your test. This can be found in the URL bar of your browser after opening an environment.

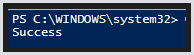
Once you have configured these values, you can execute the Test. If everything is set up correctly, you should see "Success" as the return value.
Example script
You can download example scripts for each use case by clicking the green exclamation mark button mentioned earlier. This section uses the Continuous Test script as an example. For more information on Continuous Testing, see Configuring Continuous Testing.
# basic information
# The access-token needs to be a System Access Token with the appropriate access
# For more information see https://MyLoginEnterpriseAppliance/external-notifications/public-api
[string]$accessToken = "U49-UKj5rtzP5cuL-PcsQsAQxtbGhwVT3OZesdLlUAE"
[string]$baseUrl = 'MyLoginEnterpriseAppliance/publicApi'

# Test id
$testId = '3a9f24a1-232f-4849-8a37-56117ba82734'
# Start-request data
$requestObject = @{
    # Comment
    'comment' = '...'
}

# if something goes wrong we stop processing this script
$ErrorActionPreference = 'Stop'

# this is only required for older version of PowerShell/.NET
[Net.ServicePointManager]::SecurityProtocol = [Net.SecurityProtocolType]::Tls12 -bor [Net.SecurityProtocolType]::Tls11


# WARNING: ignoring SSL/TLS certificate errors is a security risk
[System.Net.ServicePointManager]::ServerCertificateValidationCallback = { return $true; }

# set the content-type and add the authorization http header with our access token
$requestHeaders = @{
    'Content-Type' = 'application/json'
    'Authorization' = "Bearer $accessToken"
}

$requestBody = ConvertTo-Json -InputObject $requestObject
try {
    $response = Invoke-RestMethod -Method Put -Uri "${baseUrl}/v6/tests/${testId}/start" -Headers $requestHeaders -Body $requestBody
    Write-Host -Object 'Success'

} catch {
    [int]$statusCode = $_.Exception.Response.StatusCode;

    switch ($statusCode) {
        404 { Write-Host -Object 'Not Found' }
        409 { Write-Host -Object 'Conflict' }
        400 { Write-Host -Object 'Bad Request' }
        401 { Write-Host -Object 'Unauthorized' }
        default { throw }
    }
}
Retrieving a List of Environments
This is a practical example of how to use API calls through a PowerShell script. The logic in this script can also be adapted for use in other scripting or programming languages, such as Python.
The script is designed to retrieve a list of available and configured environments. To learn more about the environments, see Configuring Environments. It is configured to ignore certificate errors if you are using a self-signed certificate. For more information on certificates, see Managing Certificates on the Appliance. You can utilize the authentication mechanisms within the script for any API endpoint. Depending on the specific API call, you can modify or retrieve data.
Tip: You can download the script from Additional Resources. Look up the file named “Query_List_of_Environments.ps1.”
Requirements
To run this script, you will need the following:
-
Virtual Appliance URL:
https://myvirtualappliance.loginvsi.com -
API token: The role assigned to the token must include the required permission. For details, see Managing Roles and Permissions.
Script Example
# basic information
# role based access API
[string]$publicApiSecret = 'PUBLICAPISECRET'

#url without https
$baseUrl = 'loginenterprise.my.url'

# if something goes wrong (e.g. authentication) we stop processing this script
$ErrorActionPreference = 'Stop'

# WARNING: ignoring SSL/TLS certificate errors is a security risk
$code = @"
public class SSLHandler
{public static System.Net.Security.RemoteCertificateValidationCallback GetSSLHandler()
    {return new System.Net.Security.RemoteCertificateValidationCallback((sender, certificate, chain, policyErrors) => { return true; });}
}
"@
Add-Type -TypeDefinition $code

# WARNING: ignoring SSL/TLS certificate errors is a security risk
[System.Net.ServicePointManager]::ServerCertificateValidationCallback = [SSLHandler]::GetSSLHandler()


# this is only required for older version of PowerShell/.NET
[Net.ServicePointManager]::SecurityProtocol = [Net.SecurityProtocolType]::Tls -bor [Net.SecurityProtocolType]::Tls11 -bor [Net.SecurityProtocolType]::Tls12

# Define authorization header
$Header = @{
    "Accept"        = "application/json"
    "Authorization" = "Bearer $publicApiSecret"
}

# Define body contents
$Body = @{
        "orderBy" = "Name"
        "direction" = "desc"
        "count" = "20"
}

#Parameters of the API command
$Parameters     = @{
    Uri         = 'https://' + $baseUrl + '/publicApi/v6/tests/'
    Headers     = $Header
    Method      = 'GET'
    body        = $Body
    ContentType = 'application/json'
}

#request data with call to the public api environments URL
$Results = Invoke-RestMethod @Parameters

#display each environment in the results
ForEach ($item in $Results.items)
{
Write-Host $item
}
Retrieving Dashboard Data
In some cases, you may not want to view the Virtual Appliance dashboard at all times but still wish to access the data presented in your custom dashboard. This section provides an example of a PowerShell script that retrieves this data.
Tip: You can download the script from Additional Resources. Look up the file named “Retrieve_Dashboard_Data_script.ps1“
Requirements
To ensure the script functions correctly, you will need the following items:
-
Virtual Appliance URL: ($WebURL)
-
API Token: ($ConfigToken). The role assigned to the token must include the required permission. For details, see Managing Roles and Permissions.
-
Test GUID: ($TestGuid)
These values should be specified at the beginning of the script:
## Script Variables
$WebURL = "https://Loginenterprise.my.domain"
$ConfigToken = "BifSUhkFfEKkLb7tqnYUtYiNBkaJA4OgrdemwoLM71Q"
$TestGUID = "3a9f24a1-232f-4849-8a37-56117ba82734"
The section following the script variables sets up SSL connection certificates. By default, the script ignores certificate errors, allowing it to work with both self-signed and official certificates. For more information on certificates, see Managing Certificates on the Appliance.
Script actions
The script will perform the following actions:
-
Retrieve the top two launcher locations.
-
Retrieve diagnostic tile data for all Continuous Tests (for the last hour) as found on the dashboard overview.
-
Retrieve diagnostic tile data for a specific Continuous Test (for the last 15 minutes).
-
Retrieve diagnostic tile data for a specific Continuous Test and Launcher combination (for the last hour).
-
Retrieve application statistics for a specific Continuous Test (for the last hour).
-
Retrieve application statistics for a specific Continuous Test and a specific launcher location (for the last hour).
## Script Variables
$WebURL = "https://Loginenterprise.my.domain"
$ConfigToken = "BifSUhkFfEKkLb7tqnYUtYiNBkaJA4OgrdemwoLM71Q"
$TestGUID = "3a9f24a1-232f-4849-8a37-56117ba82734"

# WARNING: ignoring SSL/TLS certificate errors is a security risk
$code = @"
public class SSLHandler
{public static System.Net.Security.RemoteCertificateValidationCallback GetSSLHandler()
    {return new System.Net.Security.RemoteCertificateValidationCallback((sender, certificate, chain, policyErrors) => { return true; });}
}
"@
Add-Type -TypeDefinition $code

# WARNING: ignoring SSL/TLS certificate errors is a security risk
[System.Net.ServicePointManager]::ServerCertificateValidationCallback = [SSLHandler]::GetSSLHandler()

# this is only required for older version of PowerShell/.NET
[Net.ServicePointManager]::SecurityProtocol = [Net.SecurityProtocolType]::Tls -bor [Net.SecurityProtocolType]::Tls11 -bor [Net.SecurityProtocolType]::Tls12

# Define global authorization header for the script
$Header = @{
    "Accept"        = "application/json"
    "Authorization" = "Bearer $ConfigToken"
}

## Retrieve location site 1 and 2 in the list. To add more simply copy paste and make changes to the numbers in the []
$Location1 = (Invoke-RestMethod -Uri "$WebUrl/publicApi/v6/locations" -Headers $Header -Method Get).Items[0].id
$Location2 = (Invoke-RestMethod -Uri "$WebUrl/publicApi/v6/locations" -Headers $Header -Method Get).Items[1].id

## Retrieve the diagnostic tile data on the dashboard for all continuous tests for the last hour
Invoke-RestMethod -Uri "$WebUrl/publicApi/v6/test-diagnostics?timeRange=lasthour" -Headers $Header -Method Get

## Retrieve the diagnostic tile data on the dashboard for a specific continuous test, for the last 15 minutes
Invoke-RestMethod -Uri "$WebUrl/publicApi/v6/tests/$TestGUID/test-diagnostics?timeRange=last15minutes" -Headers $Header -Method Get

## Retrieve diagnostic tile data based on the location dashboard per site for the last hour, to expand duplicate the entries.
Invoke-RestMethod -Uri "$WebUrl/publicApi/v6/tests/$TestGUID/test-diagnostics?timeRange=lasthour&locationId=$Location1" -Headers $Header -Method Get
Invoke-RestMethod -Uri "$WebUrl/publicApi/v6/tests/$TestGUID/test-diagnostics?timeRange=lasthour&locationId=$Location2" -Headers $Header -Method Get

## Retrieve application statistics for a specific continuous test for the last hour
Invoke-RestMethod -Uri "$WebUrl/publicApi/v6/tests/$TestGUID/application-diagnostics?timeRange=lasthour" -Headers $Header -Method Get

## Retrieve application statistics for a specific continuous test and a specific launcher location, for the last hour
Invoke-RestMethod -Uri "$WebUrl/publicApi/v6/tests/$TestGUID/application-diagnostics?timeRange=lasthour&locationId=$Location2" -Headers $Header -Method Get
Additional Resources
CreateTestExample_RDPHosts.ps1
ExampleScript_ScheduleControl.ps1