Overview
The instructions below describe how to use the WinApp Recorder. For general information on Script Recorder and related use cases, see Using Script Recorder.
In 6.5, Script Recorder moved to a new UI automation backend (FLAUI) and uses a standardized XPath-style locator format. Existing scripts remain supported, but locator generation and robustness have improved. For details on Script Recorder (WinApp) implementation, see Understanding Script Recorder (WinApps) Implementation.
Getting Started
Download the latest Script Editor package containing the WinApp Recorder v1 from your admin or setup email. For details, see Downloading and installing Script Recorder.
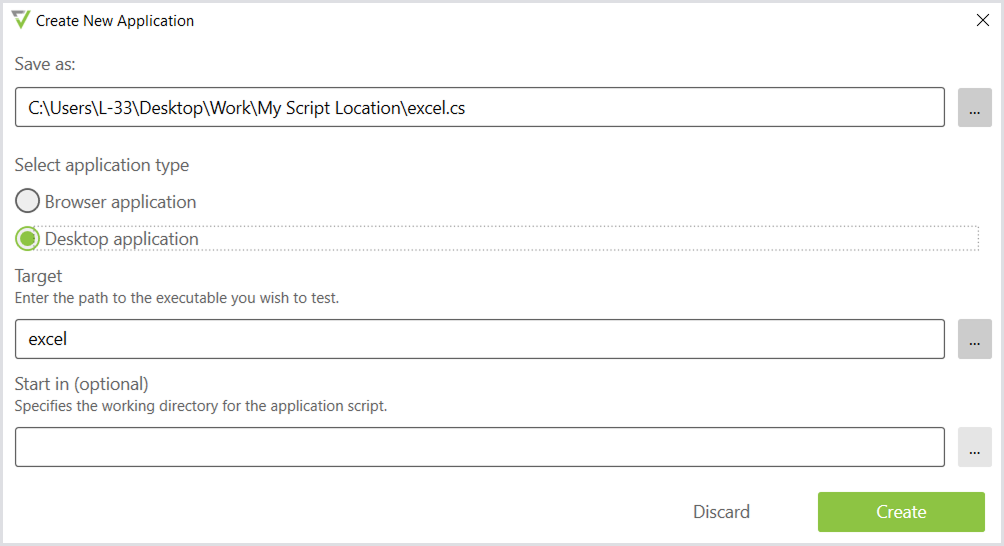
Creating a New Application
-
In the Login Enterprise Script Editor, click Create a new Login Enterprise Application.
-
Click the three-dot icon to the right of Save as, choose a folder for the script, and enter a file name.
-
In Application type, select the type of your application.
-
In Target, enter the path to the executable you want to test.
-
In Start in, you can specify the working directory for the application script.
-
Click Create.
Starting the Recording: Recording the Script
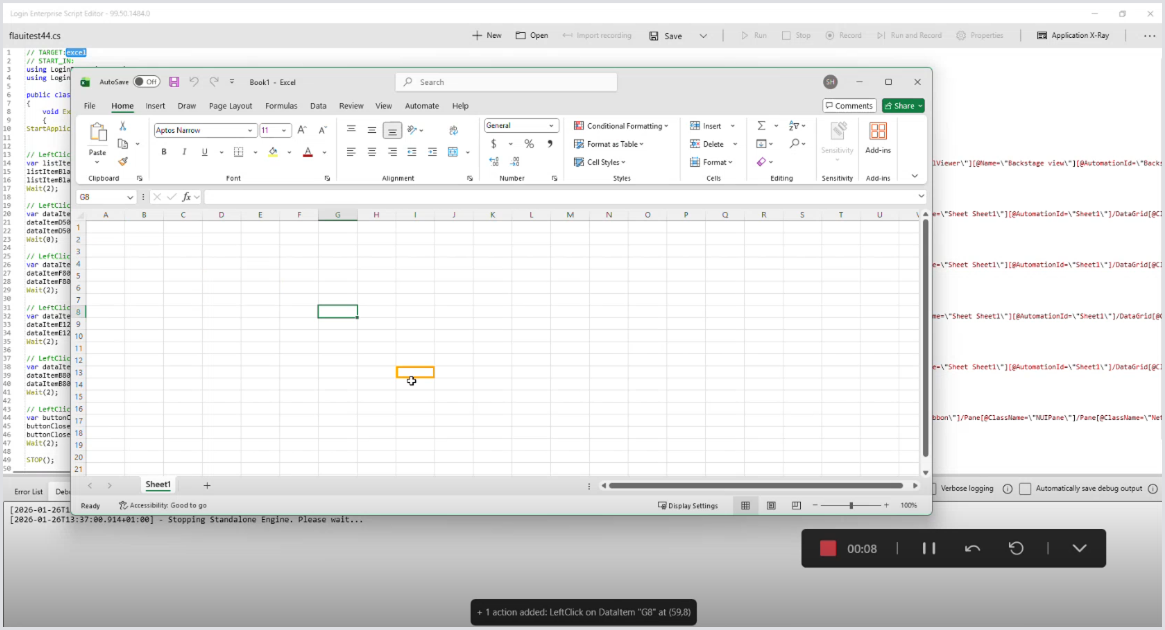
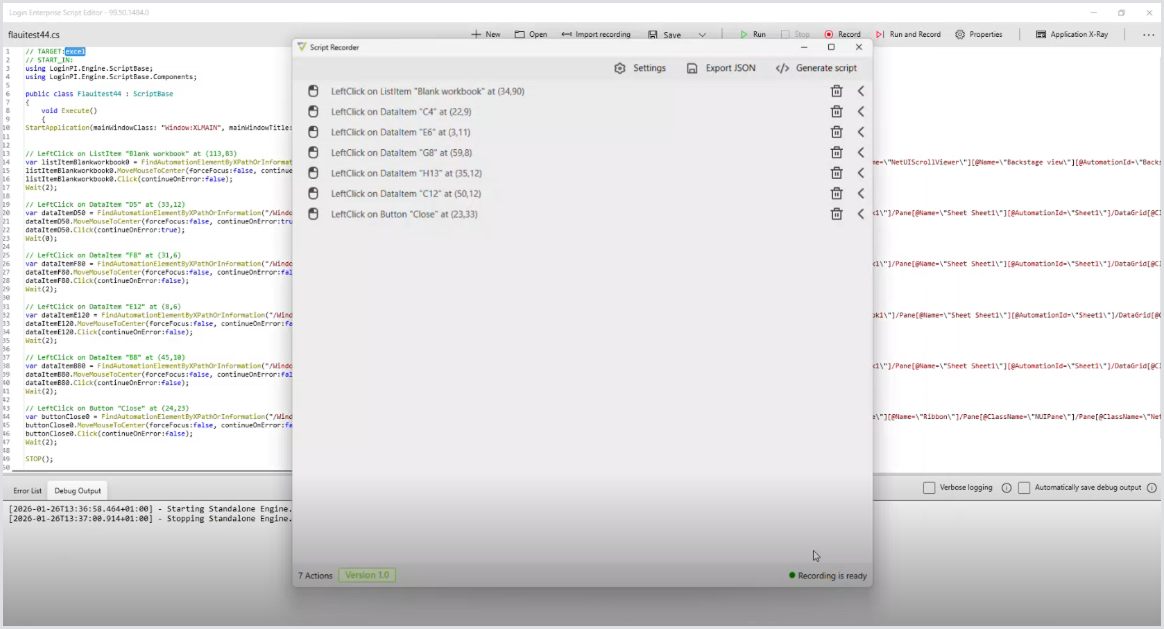
In the Script Editor top menu, click Record to start the recording.
When the recording starts, a player where you can perform actions opens.
The recorder uses visual indicators to show the status of detected elements:
-
Orange indicates that the recorder is in the process of locating an element.
-
Green indicates that the element is ready and can be interacted with. Actions performed on green-highlighted elements are recorded.
WinApp Recorder supports the following actions:
-
Stop the recording of actions
-
Start the recording of actions
-
Pause or continue the recording
-
Remove the last recorded action
-
Remove all recorded actions
-
Show or hide the list of recorded actions (downward/upward arrow icon)
Stopping the Recording: ScriptResultWindow
When you stop the recording, the ScriptResultWindow shows an overview of all recorded steps (before generating the script, right after the recording was stopped).
In the Overview screen, you can adjust General and Action settings, export the script as JSON, and generate the script.
Settings
Changes made in General settings apply to all action settings.
General
|
Option |
Description |
|
|---|---|---|
|
Recording interaction |
Determines mouse positioning when interacting with elements. |
|
|
Click to center (default) |
The script will always click in the center of the element. |
|
|
Use X and Y coordinates |
The script will click within the element as it was recorded. |
|
|
Mouse move |
Determines the inclusion or exclusion of mouse movements in the script. |
|
|
|
Include mouse moves in the recording |
Once you select the toggle, the actual mouse movements will be included in the script. This might lead to an increased runtime of the script. |
|
Waits |
Adds a pause after each recorded step in the script. |
|
|
CPM (Characters Per Minute) |
Adjusts typing speed. If you leave the toggle unselected, the default value will be used. If you select the toggle, the CPM value will appear in the script. The default is 300 characters per minute. |
|
|
Timeout |
Specifies how long the recorder repeatedly attempts to find the target element before the action fails. If the element is not found within the timeout, the action fails. The default is 5 seconds. |
|
|
Find element by |
Defines a strategy for locating UI elements during playback. |
|
|
|
XPath with information fallback (default) |
Attempts to locate the element using XPath first. If XPath fails, the recorder falls back to locating the element based on its identifying information (such as name, automation ID, class name, and other properties). Provides a balance between performance and reliability and is recommended for most scenarios. |
|
XPath only |
Locates the element using only XPath. Typically faster but more fragile, as changes to the UI structure (such as added or removed containers) can cause the XPath to become invalid. |
|
|
Information only |
Locates the element using identifying properties (such as name, automation ID, and class name) without using XPath. More resilient to UI structure changes, but may take longer to locate elements. |
|
|
Ancestor metadata |
When enabled, XPath includes metadata from parent (ancestor) elements to more precisely identify the target element, which can improve precision but may reduce robustness in applications with dynamic containers or changing window titles. |
|

Action
Changes made in Action settings apply only to the selected action.
|
Option |
Description |
|
|---|---|---|
|
Recording interaction |
Determines mouse positioning when interacting with elements. |
|
|
Click to center (default) |
The script will always click in the center of the element. |
|
|
Use X and Y coordinates |
The script will click within the element as it was recorded. |
|
|
Waits |
Adds a pause after each recorded step in the script. |
|
|
Mouse move |
Determines the inclusion or exclusion of mouse movements in the script. |
|
|
|
Include mouse moves in the recording |
Once you select the toggle, the actual mouse movements will be included in the script. This might lead to an increased runtime of the script. |
|
CPM (Characters Per Minute) |
Adjusts typing speed. If you leave the toggle unselected, the default value will be used. If you select the toggle, the CPM value will appear in the script. The default is 300 characters per minute. |
|
|
Timeout |
Specifies how long the recorder repeatedly attempts to find the target element before the action fails. If the element is not found within the timeout, the action fails. The default is 5 seconds. When using Information only, consider increasing the Timeout, as element searches may take longer and could otherwise fail prematurely. |
|
|
Continue on error |
Available only in Action settings. Disabled by default. When enabled for an individual action, the script doesn’t abort if that action fails and instead continues with the next action. |
|
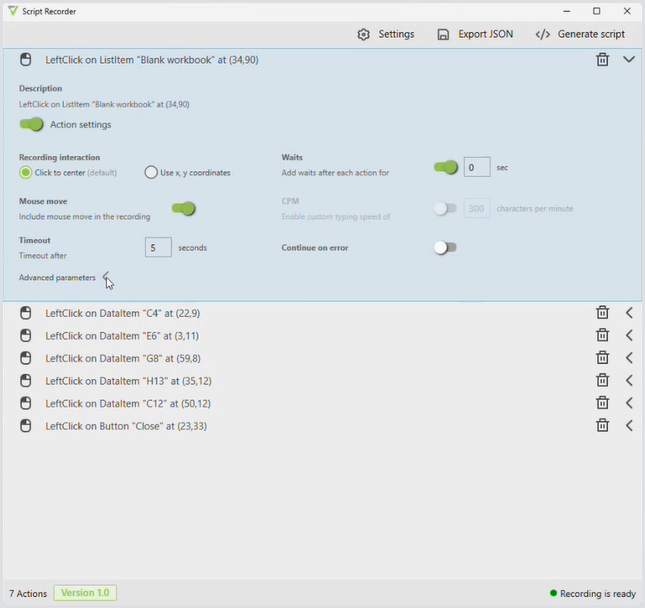
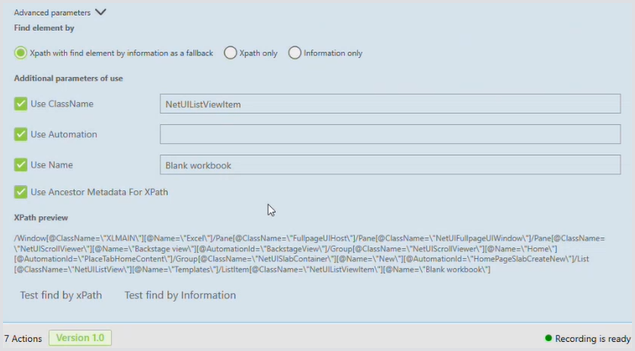
Advanced parameters
You can use Advanced parameters to fine-tune how UI element locators are generated and tested for a selected action. There are 3 options available:
|
Option |
Description |
|
|---|---|---|
|
Find element by |
Defines a strategy for locating UI elements during playback. |
|
|
|
XPath with information fallback (default) |
Attempts to locate the element using XPath first. If XPath fails, the recorder falls back to locating the element based on its identifying information (such as name, automation ID, class name, and other properties). Provides a balance between performance and reliability and is recommended for most scenarios. |
|
XPath only |
Locates the element using only XPath. Typically faster but more fragile, as changes to the UI structure (such as added or removed containers) can cause the XPath to become invalid. |
|
|
Information only |
Locates the element using identifying properties (such as name, automation ID, and class name) without using XPath. More resilient to UI structure changes, but may take longer to locate elements. |
|
Additional parameters of use
|
Option |
Description |
|---|---|
|
Use ClassName |
Uses the element’s class name as part of the criteria to locate the target element. The value can be manually adjusted, and wildcards ( Use wildcards when the element’s class name has a consistent prefix or pattern but may include dynamic suffixes. Example: Button* |
|
Use Automation |
Uses the element’s automation ID to locate the target element. The value can be manually adjusted, and wildcards ( Use wildcards when the automation ID is partially dynamic and only part of the value is stable. Example: loginButton* |
|
Use Name |
Uses the element’s name property to locate the target element. The value can be manually adjusted, and wildcards ( Use wildcards when the visible name contains variable text or additional context. Example: *Sign in* |
|
Use Ancestor Metadata for XPath |
XPath includes metadata from parent (ancestor) elements to more precisely identify the target element. |
|
XPath preview |
Shows the XPath expression generated for the selected action using the current advanced parameters. |
|
Test find by XPath |
Tests whether the target element can be successfully located using XPath. The application must be open at the element’s location. |
|
Test find by Information |
Tests whether the target element can be successfully located using information-based identification. The application must be open at the element’s location. |
Generating the Script
This option generates the script. After generating the script, you can go back, change the settings, and generate the script (with new settings) again.
Running the Script
-
In the ScriptResultWindow, click Generate script.
-
Copy the generated script to the clipboard and paste it into the Script Editor.
Recorded scripts automatically include Start Application and Stop commands.
When you record a script, the recorder generates a complete sequence that includes starting the application, performing the recorded actions, and stopping the script. This differs from manually created scripts, which typically use separate Start, Wait, and Stop commands.
If you are copying recorded actions into an existing script, replace the existing Start, Wait, and Stop commands with the generated Start Application and Stop commands to ensure the script runs correctly.
Script Recorder doesn’t support notifications, such as Copied to the clipboard. So, once you copy the script to the clipboard, it has been saved; the Script Recorder is just not letting you know about it. You can now proceed and paste the script into the Script Editor.
-
In the Script Editor top menu, click Run to run the script.
Run and Continue Recording
The Run and Record button in the Script Editor allows you to execute an already created script and then automatically opens the recorder at the end of the script.
This is useful if you need to add new steps to an existing script or make adjustments without re-recording everything from the beginning.
How it works
-
Execute the existing script: Click Run and Record. This will first execute the script that is currently open in the Script Editor.
-
Automatic recording: Once the script has finished running, the recorder will open automatically, enabling you to continue capturing additional actions or steps without starting from scratch.
-
Stop the recorder, click Generate script, and copy the script to the clipboard. Then, paste the script into the Script Editor and click Run.
Exporting the Script as JSON
This option provides additional information on script failures, facilitating feedback submission and analysis.
Importing the Script as JSON
Alternatively, if you already have an existing script recording (JSON file), click Import recording in the Script Recorder top menu and proceed with the steps described above.
Restrictions and Limitations
|
Aspect |
Details |
|---|---|
|
Script compatibility |
The script generated by Script Recorder can only be run in Login Enterprise v5.10 or higher. |
|
Supported applications |
V1 supports only WinApps. Browser and browser-based apps (e.g., Teams, Spotify) are currently out of scope. |
|
Unsupported actions |
Actions that were not previously supported in the Engine remain unsupported, e.g., mouse drag and mouse scroll. |
|
Application types with limited functionality |
Applications built with Java, Web components, or those that launch separate windows with new executables do not function properly yet. |
|
Script handling |
Script Recorder now only generates the script and does not automatically import it into the editor. You must copy the script to the clipboard and paste it manually into the editor. Important: The generated script includes the initial |
|
Recording scope |
Only one application per recording can be captured at a time. |
|
Recorder no longer locks to a single application |
Previously, the recorder was locked to the application you selected at the start of recording. Any actions performed outside that application, including actions in other apps or in pop-up windows, were not recorded. The recorder no longer locks to a single application. When you start recording, the selected application opens as before, but the recorder captures actions across all applications. For example, if you start recording in Excel and then switch to Word, your actions in Word are also recorded. Benefits
Things to keep in mind
|
Recommendations
|
Recommendation |
Explanation |
|---|---|
|
Use one monitor during recording |
Using multiple monitors with different scaling settings during recording may cause issues. Specifically, when working across two screens with varying scaling configurations, Script Recorder may not function correctly. |
|
Proceed carefully |
Wait for the green box to blink over a button or object before proceeding. This visual cue indicates that you can safely move to the next step. |
Tutorials
Launching Apps with a START_IN Magic Comment
Script Recorder uses the START_IN magic comment to launch applications, such as OBS Studio, if this comment is present in the script.
The screenshot below shows how the START_IN path appears in the recorded script:
For information on how to use the magic comment, including its formatting, practical examples, and best practices, see Using // TARGET: Comments for CLI Automation.
CLI Parameters and Arguments
Script Recorder (and the Engine) allows you to write arguments and parameters to scripts. You will write your parameters in the // Target: aka the Target application.

There are a few things to note:
-
Script Recorder will allow the use of environment variables, and these will be expanded to the respective values
-
It is possible to write in the target application without quotations as per legacy behavior in the Engine.
-
While Script Recorder allows the end user to write in the target application without quotations, this goes against standard Windows functionality when starting a process. Windows expects the user to wrap any file paths containing spaces in quotations. This functionality exists due to legacy behavior. See the following example. The second attempt is the standard behavior.
-

-
This functionality will only allow the end user to write down a target application without quotations If the target application has the following File extensions: ".exe", ".bat", ".cmd", ".vbs", ".wsh". This is also part of the legacy behavior in the Engine.
-
If you do not provide any of these extensions, the behavior will revert to the original Windows behavior. Thus, the end user should wrap the target application in quotations, or at least, make sure that the provided file path does not contain spaces.
-
Arguments provided to Script Recorder expect that any arguments with a file path be wrapped in quotations. Otherwise, you just have to ensure that your file path does not contain any spaces. This is consistent with standard Windows behavior.
-
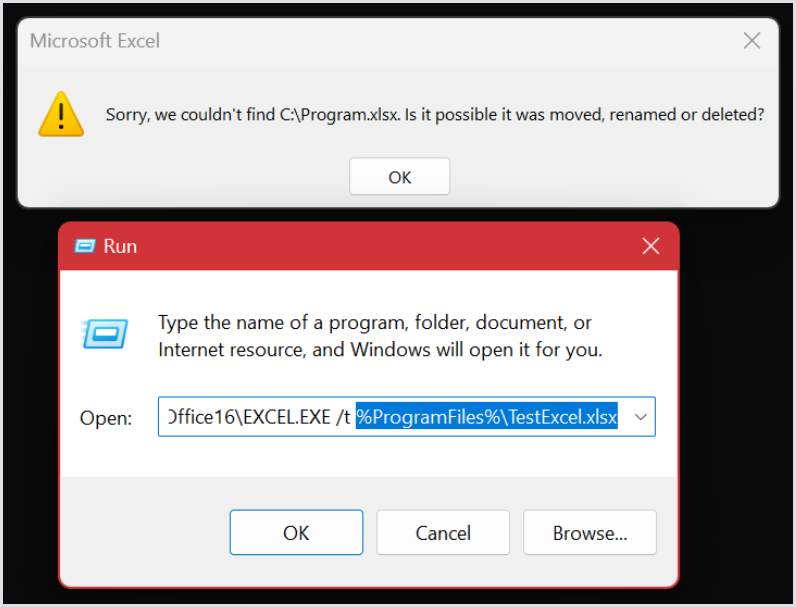
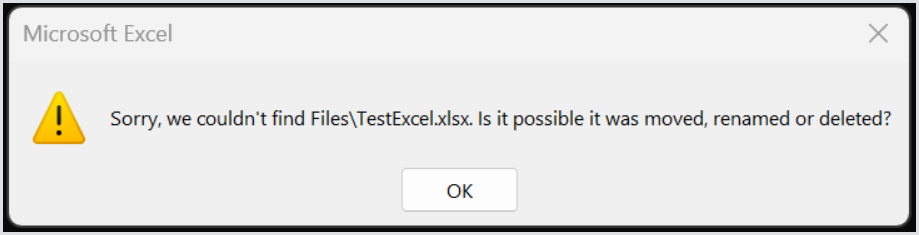
The previous example attempts to run the following command:
%ProgramFiles%\Microsoft Office\root\Office16\EXCEL.EXE /t %ProgramFiles%\TestExcel.xlsx
This example expands environment variables to:
C:\Program Files\Microsoft Office\root\Office16\EXCEL.EXE /t C:\Program Files\TestExcel.xlsx
-
This means that Excel then identifies C:\Program as one parameter and Files\TestExcel.xlsx as another parameter. Therefore, it fails to find the file
-
The solution is to wrap the argument in quotations as “%ProgramFiles%\TestExcel.xlsx”
Wildcards for Class Names, Names, Titles, and Automation IDs
Wildcards are useful when dealing with elements that have dynamic properties in an application.
Why use wildcards?
Wildcards allow for flexible matching of elements when their properties are not fixed. For instance, if elements in an application have names or IDs that change dynamically, using wildcards can help you identify and interact with these elements more effectively.
How wildcards work
-
A
*(asterisk) serves as a wildcard character. -
Placing the
*at the end of a string, e.g.,classn*will match all elements that start with the given prefix. -
The
*can also be placed at the beginning or middle of the string to match elements with varying prefixes or suffixes.
Syntax example
{TagGoesHere} : {ClassNameGoesHere} [{NameGoesHere}][AutomationId : {AutomationIdGoesHere}][Position: {PositionGoesHere}]
In this syntax, wildcards can be used in the following elements:
-
{ClassNameGoesHere} -
{NameGoesHere} -
{AutomationIdGoesHere}
Practical example
Imagine you’re writing a script to interact with Microsoft Word. When you open a new document, the Script Recorder might capture the window title as:
var nWindow0 = FindWindowByClassAndName(className: "Window:OpusApp", name: "Document1 - Word");
Here, the title "Document1 - Word" is specific and might not always be the same. If you want your script to work regardless of the specific window title, you can use a wildcard to match any title that ends with " - Word":
var nWindow0 = FindWindowByClassAndName(className: "Window:OpusApp", name: "* - Word");
In this example, the asterisk (*) acts as a wildcard character, allowing the script to successfully find any Microsoft Word window where the title ends with " - Word", even if the part before " - Word" changes.