Overview
Login Enterprise connectors are used for remotely initiating sessions to published applications and desktops across a variety of technologies, including Citrix Virtual Apps and Desktops (CVAD), Citrix Cloud, Microsoft Remote Desktop Services, Microsoft Azure Virtual Desktop, Microsoft Windows 365, and VMware Horizon.
Connectors are selected and configured as part of a test configuration and come in 3 distinct types: Standard Connectors, Desktop Connectors, and Custom Connectors. Login Enterprise supports the following Connector types:
Review the parameters you must specify to configure a Connector for your connection server, e.g., “username”, “domain”, “password”, “broker URL”, and “resource name”. The parameters supply the details of how to interact with the target environment. These required parameters will be the same for a Connector regardless of Test type, so once you have configured a particular Connector for one type of Test, the configuration settings can be used for any other Test or Test type.
Benefits of Using Connectors
|
Benefit |
Description |
|---|---|
|
Seamless integration |
The Login Enterprise appliance offers pre-configured Connectors for leading platforms such as Citrix Netscaler 12.1, Citrix Netscaler 13.0, Citrix Storefront, Microsoft RDS, and VMware Horizon View. This ensures seamless integration, simplifying remote access setup. |
|
Customization options |
Organizations can tailor configurations with the Custom Connector feature, adapting settings to specific needs while maintaining simplicity. |
|
Centralized management |
Administrators can efficiently manage and monitor Connectors from a unified interface, simplifying remote access management and troubleshooting processes. |
|
Scalability and compatibility |
With support for diverse Connectors, the Login Enterprise appliance scales easily to accommodate changing IT environments while ensuring compatibility with evolving technology landscapes. |
Citrix Netscaler 12.1 and 13.0
For the two Citrix clients, we interact with their web interfaces to identify and select the desired resource from the supplied URL. That will result in an ICA file, which we then pass to Citrix\ICA Client\wfcrun32.exe to initiate the actual remote session.
The Citrix Netscaler connector exclusively supports nFactor authentication and is currently compatible only with forms-based authentication factors, such as LDAP. For configuring nFactor and understanding the requirements, refer to the following links:
In Login Enterprise, the Citrix Netscaler connector supports the following parameters:
-
Netscaler URL: Specifies the Netscaler URL.
-
Resource: Defines the resource name visible to end users upon logging into StoreFront.
-
Display Configuration: Offers options for full-screen display or custom resolution settings.
-
Accounts: Allows selection from previously configured account groups or all accounts.
-
Launchers: Provides the option to choose from previously configured launcher groups or all launchers.
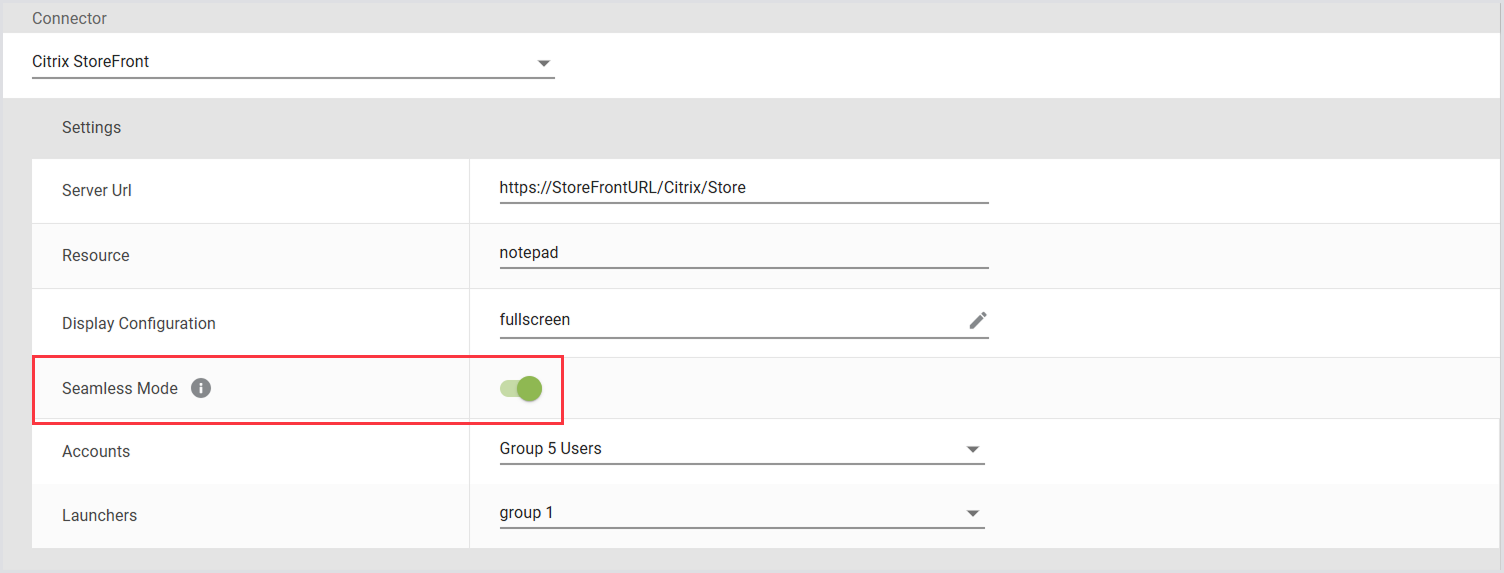
Citrix Storefront
In Login Enterprise, the Citrix Storefront connector supports the following parameters:
-
Server URL: Specifies the Store URL (not the StoreWeb URL). Refer to the provided screenshot as an example.
-
Resource: Specifies the resource name visible to end users upon logging into StoreFront.
-
Display Configuration: Offers options for full-screen display or custom resolution settings.
-
Accounts: Allows selection from previously configured account groups or all accounts.
-
Launchers: Provides the option to choose from previously configured launcher groups or all launchers.
Seamless Mode for Citrix Published Apps
Seamless Mode supports published applications delivered through Citrix virtualization platforms. This mode allows for more accurate performance testing that aligns with Citrix’s best practices. When enabled, it launches apps in seamless mode instead of the Login Enterprise default windowed mode (TWIMode=Off).
This configuration is especially useful for organizations running newer Citrix LTSR versions where ShellBridge or other seamless mode mechanisms affect application behavior and performance. Running in windowed mode may no longer reflect the typical user experience in these environments.
Important: Seamless Mode is only available when using Launcher version 6.2 or later. Ensure your Launcher is up to date before enabling this setting.
If the Launcher version is not supported, this option will be ignored, and the Test will run in windowed mode.
Benefits of Seamless Mode
-
Reflects Citrix’s recommended configuration for published apps.
-
Improves the accuracy of performance metrics.
-
Enhances the realism of Test scenarios for end-user experience.
How to Enable Seamless Mode
-
Open the connector configuration for StoreFront and/or NetScaler.
-
Locate the Seamless Mode toggle.
-
Enable Seamless Mode to allow published apps to launch outside a fixed window.
-
Save the configuration.
Note: If Seamless Mode is not enabled, Login Enterprise defaults to windowed mode (TWIMode=Off) for compatibility.
Behavior and Compatibility
-
Enabling Seamless Mode allows multiple published app sessions to be tracked reliably using ProcessId (instead of relying on window titles).
-
Session lifecycle behavior (start, monitor, terminate) is consistent in both seamless and windowed modes.
-
If Seamless Mode is disabled, apps will behave as they did in previous versions.
-
Upgrading to this version does not change existing connector behavior unless Seamless Mode is explicitly enabled.
-
Enabling Seamless Mode may affect testing results, such as changes in the EUX score.
-
Seamless Mode requires the app window to stay in focus. When multiple published app sessions are running simultaneously, they may compete for focus. In some cases, this can cause interference between sessions, and some applications may fail, depending on the application itself and how the script is written. You may need to restrict your test to have only one Seamless Mode session per Launcher.
Best Practices
-
Use Seamless Mode when testing Citrix-published apps.
-
Refer to in-product tooltips for guidance on when to enable Seamless Mode.
-
Always confirm that your Launcher version supports this feature before use.
Microsoft RDS
For the Microsoft Remote Desktop Session (RDS), we construct an RDS file that contains the target server, resource information, and authentication information, then we execute MSTSC.exe to launch it and monitor the resulting process.
In Login Enterprise, the Microsoft RDS connector supports the following parameters:
-
RDS Broker / RDP Host: Allows connection to an RDS farm or a single desktop.
-
Resource: Optionally specifies the name of the desktop pool when the RDS broker is configured.
-
RDS Gateway: Optionally configures RDS Gateway information if applicable.
-
Suppress Certificate Warnings: Enables ignoring certificate warnings for untrusted hosts.
-
Display Configuration: Supports fullscreen or custom resolution settings.
-
Accounts: Provides the option to choose from previously configured account groups or all accounts.
-
Launchers: Offers selection from previously configured launcher groups or all launchers.
Multi-Host Configurations
Multi-host configurations in the Microsoft RDS are crucial for achieving various objectives such as high availability, load balancing, scalability, and fault tolerance. Unlike using the RDS Broker for load balancing, the multi-host configuration allows organizations to specify hosts or IP addresses directly, bypassing load balancing. This means that virtual users can be directed to specific hosts, such as host1, host2, and so on, without going through the Broker's load-balancing mechanism. When multiple hosts are configured, the Test will direct connections to them in a round-robin sequence, cycling through the entire list in order.
This approach offers flexibility, as you can choose to test only a subset of servers within the RDS Farm. For instance, if you want to test only a few servers (e.g., host1 to host5) instead of all servers on the farm, you can utilize the Multi-host option. By doing so, you can ensure that virtual users are directed only to the specified hosts, without undergoing load balancing by the Broker. This strategy helps optimize testing scenarios and ensures efficient resource utilization.
To add Multi-host configurations:
-
When creating or modifying your Microsoft RDS environment, click Multi-Host Configs on the right (The Multiple-server hosts window will open).
-
In the Multiple server hosts table, provide the details of the RDS servers you wish to have tested. You can also copy and paste a list of machines here for easy entry. Please note that we will connect to your machines in a round-robin style. That is, we will connect to machine 1 first, then proceed to machine 2, and so on in a sequential fashion.
-
Click Save to apply the changes.
VMware Horizon View
For the VMware Horizon View connector, we call the installed vmware-view.exe executable with the appropriate resource, server, and authentication parameters, and monitor the resulting process. Below is a breakdown of the parameters used:
-
Resource: Specifies the resource (virtual desktop or application) that the user wants to access.
-
Server: Specifies the server address or hostname of the VMware Horizon View server.
-
Authentication Parameters: Include credentials or authentication tokens required to authenticate the user and establish a secure connection.
If your VMware View client is not included in your System Path variable, you need to provide the explicit path. Typically, the path is as follows:
-
For 64-bit versions of VMware View client: C:\Program Files\VMware\VMware Horizon View Client\vmware-view.exe
-
For 32-bit versions of VMware View client: C:\Program Files (x86)\VMware\VMware Horizon View Client\vmware-view.exe
Ensure to verify the installation directory on your system and adjust the path accordingly when specifying it.
In Login Enterprise, the VMware Horizon View connector supports the following parameters:
-
Server URL: Specifies the View Server for the connection.
-
Resource: Defines the resource name visible to end users.
-
Connection command line: Contains the path and parameters used by the VMware View executable. See the connection command line table for more information. The example provided below is the default command line from the Login Enterprise.
-
Accounts: Allows selection from previously configured account groups or all accounts.
-
Launchers: Enables selection from previously configured launcher groups or all launchers.
Additionally, you can incorporate all accepted parameters for the Horizon View Client. For further details, see the VMware View Connector Reference.
Connection command line
The following variables are commonly used in the connection command line for the VMware Horizon View connector. The available connection command line options are controlled by the VMware client itself. If you need to set additional options, see the Omnissa documentation.
|
Field |
Description |
|---|---|
|
serverurl |
The URL address of the server to connect to |
|
username |
The username field from the selected account |
|
password |
The plain-text password from the selected account |
|
domain |
The domain field from the selected account |
|
resource |
The “Resource” field from the custom connector configuration |
|
customX |
The Custom1 to Custom5 fields configured within the Account record |
|
SecureCustomX |
The Secure Custom1 to Secure Custom5 fields configured within the Account record |
Desktop Connection
The Desktop connector lets you trigger a Test run without needing a remote-access system. Instead of using a Launcher that triggers a login for a properly configured account, you, as a user, run the appropriate program by hand. When you select a Desktop connector, there are no configuration parameters. The Test definition lets you simply copy a command (LoginPI.Login.exe <URL> <TestID>) and paste it into your existing session to download and execute the Test.
The Desktop connection method is highly beneficial for initial testing and can also prove invaluable in unique situations where creating a remote session is not feasible. Instead, you can use existing machines with active interactive sessions to trigger the Tests.
To set the connector in the environment (Continuous Testing or Application Testing), you need 3 values:
-
Environment Name
-
Connector (Desktop)
-
Description
Once configured, you might notice the lack of other configurations as seen in the different connectors. This is normal as we start the process from the machine; there is no remote connection required. You can now configure the environment as usual.
Continuous Testing Scenario
There are other differences in the connection setup of the Desktop Connection with other remoting configurations. With Continuous Testing, the schedule has changed from a detailed overview to a simple enable or disable button. Enabling the schedule will allow the Desktop Connector to start. If it is disabled, no sessions can be initiated.
The Actions list is almost the same as the Continuous Testing that uses a remote connection. There is a single difference. Instead of logging off at the end, we have the Restart on complete. The "Restart on Complete" will automatically restart the machine. Depending on the configuration, the machine will auto-start / login and repeat the same process.
If you do not want the machine to reboot after each run, you can decide if you want to run the process once or repeat it x number of times. We have seen situations where customers want to repeat the process 9999 times using the "Repeat all steps above" function.
Notifications are also different, as you can see, there are no results concerning the remote connection to the environment. There are no Logon Failures, Logon Measurements, and Latency measurements done. Only application failures are measured by default.
You have the option, similar to other situations, to add specific thresholds you wish to be notified of when they are crossed.
Application Testing Scenario
Application testing configuration differs from Continuous Testing and Application Testing done with a remoting protocol. Again, the function "Restart on Complete" is added to the Action list. You can decide to reboot the machine when it is done.
The thresholds are configurable as normal, but without the Login and Latency measurements.
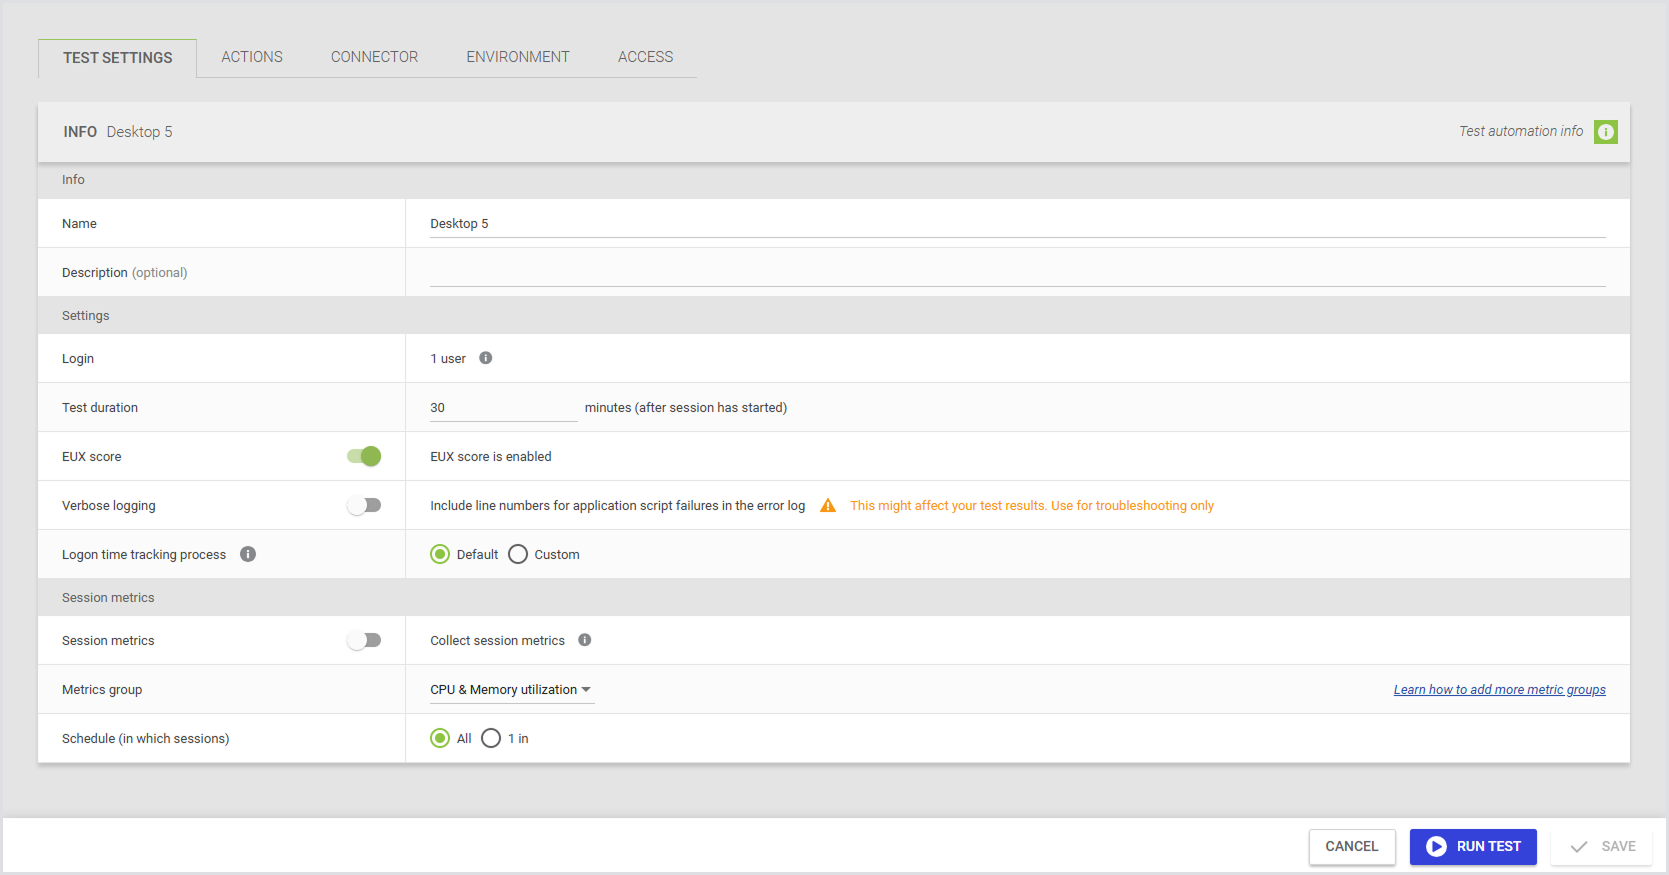
Load Testing Scenario
You can run a Load Test by using a Desktop Connector. When you create a new Load Test, the Connector dropdown includes Desktop as an additional option. Selecting a Desktop Connector gives you access to capabilities that aren’t available in Continuous Testing or Application Testing, such as:
-
Session metrics
-
EUX calculation
-
PDF reporting
Desktop-specific behavior
Desktop Connectors behave differently than other connectors:
-
Desktop Tests don't include a login process.
-
Tests always run with one user.
-
The VSImax users setting is hidden.
-
Even though this is a one user Test, the limitation that only one Load Test can run at a time still applies.
Here’s how the Load Test settings appear when you select a desktop connector:
Logon App
To configure the Logon App for Desktop situations, see Configuring Logon Components.
Custom Connector
The Custom Connector provides a flexible solution for defining commands with parameter substitution, allowing the Launcher to execute various remote connection software. This versatility enables you to trigger connections using executable clients on the Launcher machine.
When none of the predefined connector options meet your requirements, the Custom Connector offers a tailored approach. For example, if your setup requires compatibility with a specific version of NetScaler not supported by our out-of-the-box connectors, the Custom Connector can accommodate this need. While third-party scripts are also viable, it's worth noting that the Custom Connector is most often used seamlessly with the Universal Web Connector (UWC). For guidance on using the UWC with the Custom Connector, see Configuring the Universal Web Connector.
In Login Enterprise, the Custom Connector supports the following parameters:
-
Host: Specifies the connection server.
-
Resource: Defines the resource name visible to end users.
-
Connection command line: Specifies the command line executed on the Launcher machine to initiate a session. See the connection command line table for details.
-
Accounts: Allows selection from previously configured account groups or all accounts.
-
Launchers: Enables selection from previously configured launcher groups or all launchers.
Connection command line
The following variables are used in the connection command line for the custom connector.
|
Field |
Description |
|---|---|
|
host |
The “Host” field from the custom connector configuration |
|
username |
The username field from the selected account |
|
password |
The plain-text password from the selected account |
|
domain |
The domain field from the selected account |
|
resource |
The “Resource” field from the custom connector configuration |
|
|
The e-mail field from the selected account |
|
sessionId |
The current session ID provided by the Launcher for event tagging |
|
customX |
The Custom1 to Custom5 fields configured within the Account record |
|
SecureCustomX |
The Secure Custom1 to Secure Custom5 fields configured within the Account record |
Custom Fields
You can add custom fields during account configuration and use them with custom connectors, just like you would with email, username, domain, password, and other standard fields. You can define up to five custom fields with editable values, but their names remain fixed.
Benefits of Using Custom Fields
Custom fields offer several practical advantages, especially when used with the Universal Web Connector:
|
Benefit |
Description |
|---|---|
|
Enhanced customization |
You can store extra information, like additional usernames or authentication tokens, making your setup more specific to your needs. |
|
Improved flexibility |
Custom fields let you pass values in command lines, so you can easily adapt to different configurations without changing core settings. |
|
Streamlined testing |
You can quickly adjust field values for testing. This makes your testing process more efficient and thorough. |
|
Seamless integration |
Custom fields work well with custom connectors and Swagger, helping you manage extra data smoothly across different tools. |
|
Increased efficiency |
Updating custom field values through Launchers and command lines reduces manual errors and saves time. |
Setting Custom Field Values
Custom field values can be set when creating a new account. To edit these values later, use the account editing form. Click the “pencil” icon in each row to open this form, which will display the fields with their current values pre-populated.
If any custom fields have been saved, the panel automatically expands to show their values. Custom fields can hold various types of values, including a single digit, random text, or an authentication token. They accept any string up to 1,024 characters in length.
To use saved custom field values with custom connectors, you need to update your Launchers. This ensures that the latest custom field values are correctly integrated and utilized.
Adding Custom Fields as Arguments
Once the Launchers are updated, you can include custom fields as arguments when starting a new custom connector process. For example, you might pass a custom field value like this:
CustomConnector.exe --custom1 "{custom1}"
Modifying Command Line Values
You can also modify the command line to source values for username, email, domain, and other fields from custom fields instead of their dedicated fields. For example:
CustomConnector.exe --username "{username}" --password "{password}" --domain "{domain}"--resource "{resource}" --email "{email}"
Can be updated to:
CustomConnector.exe --username "{custom1}"--password "{custom2}" --domain "{custom3}" --resource "{custom4}" --email "{custom5}"
This flexibility allows you to use custom field values in various configurations and testing scenarios.
Other Customization Options
In some cases, you might need to test with an additional username, password, or authentication token. Custom fields provide this additional level of customization.
Custom fields can also be added when creating accounts in Swagger (API v5 and v6). Since this is optional, the property can be set to null or omitted entirely.
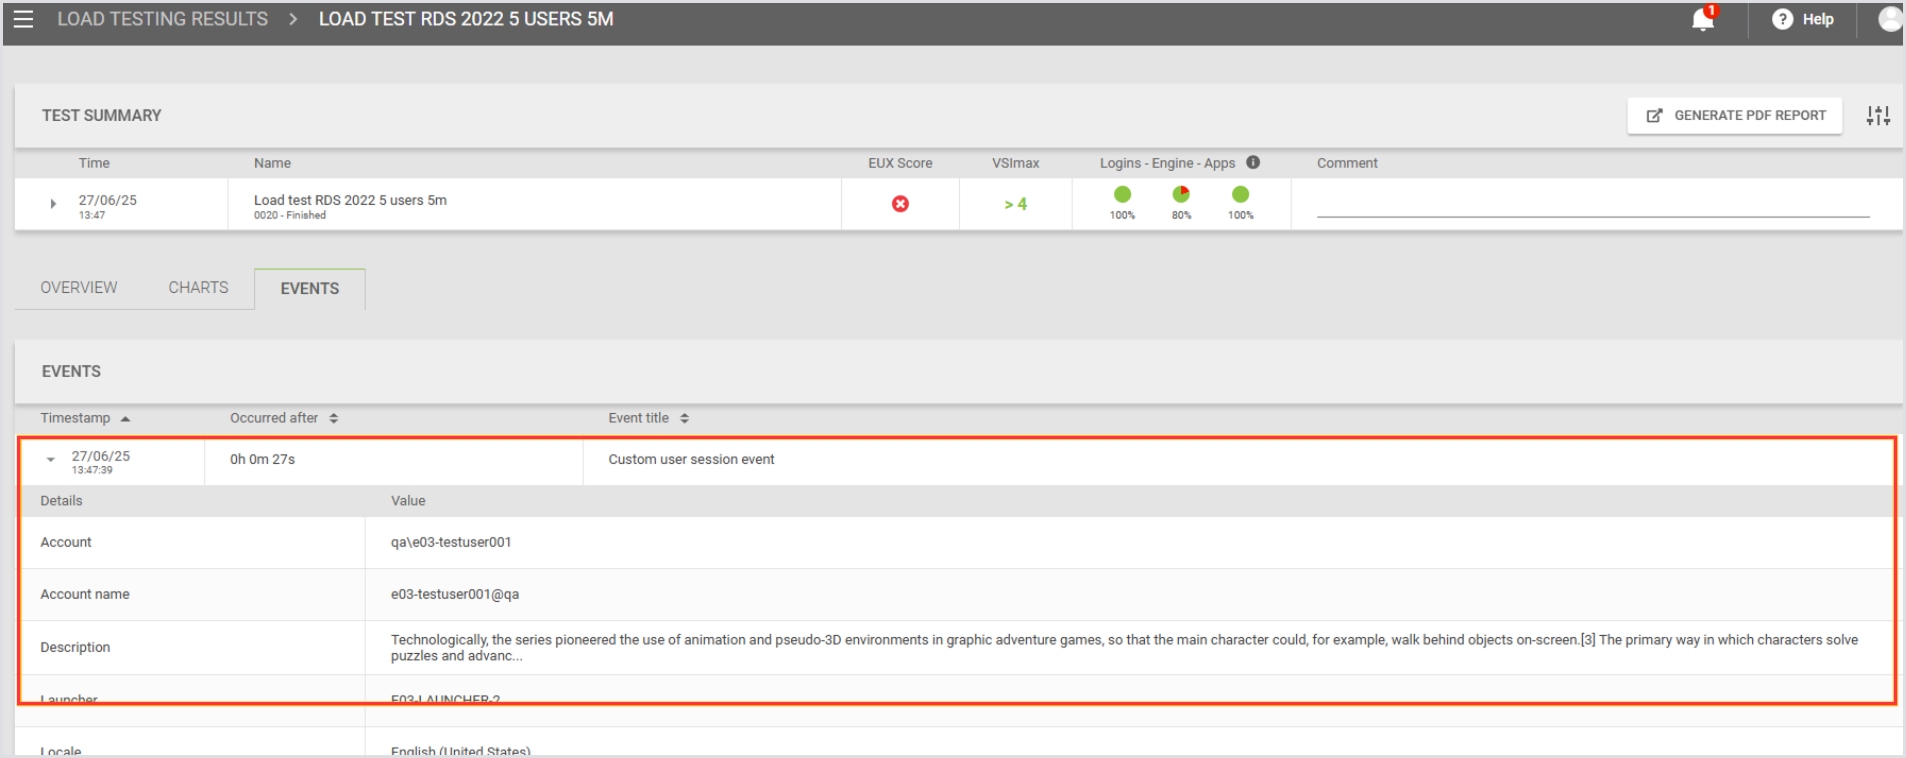
Custom Events for Connectors and Launchers
You can emit custom events directly from connector scripts and view them alongside standard Launcher events in the Events feed. This helps you trace and diagnose custom connector behavior without relying on external logs.
What Are Custom Events?
Custom events are user-defined messages sent from your connector implementation during a Test. They appear in the Events section of the Login Enterprise UI and include:
-
A timestamp
-
A session ID
-
A message (custom, free-form text)
This functionality lets you track key steps, issues, or decisions made during the Test session, especially helpful when using custom logic or workflows in your connector.
When to Use Custom Events
-
Report internal states, checkpoints, or branching logic
-
Flag warnings or known edge conditions in real time
-
Log custom errors tied to a specific test session
Custom events are purely informational and do not affect test execution or scoring.
Viewing Custom Events
-
The Events tab of a test run, alongside standard events like
SessionStartandSessionEnd -
Launcher logs, for local debugging
-
The Events section of the Appliance UI, where they can be identified by their message text.
These events follow the same retry and buffering logic as standard events, so they won't be lost during temporary connection issues.
Enabling Custom Events
-
Ensure you are using Login Enterprise v6.2, which supports this feature.
-
Generate a Configuration-level Public API system access token (see Adding a System Access Token).
-
Include the Session ID in your Custom Connector invocation (refer to Passing Session ID to the Custom Connector).
No additional configuration is required on the Appliance or Launcher side.
Implementation
Custom Events are implemented as an API call (see Using the Public API). You must provide the User Session ID of the session you want to attach your event to, and a “description” field as a JSON payload.
The API is a REST method at /v8-preview/user-sessions/{sessionId}/events. It accepts POST invocations only, and expects a simple payload:
{
"description": "Event message content"
}
For instance, to post a Custom Event for a specific User Session from PowerShell, this command will work (as will the corresponding Invoke-RestMethod):
Invoke-WebRequest -Method POST `
-uri https://login-ent.loginvsi.com/publicApi/v8-preview/user-sessions/$sessionId/events `
-H @{"accept" = "*/*"; "Content-Type" = "application/json"
"Authorization" = "Bearer zRZXRvJoAHM3tGiAiYpecKzTfcQN0lwZGr-GJ4XagzE"} `
-body '{ "description": "This is a custom event" }'
Note: You may need to tell PowerShell to ignore certificate errors if you are using a self-signed certificate (see this Public API example for how to do that).
To make this call from a Login Enterprise Stand-Alone Engine script, use this code:
using System.Net;
string appliance = "appliance-hostname";
string apiKey = "generated-API-key";
var client = new WebClient();
client.Headers.Add("accept", "*/*");
client.Headers.Add("Content-Type", "application/json");
client.Headers.Add("Authorization", $"Bearer {apiKey}");
var response = client.UploadString($"https://{appliance}/publicApi/v8-preview/user-sessions/{sessionId}/events", "{ \"description\": \"This is a custom event\" }");
}
}
To make this call from a Linux server or Linux-like environment, you can use this curl:
curl -X POST https://login-ent.loginvsi.com/publicApi/v8-preview/user-sessions/$sessionid/events -H 'accept: */*' -H 'Content-Type: application/json' -H "Authorization: Bearer $key" -d '{ "description": "This is a custom event" }'
Tip: REST calls are standard, so you can implement this in any language you need to.
Notes and Considerations
-
Custom events do not support attachments such as screenshots or logs.
-
The feature is optional and backward compatible. If your environment doesn’t use a supported Launcher version, the functionality will not be available.
-
Use descriptive but concise messages. Overuse of verbose or excessive events may clutter logs.
-
Your Custom Connector must already include the address for the Login Enterprise Appliance and the API Secret Key in the code, or you will need to add them as Custom Fields for all of your accounts and include the Custom Fields in your command-line invocation.
How Custom Events for Connectors and Launchers and Passing Session ID to the Custom Connector work together:
Pass {sessionId} in your Custom Connector command line; the Launcher substitutes the real session ID at runtime, allowing the connector to POST {"description":"..."} to https://<appliance-FQDN>/publicApi/v8-preview/user-sessions/{sessionId}/events so events appear attached to that test session in the Appliance Events feed.
Passing Session ID to the Custom Connector
Before Login Enterprise v.6.2, the session ID was only available inside the Launcher process. This enhancement ensures that the session ID is passed to the connector during its initialization.
How It Works
When you define a Custom Connector, there is a new variable available for command-line substitution: {sessionid}. Add it to your custom connector invocation, and you can use that parameter however you need to. You must make sure your custom connector is expecting and will accept this new parameter.
When the Launcher initiates a custom connector on the Appliance, it supplies the current session ID. This allows the connector to tag any custom events or log messages with the correct session so that they appear in the appropriate place in the Appliance UI.
Key Details
-
Accuracy: The session ID is accurate and deterministic, ensuring that any custom events posted by the connector are matched to the correct session in the event list.
-
Non‑breaking: Existing custom connectors that do not use the session ID continue to function without any changes.
Example Connector Script
Here is a simple example script showing how to pass the session ID to a PowerShell script and use that script to post Custom Events. To use this script as a Custom Connector, set your Connection Command Line field to this:
powershell.exe -c C:\LoginVSI\Scripts\connector.ps1 {host} "{username}" "{password}" "{domain}" "{resource}" "{email}" {sessionId}
The script simply receives these parameters, posts a custom event reporting the parameters passed, sleeps for 30 seconds, and posts a closing custom event. You would place your actual commands to perform the login in place of the sleep 30.
[CmdletBinding()]
param(
[string]$hostname,
[string]$username,
[string]$password,
[string]$domain,
[string]$resource,
[string]$email,
[string]$sessionid
)

$appliance = "your-appliance-FQDN"
$apikey = "your API secret key"

Invoke-WebRequest -Method POST `
-uri https://$appliance/publicApi/v8-preview/user-sessions/$sessionId/events `
-H @{"accept" = "*/*"; "Content-Type" = "application/json"
"Authorization" = "Bearer $apikey"} `
-body "{ ""description"": ""Host $hostname; Username $username@$domain; Resource $resource; Email $email; SessionID $sessionId"" }"

# perform the actual login process

sleep 30

Invoke-WebRequest -Method POST `
-uri https://$appliance/publicApi/v8-preview/user-sessions/$sessionId/events `
-H @{"accept" = "*/*"; "Content-Type" = "application/json"
"Authorization" = "Bearer $apikey"} `
-body '{ "description": "This is a custom event injected at the end of the test" }'
Using Secure Custom Fields in Connector Configurations
Secure custom fields can be passed to launchers and connectors at runtime, the same way password fields are handled.
For details on configuring secure custom fields in accounts, see Secure Custom Fields (Optional).
Runtime Behavior
-
Launchers and connectors receive secured values at runtime in the same way as passwords.
-
Values aren’t retrievable after the test finishes.
UWC/Custom Connectors
When you use secure custom fields with a custom connector, pass them as command-line parameters.
|
Field |
Parameter name |
|---|---|
|
SecureCustom1 |
|
|
SecureCustom2 |
|
|
SecureCustom3 |
|
|
SecureCustom4 |
|
|
SecureCustom5 |
|
Use these parameter names in the same way you use {custom1}, {custom2}, and so on for standard custom fields.
Process Tracking (Optional)
By default, the Launcher will track the specific process ID it gets when it starts the custom connector. Login Enterprise will track the main window associated with that process ID, and report when that process ID terminates. If your custom connector creates additional processes, and if the initial process terminates before the remote session, the Launcher can find itself watching the wrong process.
Process tracking lets you monitor your custom connector and any processes it creates. It helps you:
-
See exactly when connections start and stop.
-
Identify the single process associated with the connector for the session (this may be the connector process itself or one of its child processes) that is configured for tracking.
-
Troubleshoot issues faster because you know which processes are running.
This ensures your custom connector runs smoothly and gives you accurate insight into its lifecycle.
Configuring Process Tracking
In your Custom Connector settings > Process Tracking, configure the following three fields:
|
Field |
Description |
|---|---|
|
Process name |
The name of the process to monitor. Process names don’t include file extensions. For example, enter |
|
Command-line token |
A substring to match in the process command line. |
|
Window title token |
A substring to match in the main window title. |

So that the fields are filled accurately, follow these rules:
-
Maximum 255 characters per field.
-
Leading and trailing spaces are removed automatically.
-
Token examples:
{sessionid},{username},{password},{domain},{custom1}. -
Functionality is enabled only if a value is present. Blank fields are ignored. The value is treated as a substring, so you don’t need to enter wildcards. For example, enter
{sessionid}instead of*{sessionid}*.
Note: The system only checks that fields aren’t empty or too long. Other errors, like typos in the process name, won’t be detected until you run the process.
Behavior Overview
-
If you leave all fields blank, process tracking is turned off, and the system defaults to the legacy behavior. If you enter one or more values, process tracking is turned on.
-
The system checks all the fields you enter and tracks a process only when every field matches.
-
For example, if you enter both the Process name and the Window title token, the system will track the process only if both match.
-
-
Matching happens automatically on the backend, i.e., you do not need to add scripts to your custom connector.
-
If no match is found, the system defaults to the legacy behavior.
-
A session is considered ended when the tracked process stops or the window closes. The engine timeout still applies, but is used only as a fallback safety measure.
Best Practices
-
Use unique identifiers in the Window title or Command-line token to avoid conflicts in multi-session scenarios.
-
Configure at least one field to ensure accurate session tracking.
-
Avoid relying solely on the Process name unless you are sure it will be unique.
-
Keep fields concise, under 255 characters, and avoid unnecessary spaces.
-
Track the actual remote session process, not the custom connector that initiates it. For example, if your connector is PowerShell-based, track the Windows remote session process (
mstsc) instead of the PowerShell process.
Named Pipes for Custom Connector
Custom Connectors communicate with the Launcher using Named Pipes, a lightweight and efficient Windows inter-process communication (IPC) mechanism. Named Pipes support bilateral communication, allowing both the Launcher and the Custom Connector to exchange structured messages with each other without relying on network services, sockets, or external dependencies.
Using Named Pipes improves reliability and bridges the gap between Custom Connectors and Built-in Connectors. It also replaces command-line arguments, which can expose sensitive data in logs or the Event Viewer.
This diagram illustrates the flow of messages between the Custom Connector and the Launcher using Named Pipes:
.png?cb=ef71320613c81c7959f30ef07db411b4)
Pipe Channel Characteristics
-
Bidirectional: Both the Launcher and the Connector can send and receive messages.
-
Isolated: Each pipe is unique per user session.
-
Fast and reliable: Memory-based transport ensures efficient data exchange.
-
Schema-driven: Messages use JSON for consistency and validation.
Benefits of Named Pipes
|
Benefit |
Description |
|---|---|
|
Secure communication |
Data is transmitted in memory (RAM) and scoped to the user session. |
|
Bidirectional messaging |
Both Launcher and Custom Connectors can send and receive messages. |
|
Improved monitoring/logging |
Admins can observe custom events without exposing sensitive data. |
|
Faster reporting |
Custom Connectors can report status/errors immediately. |
|
Future expandability |
Lays the foundation for advanced tracking/status reporting. |
Prerequisites
-
Windows environment
-
A Launcher version that supports Named Pipes
-
Custom Connector configured to leverage a data pipe
How Named Pipes Work
-
Named Pipes are automatically created when a Custom Connector process starts.
-
The Launcher stores the pipe name in an environment variable that’s available to the entire user session, not to a specific process. Any process running in that session can use the pipe name if it has access to it, so the connection works on a first-come, first-served basis. After the connection is established, the two endpoints remain fixed and can’t be changed.
-
Messages transmitted through the pipe are structured (JSON) and handled internally by the Launcher.
-
No command-line arguments are required, reducing exposure of sensitive information.
Custom Events and Session Information
Custom Connectors can send custom events to the Launcher via Named Pipes. These events allow the Launcher to track the state of a user session or report informational updates from the Connector.
|
Event Type |
Description |
|---|---|
|
|
Signals that a new user session has begun. |
|
|
Signals that the user session has finished. |
|
|
Reports that a connection attempt completed successfully. |
|
|
Reports that a connection attempt failed. |
|
|
Optional messages such as login attempts, status updates, or session logs. |
Key points:
-
Events are informational and generally do not require action.
-
Custom Connectors can report errors or session drops immediately without waiting for the Launcher or the Engine.
-
Events are tied to the user session, allowing you to trace which account, test, or attempt raised each event.
SDK Support
A Custom Connector can implement Named Pipe communication manually or use the CustomConnector SDK included with the Launcher.
-
The SDK is provided as a DLL in the extracted Launcher package.
-
It exposes methods for sending Launcher events directly, without requiring custom pipe-handling code.
-
The SDK can be used from PowerShell, C#, or other languages that can load the DLL.
For more information, see the CustomConnector SDK (Named Pipe).
From the Launcher Perspective (Named Pipe)
When Starting a New Session
When the Launcher starts a new session, it performs the following actions:
-
Starts
SessionTracker(if configured) andPipeServer -
Adds the
PipeNameto the environment variables of the connector process (environment variable name:VSI_IPC_PIPE_NAME) -
Starts the custom connector process
The Launcher also starts background threads to manage the communication channel:
-
SessionTrackerthread starts looking for the session window -
Another thread waits until the client connects to the pipe
-
When the client connects, it sends
ConnectionConfigurationto the client
-
-
PipeServerthread waits for messages from the connector
When an Event Message is Received from the Connector Process
When the Launcher receives an event message from the connector process, it processes it based on the event type.
|
Event type |
Description |
Arguments |
Launcher Behavior |
|---|---|---|---|
|
|
Signals the Launcher that the remote connection was successful and updates the internal state. |
|
When
|
|
|
Sends a |
None |
- |
|
|
Sends a |
|
- |
|
|
Sends a |
|
- |
When the Custom Connector Doesn't Use the Pipe
Using the pipe is optional. If the custom connector doesn’t interact with the pipe, the workflow continues to operate as it does.
-
If
SessionTrackeris configured, the Launcher still attempts to track the session window using the existing mechanism. -
If the Launcher can’t track the window, it falls back to the legacy behavior:
-
The Launcher waits for the configured timeout after the session ends.
-
The Launcher then sends the “connection closed” signal to the Appliance.
-
This ensures backward compatibility and prevents breaking existing custom connector implementations.
From the Connector Perspective (Named Pipe)
When the Launcher Starts the Connector Process
It adds PipeName to the connector’s environment variables.
When the Custom Connector Starts
It should:
-
Read the pipe name from the
VSI_IPC_PIPE_NAMEenvironment variable. -
Connect to the named pipe.
-
(Optional) Read the connection configuration from the pipe.
Tip: Parameters can still be passed through the command line if preferred.
When the Remote Session Window is Created
The custom connector can report progress to the Launcher by sending a RemoteConnectionWindowCreated event. The event must include a string message with additional information about the event.
The event object also supports an optional ProcessId property, which represents the process ID of the created remote session window. The Launcher uses this process ID to track the window, even if the connector settings do not include session tracking configurations.
When the Remote Window is Closed by the Connector
It can send a RemoteConnectionWindowClosed event to the Launcher to indicate the end of the connection. The event must include a string message with additional information.
If the Launcher did not detect the window closure (i.e., it wasn't able to track it in the first place), this will generate a ConnectionEnded event in LoginEnterprise and move the session to its final state.
If the launcher is not tracking the window and the connector never sends this event, the system falls back to legacy behavior: it waits for the configured timeout and then sends the event.
When a Connection Fails
If something goes wrong during the connection process, the connector can send a RemoteConnectionFailure event with an error message. This notifies the Launcher that the connection has failed and generates a ConnectionFailed event in LoginEnterprise, moving the session to its final state.
If the failure occurs before the remote window is created and the connector does not send this event, the system falls back to legacy behavior: the user session will eventually be timed out by LoginEnterprise.
Sending Custom Events
At any time, the connector can send custom events to the launcher by sending a CustomConnectorEvent event with the type Custom and a string message. This generates a custom user-session event in LoginEnterprise, which is visible on the All Events page, Dashboard, etc.
From the User Session Perspective (Named Pipe)
When the Launcher receives a new session request, it posts a ConnectionStarted event to the session. This moves the session login state to InProgress. Next, the Launcher initializes the PipeServer and SessionTracker, and then starts the custom connector process. At this point, it begins listening for event messages from the connector.
Connector Sends RemoteConnectionWindowCreated
This event does not produce any user-session events or state changes, but it signals the launcher that the window has been created and updates its internal state.
If the event includes a process ID for tracking, the Launcher starts a new, or restarts an existing, SessionTracker to monitor the remote window.
Connector Sends RemoteConnectionWindowClosed
This event signals the Launcher that the connection window has closed. If the Launcher was not already tracking the window, the event generates a ConnectionEnded user-session event. Based on the current session state, this moves the session to one of its final states:
|
State before the event |
State after the event |
||
|---|---|---|---|
|
Login: |
Session: |
Login: |
Session: |
|
Login: |
Session: |
Login: |
Session: |
|
Login: |
Session: |
Login: |
Session: |
|
Login: |
Session: |
Login: |
Session: |
|
Login: |
Session: |
Login: |
Session: |
If the connector does not send the event, but the Launcher is tracking the window, the Launcher raises the ConnectionEnded event when the tracked process closes.
If the connector does not send the event and the Launcher was unable to track the window, the ConnectionEnded event is sent only after the configurable timeout following the session’s end, failure, or timeout.
Connector Sends RemoteConnectionFailure
This event signals the Launcher that a failure occurred during the connection process, so no remote window is created. The Launcher posts a ConnectionFailed event in LoginEnterprise, moving the session to its final state.
|
State before the event |
State after the event |
||
|---|---|---|---|
|
Login: |
Session: |
Login: |
Session: |
If the connector does not send this event, the Launcher cannot detect the failure. In this case, LoginEnterprise times out the session (as it will stay too long in LoginState.InProgress). After the configured delay, the Launcher sends a ConnectionEnded event, which moves the session to the final faulted state.
Using this event allows a custom connector to notify the Launcher of a failure immediately, invalidating the session without waiting for a timeout.
Connector Sends a Custom Event
This event forwards a user-session custom event to LoginEnterprise without requiring the custom connector to post it manually through the Public API. The event is visible in Test results, Dashboards, Event pages, and the Event APIs.
Connector Named Pipe Schema
ConnectionConfiguration
After the Launcher detects a new client connection, it sends the following message containing all the information required to launch the remote connection:
{
  "sessionId": "<GUID>",
  "host": "<string>",
  "resource": "<string>",
  "username": "<string>",
  "password": "<string>",
  "domain": "<string>",
  "accountCustomFields": {
    "<string>": "<string>"
  },
  "accountSecureFields": {
    "<string>": "<string>"
  }
}
|
Field |
Description |
|---|---|
|
|
Unique |
|
|
Target machine host (forwarded from the connector configurations). |
|
|
Target resource (forwarded from the connector configurations). |
|
|
Username of the account selected for the session. |
|
|
Password of the account selected for the session. |
|
|
Domain of the account selected for the session. |
|
|
Dictionary of custom fields of the account selected for the session. |
|
|
Dictionary of secure custom fields of the account selected for the session. |
CustomConnectorEvent
The connector can send messages back to the Launcher through the named pipe.
Each message uses the following schema:
{
  "eventType": "<CustomConnectorEventType>",
  "message": "<string>",
  "processId": <int|null>
}
|
Field |
Description |
|---|---|
|
|
The type of the event being reported. Determines how the |
|
|
Human-readable description of the event. |
|
|
(Optional) ID of the remote window process. Only used for |
CustomConnectorEventType enum
The connector can send messages back to the Launcher through the named pipe.
Each message uses the following schema:
[
  "Custom",
  "RemoteConnectionWindowCreated",
  "RemoteConnectionFailure",
  "RemoteConnectionWindowClosed"
]
|
Event Type |
Description |
Expected Payload |
|---|---|---|
|
|
Custom event. |
|
|
|
Notifies Launcher that the connector successfully launched the remote client window. |
|
|
|
Reports a failure during connection and invalidates the session. |
|
|
|
Notifies Launcher that the remote client process has exited and moves the session to the final state. |
|
CustomConnector SDK (Named Pipe)
The Launcher installer now ships an optional Connector SDK (a .NET DLL) that you can import to simplify communication over the named pipe.
SDK Contents
Typed Models
For all messages exchanged with the Launcher (ConnectionConfiguration, CustomConnectorEvent).
LauncherIpcClient Client Functionality
-
Pipe creation and connection
-
Serialization and deserialization
-
Message framing
-
Error handling
-
Automatic reading of
ConnectionConfiguration -
Automatic event construction (
RemoteConnectionWindowCreated,RemoteConnectionWindowClosed,RemoteConnectionFailure,Custom)
Utility Methods
|
Method |
Description |
|---|---|
|
|
Creates an instance of |
|
|
Blocks execution until a |
|
|
Sends a custom user-session event to the |
|
|
Notifies the |
|
|
Notifies the |
|
|
Notifies the |
Example Usage (C#)
The following example demonstrates how to use the Connector SDK to communicate with the Launcher over a named pipe.
using Connectors;
using LoginEnterprise.Launcher.Connectors.Custom.Ipc.Client;
...
// create an instance of launcher client AND connects to the pipe
await using var launcherClient = await LauncherIpcClient.ConnectToLauncherAsync();
try {
    // waits (blocks execution) until launcher sends the connection configurations
	var config = await launcherClient.WaitForConnectionConfigurationAsync();
	// send custom event
	await launcherClient.SendCustomEventAsync("starting new session");
	...
	// starts remote connection
	...
	// notifies the launcher the remote window is created
	await launcherClient.SendRemoteConnectionWindowCreatedAsync();
	...
	// after the window is closed
	...
    // notifies that the session is ended
    await launcherClient.SendRemoteConnectionWindowClosedAsync();
}
catch (Exception e){
    // notifies that something went wrong during the connection
    await launcherClient.SendRemoteConnectionFailureAsync(
	    $"Connection failed: {e.Message}");
}
Using the Pipe Without the SDK
This section explains how to communicate with the Launcher over a named pipe without using the Connector SDK. It covers retrieving the pipe name, sending and receiving event messages, and implementing a minimal end-to-end flow.
1. Getting the Pipe Name
When the Launcher starts your connector, it exposes the pipe name through the VSI_IPC_PIPE_NAME environment variable. Your process should:
-
Read this environment variable.
-
Use the value to connect as a named pipe client.
Pseudo-code sample:
// get pipe name from env variables
pipeName = getenv("VSI_IPC_PIPE_NAME")
// use pipe name to connect to launcher
pipe = connect_to_named_pipe(pipeName)
// create write and read stream
reader = new TextReader(pipe, encoding=UTF8)
writer = new TextWriter(pipe, encoding=UTF8, autoFlush=true)
2. Event Messages (Newline-Delimited JSON)
Follow the format and structure of event messages exchanged between the Launcher and the Connector.
All messages over the pipe:
-
are UTF-8 encoded text,
-
contain a single JSON object per line, and
-
are terminated by a newline (
\n).
Both the Launcher and the connector follow the same pattern:
-
To send a message: serialize the JSON object to a string, then write it, followed by a newline.
-
To receive a message: read a full line (until
\n), then parse that line as JSON.
Pseudo-code sample:
// send message
jsonText = serialize_to_json(messageObject)
writer.write_line(jsonText) // appends '\n'
// receive message
line = reader.read_line() // reads until '\n'
messageObject = parse_json(line)
Important: Do not send multiple JSON objects on the same line, and do not rely on length prefixes. Newlines are the only framing mechanism.
3. Launcher > Connector: ConnectionConfiguration
Once your connector is connected to the pipe, the first message the Launcher sends is always a ConnectionConfiguration JSON object:
{
  "sessionId": "<GUID>",
  "host": "<string>",
  "username": "<string>",
  "password": "<string>",
  "domain": "<string>",
  "accountCustomFields": {
    "<string>": "<string>"
  },
  "accountSecureFields": {
    "<string>": "<string>"
  }
}
Use this information to start your remote connection.
4. Connector > Launcher: CustomConnectorEvent
While handling the connection, you can report status back to the Launcher using CustomConnectorEvent messages:
{
  "eventType": "<CustomConnectorEventType>",
  "message": "<string>",
  "processId": <int|null>
}
Where eventType is one of:
[
  "Custom",
  "RemoteConnectionWindowCreated",
  "RemoteConnectionFailure",
  "RemoteConnectionWindowClosed"
]
Minimal End-To-End Flow
Here’s a simplified example demonstrating basic communication between the Launcher and the Connector using the named pipe.
A connector implemented in any language should roughly:
-
Read pipe name from environment variable
VSI_IPC_PIPE_NAME -
Connect to the named pipe as a client
-
Wrap the pipe in a UTF-8 text reader/writer (newline-based)
-
Read first line from the pipe > parse as
ConnectionConfiguration -
Use
ConnectionConfigurationto start the remote client process -
When the remote window is created, send:
CustomConnectorEvent {
  eventType: "RemoteConnectionWindowCreated",
  message: "...",
  processId: 1234
}
-
On connection failure, send:
CustomConnectorEvent {
  eventType: "RemoteConnectionFailure",
  message: "error details"
}
-
When the remote client process exits, send:
CustomConnectorEvent {
  eventType: "RemoteConnectionWindowClosed",
  message: "optional reason"
}
-
Close the pipe and exit.
Additional Resources
-
For information on Launchers overview and best practices, see Launchers Overview and Best Practices.
-
To learn about the Login Enterprise Windows Launcher setup, configuration, maintenance, and more, see Configuring the Windows Launcher.
-
To learn about the Universal Web Connector, see Configuring the Universal Web Connector.
-
To see an example of a Custom Connector implemented as a Stand-Alone Engine script, see Setting Up the Win 365 Connector.