Overview
This section outlines the steps to deploy the Login Enterprise Virtual Appliance to Azure.
If you haven't already, download the VHD from the Downloads page (Be sure to select the Microsoft Azure download option).
The instructions below outline a general deployment pattern and may not account for all environment-specific requirements. Organizations with existing Azure networking infrastructure, such as virtual networks, subnets, or network security groups (NSGs), may need to modify the CLI examples to fit their architecture. While key configuration concepts are covered, this guide is not a comprehensive deployment reference, and additional customization may be necessary.
Uploading VHD to Azure
Although the VHD is compressed in a ZIP file, it remains large. For best results, download it from an Azure VM with sufficient bandwidth to ensure a fast and reliable transfer. The same Azure VM can also be used to upload the file in the next step.
You need to upload the VHD to Azure using Microsoft Azure Storage Explorer. You can download it by clicking the link below. Note that this will start the download immediately. Storage Explorer allows you to upload a raw .VHD file directly to a resource group as a managed disk, simplifying the deployment process.
Download Microsoft Azure Storage Explorer
After signing in to your Azure tenant, navigate to the subscription where you want to upload the disk.
-
In the left-hand menu, select Disks, then choose the resource group where the managed disk will be created.
-
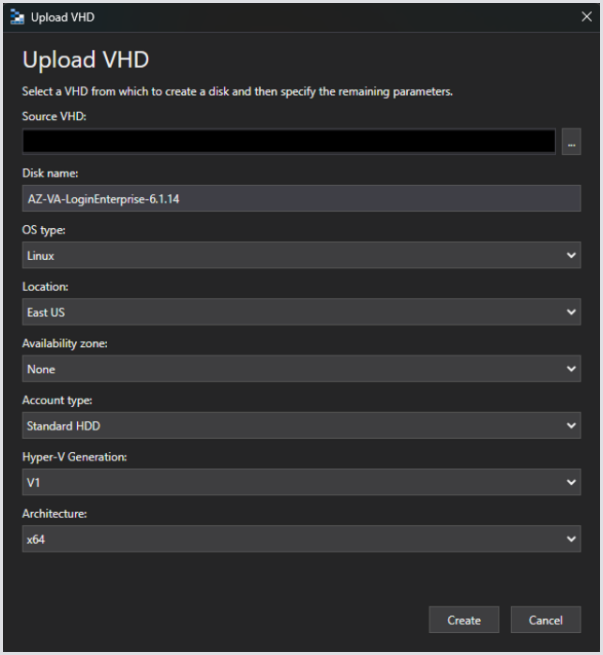
Select Upload and complete the Upload VHD Wizard form.
Make sure to select Linux as the operating system type and Generation 1 (V1) for Hyper-V generation, as Generation 2 (V2) disks are not compatible with Login Enterprise VHDs.
Creating an Image
This section provides an Azure CLI walkthrough for automating the Login Enterprise deployment process. Due to dependencies on cloud-init files, it is recommended to use Azure Cloud Shell, which supports file uploads.
Before you proceed, verify the Hyper-V generation of the uploaded VHD. If Generation 2 (V2) was used, you must reupload the disk using Generation 1 (V1), as V2 is not supported for Virtual Appliance VHDs.
# Variables
$resourceGroupName = "" # The resource group where the image will be created
$imageName = "" # The name for the new image
$sourceDisk = "" # The managed disk or VM name to use as the source
$storageSku = "" # The storage performance tier for the image
# Create the image
az image create --resource-group $resourceGroupName --name $imageName --source $sourceDisk --storage-sku $storageSku --os-type Linux
Once the command has run successfully, a managed disk will appear in the specified resource group and can be used to deploy a virtual machine.
Configuring the Cloud-Init File
From Additional Resources, download the YAML file.
The file serves as a cloud-init configuration file. It is passed as custom data during virtual machine creation. The file sets the Virtual Appliance's password and configures the expected domain name, which is used to define its fully qualified domain name (FQDN).
Configuring the Virtual Appliance Password
The 5th line of the downloaded cloud-init file contains a placeholder password. Before deployment, you must replace this with your own password, encoded as a Base64 string. The Appliance expects the password in this format.
To convert your password to Base64, use the following PowerShell command:
[System.convert]::ToBase64String([System.Text.Encoding]::ASCII.GetBytes("<pwd_here>"))
Once you have the Base64-encoded string, replace the placeholder value in your local copy of azure.yml. This password will be used by the root user to access the Virtual Appliance.
Configuring the Virtual Appliance Domain Name
In the downloaded YAML file, the 14th line contains a placeholder for the Appliance’s expected domain name. This domain name, combined with the Virtual Machine’s hostname, is used to configure the HTTPS listener.
Tip: If you’re using custom DNS, replace the placeholder with your organization’s domain, e.g., “contoso.com.“
For instance, if the hostname is “logent” and the domain name is “contoso.com,“ the Appliance will be configured to listen for incoming requests at “logent.contoso.com.”
Uploading the Cloud-Init File to Azure Cloud Shell
After configuring the cloud-init file, upload it to your Azure Cloud Shell session. In Cloud Shell, open the Manage files menu and select Upload. This provides local access to the file within the Cloud Shell.

Creating the Virtual Machine
With the cloud-init file uploaded to your Cloud Shell session, you can now create the Virtual Machine resource. Before you proceed, verify that the YAML file is present in your Cloud Shell environment. For example, run the following command to list the contents of the current directory:
dir
You should see the uploaded azure.yml file listed in the output.
Login Enterprise requires 4vCPU and 8GB RAM; ensure you choose an appropriate virtual machine.
To deploy the Virtual Machine, use the following Azure CLI command:
# Variables
$resourceGroup = "" # The RG where VM will be created
$location = "" # Azure region to create VM in
$vmName = "" # Name for the new VM
$vmSize = "" # VM size (SKU)
$imageName = "" # VM image name to deploy
$storageSku = "" # Storage tier of OS disk eg Standard_LRS
# Create the Virtual Machine, Vnet, Snet, NSG, OS Disk, no Public IP
az vm create --resource-group $resourceGroup --location $location --name $vmName --size $vmSize --image $imageName --custom-data "./azure.yml" --authentication-type "password" --admin-username "azureadministrator" --admin-password "fakePassword123!" --storage-sku $storageSku --os-disk-size-gb 128 --public-ip-address ""
This command creates the following resources within the specified resource group:
-
A Virtual Network and subnet
-
A Network Security Group (NSG) associated with the subnet
-
A Network Interface linked to the subnet and NSG
-
An OS disk (128 GiB). Note that only 100 GiB is required, but you are billed for the full 128 GiB.
The provided examples do not assign a public IP address to the Virtual Machine. As a result, the virtual Appliance will not be accessible over the internet. In hybrid environments, accessing the Appliance may require private connectivity solutions such as Azure ExpressRoute or a Site-to-Site VPN.
Custom Requirements
As noted, these instructions do not cover every unique scenario or its specific dependencies.
By default, when creating a Virtual Machine, Azure assigns a public IP address. The deployment command above disables this default behavior.
Adding a Public IP
In many environments, a public IP address is not desirable, so the example command above does not configure one. To add a public IP to the Login Enterprise Virtual Machine, remove the parameter that disables it from the command, and include the parameter that sets the DNS label for the public IP.
az vm create --resource-group $resourceGroup --location $location --name $vmName --size $vmSize --image $imageName --custom-data "./azure.yml" --authentication-type "password" --admin-username "azureadministrator" --admin-password "fakePassword123!" --storage-sku $storageSku --os-disk-size-gb 128 --public-ip-address-dns-name $vmName
By allowing Azure to create a Public IP for the VM and specifying a DNS Name for the Public IP, the Appliance will now be publicly available. Ensure the YAML file domain name corresponds with the one used here.
Integrating with Existing Networks
In some environments, the Login Enterprise Virtual Machine may need to use existing virtual networks and/or subnets. For example, these networks might already have connectivity to on-premise networks via Site-to-Site VPN or ExpressRoute.
If the Virtual Machine should be attached to an existing Virtual Network and/or subnet, create a Network Interface (NIC) configured to use those networks. Then, use the --nics parameter with the az vm create command to specify the resourceId of the Network Interface that the Virtual Machine should use.
By default, the example az vm create command will create a NIC if the --nics parameter is not used. When used, Azure will interpret the Virtual Network, Subnet, and Network Security Group to use based on the specified NIC configuration. This requires manually creating and configuring the Network Interface, which is out of scope for this guide.